
Doas is a privilege escalation program similar to sudo. It was originally designed for OpenBSD, which allows users to run commands as if they were another user (e.g., root), and later, due to its simplicity and unique functionality, it was ported to many other Linux systems.
The two benefits doas has over sudo are that it’s smaller in size, the configuration file is empty, and its syntax is smaller and easier to remember, requiring almost no effort to audit.
If you’ve ever edited the sudo configuration file using visudo, which opens the “/etc/sudoers” file in safe mode, you’ll notice the configuration file is full of complex syntax, and even a small change is complex enough to carefully check for potential syntax errors.
Without doubt, sudo is a fantastic tool for sysadmins, but for most desktop users who use it just for installing programs and tinkering with their systems, it can be complex and a nightmare to edit the configuration file, so doas could be a better replacement for them.
Tutorial Details
| Description | Doas (A Sudo Replacement) |
| Difficulty Level | Low |
| Root or Sudo Privileges | Yes |
| OS Compatibility | Ubuntu, Manjaro, Fedora, etc. |
| Prerequisites | – |
| Internet Required | Yes (for installation) |
How to Install Doas on Linux
The doas command-line tool is popular, and its package is available in most Linux repositories, making it simple to install via the package manager.
# On Debian, Ubuntu, Kali Linux, Linux Mint, Zorin OS, Pop!_OS, etc.
$ sudo apt install doas

# On Red Hat, Fedora, CentOS, Rocky Linux, AlmaLinux, etc.
$ sudo dnf install opendoas

# On Arch Linux, Manjaro, BlackArch, Garuda, etc.
$ sudo pacman -S opendoas

# On Void Linux, VX-Linux, gabeeOSLinux, AgarimOS, etc.
$ sudo xbps-install opendoas
Once done, execute the following command to verify its successful installation:
$ doasOutput:

How to Use Doas on Linux
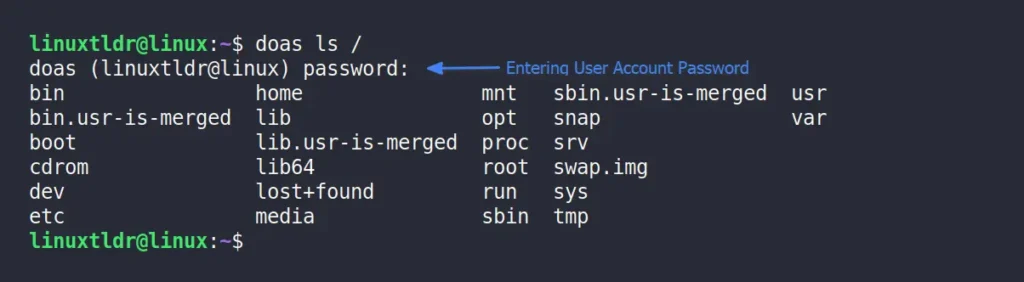
Now that you have doas installed, you think of using it, but if you run the command by appending it to another command, see what would happen.
$ doas ls /Output:

You’ll encounter the “doas is not enabled” error because when you first install doas on your Linux system, it doesn’t come with any pre-defined configuration file, so you’ll need to manually create a new “/etc/doas.conf” configuration file to suit your needs.
There are many different and simple settings available for the doas configuration file. One of the important ones is allowing a single user or users in the “wheel” group to run commands as root user. So, including it and all other settings one should know are listed below.
Allow Root Access
The first step is to create a “doas.conf” file using your preferred text editor (for me, it’s Nano), using the command below, which will also ask for your user account password.
$ sudo nano /etc/doas.confTo create a rule for allowing users to perform admin actions, you must add the following line by replacing “linuxtldr” with your actual username.
permit linuxtldr as rootOutput:

Save and close the file, and when you run any command with doas as root user, it will prompt you to enter the user account password, which should be the same as your sudo password.
It’s important to note that the settings you made in the doas configuration file only apply to the specified user (in this case, “linuxtldr“). However, if multiple users are using the same system and you want them to use doas as a sudo replacement, you should either use a group like “wheel” or “sudo“, of which the users are already members, and grant root access to those users within this group using the following rule:
permit :wheel as root

# OR

permit :sudo as root
In my scenario, I won’t have a “wheel” group, but instead, “sudo” where users are already members, so the second rule will provide root access to all those users in my system that are in the “sudo” group.

You can save and close the file, then execute the doas command from a different user account, and you’ll notice that doas runs as root smoothly. However, if you notice doas repeatedly prompts for the user account password with every execution, let’s address it.
Doas Persist Feature
Doas offers a persist feature that preserves its state after the user authenticates successfully, granting a temporary exemption from password prompts. It’s disabled by default, so to activate it for a user or group, just append the “persist” option after the “permit” statement.
# Persist the state of "linuxtldr" user.
permit persist linuxtldr as root

# Persist the state of users in "sudo" group.
permit persist :sudo as root
In my scenario, I’ve granted root access to all existing users in the sudo group to relieve them from repeatedly entering passwords after each doas execution. I would add the “persist” option in the following manner:

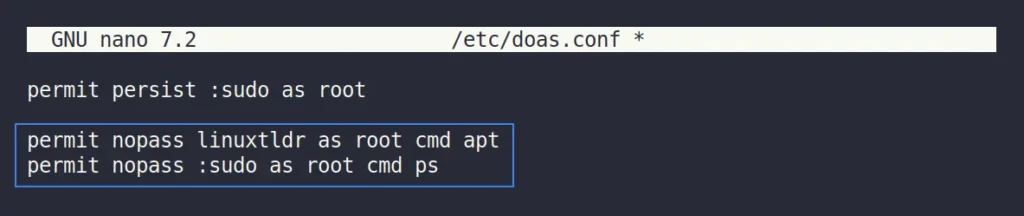
Allow Users to Run Commands Without Password
If you are using any command repeatedly and want to skip entering passwords, you can easily do so for both users and members of a group. For example, the first line below will allow the user “linuxtldr” to run the “apt” command without a password as the root user, while the second line will give all users in the “sudo” group the ability to run the “ps” command without a password as the root user.
permit nopass linuxtldr as root cmd apt
permit nopass :sudo as root cmd ps
Output:
Check the Doas Configuration File
Once you are done editing the doas configuration file, ensure file ownership is assigned to the “root” user and file permissions are set to “0400“, both of which can be done by running:
$ sudo chown -c root:root /etc/doas.conf
$ sudo chmod -c 0400 /etc/doas.conf
Finally, run this command to check the “/etc/doas.conf” file for any syntax errors.
$ sudo doas -C /etc/doas.conf && echo "All good" || echo "There is an error"Output:

You’ll notice there are no syntax errors, so if you ever decide to completely remove sudo, make sure to verify the syntax when modifying the doas configuration file.
Smooth Transition from Sudo to Doas
It is quite possible that you still unconsciously use the sudo command as a habit, which you can break by creating a “sudo” alias for the “doas” command. Don’t worry about compatibility, as “doas” are almost compatible with “sudo“.
So, to create the alias, modify your shell configuration file (“~/.bashrc” for bash) and add the following line at the end.
alias sudo='doas'
alias sudoedit='doas rnano'
Once finished, save and close the file; now, when you use the “sudo” command, it will be executed as the “doas” command.
Bash Tab Completion
To allow Bash to treat arguments as separate commands (and use the tab completion settings of other commands), add the following line to your “~/.bashrc” configuration file.
complete -cf doasSave and close the file, then type a few initials of any command and press “Tab” to display the list of suggested commands.

Doas Command Examples
The primary use of the doas command involves running a command as a root user. However, there are additional ways of using doas, like executing a command as another user can do in this way.
$ doas -u user commandTo launch the default shell as root, you can use:
$ doas -sTo make the password forget even after issuing it, you can use:
$ doas -LAfter executing the above command, running another will prompt you to re-enter the user account password, which is beneficial when someone requests immediate access to your system.
Final Word
Doas is an amazing tool with plenty more configuration options not covered in this article. I aim to cover them in future articles, so stay tuned! If you have an immediate need for a specific use case, please let us know in the comment section.
Till then, peace!


Join The Conversation
Users are always welcome to leave comments about the articles, whether they are questions, comments, constructive criticism, old information, or notices of typos. Please keep in mind that all comments are moderated according to our comment policy.