
VPNs are popular these days, but many users still prefer using a SOCKS proxy to tunnel network connections through them, as it offers faster internet connections and is ideal for managing torrent traffic, despite the generic drawback of unencrypted traffic.
You can even access blocked sites in your country using a SOCKS proxy. There are many public SOCKS proxy servers available, but as mentioned earlier, traffic on a SOCKS proxy is not encrypted, so using a public one could be risky.
In this article, I’ll show you how to install and set up a SOCKS5 proxy server on Linux using MicroSocks.
MicroSocks: A Lightweight SOCKS5 Proxy Server
MicroSocks is a lightweight and multi-threaded SOCKS5 proxy server designed to robustly handle requests on servers with low resources by consuming minimal resources and gently denying new connections during heavy loads instead of aborting them.
It supports IPv4, IPv6, DNS, uses TCP (no UDP currently) for network proxy, and allows users to connect with or without a password or by providing a one-time password, all without needing to create or edit any configuration file.
Let’s now see how to install MicroSocks on popular Linux distributions like Debian, Ubuntu, Linux Mint, Red Hat, Fedora, Rocky Linux, Arch, or any others.
Install MicroSocks on Linux
MicroSocks is available in most Linux repositories, such as Debian, Ubuntu-based distributions, and Arch systems, where you can quickly install it using one of the appropriate commands based on your Linux distribution.
# On Debian, Ubuntu, Kali Linux, Linux Mint, Zorin OS, Pop!_OS, etc.
$ sudo apt install microsocks

# On Arch Linux, Manjaro, BlackArch, Garuda, etc.
$ sudo pacman -S microsocks
On Red Hat and Fedora-based distributions, or on older Debian and Ubuntu distributions, you can build and install it from the source, which also provides you with the latest version.
To start, ensure the development tools are installed on your Linux system, then run the following series of commands to install MicroSocks from source.
$ wget http://ftp.barfooze.de/pub/sabotage/tarballs/microsocks-1.0.4.tar.xz
$ tar -xvf microsocks-1.0.4.tar.xz && cd microsocks*/
$ make && sudo make install
Once the installation is complete, the MicroSocks executable file will be added to the “/usr/local/bin” directory.
Start MicroSocks SOCKS5 Proxy Server
Now that the installation is complete, the “microsocks” command is available to use, but before that, let’s look at a few options you can use with it.
| Option | Description |
|---|---|
| “-1“ | It allows you to authenticate once, after which your IP address will be included in a whitelist, enabling you to connect to the proxy server later without authentication. |
| “-q“ | Disable logging. |
| “-i ip-address“ | Specify the IP address to listen on; not providing one means listening on all network interfaces in the server (default is “0.0.0.0“). |
| “-p port“ | Set the port to use for listening (default is “1080“). |
| “-u user” and “-P password“ | Specify the username and password for authentication in plain text, which can be anything regardless of existing users on the server. |
In my case, I’ve set up the MicroSocks proxy server on a DigitalOcean VPS and started it using the following command, which listens on all server IPs with port 8484, the username “proxyuser“, and the password “securepassword“.
$ microsocks -1 -p 8484 -u proxyuser -P securepasswordOutput:

To connect to the above MicroSocks proxy server from the local machine, run the following command, replacing the green highlighted fields with the correct proxy server information.
$ curl --socks5 user:password@server-ip:port https://www.google.com/Output:

Once you do that, your local machine will be whitelisted for the MicroSocks proxy server due to the “-1” option, allowing you to configure SOCKS5 with your browser or Linux system without providing credentials.
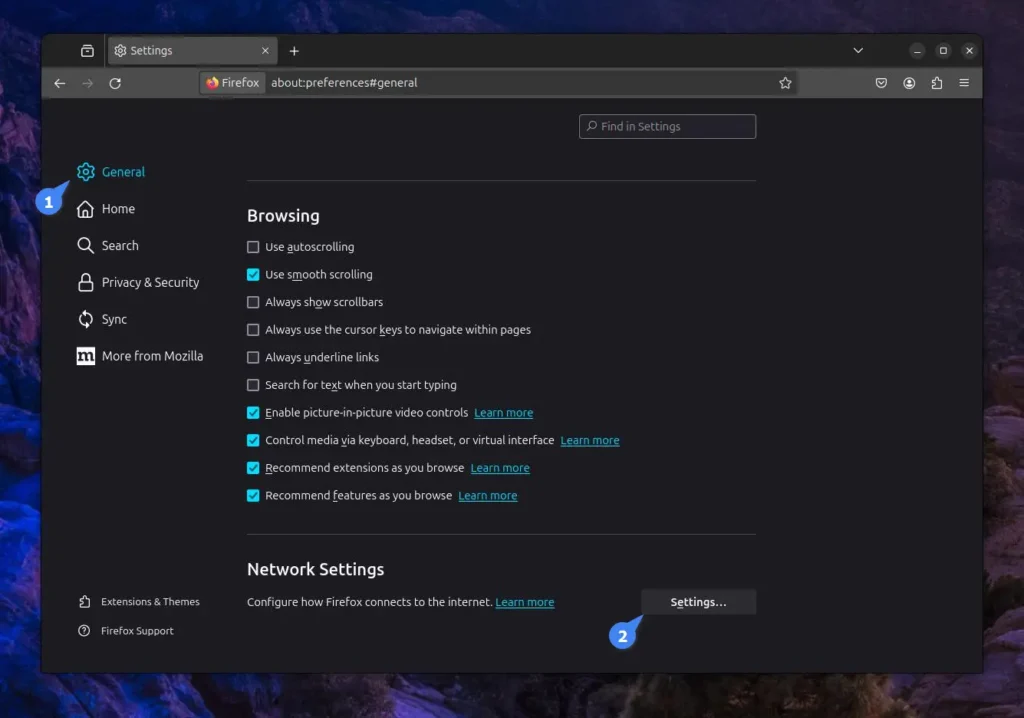
To connect to your MicroSocks proxy server from Firefox, navigate to “Preferences“, then “General“, scroll down to the “Network Settings” section, and click on “Settings“.
Then, ensure you enable manual proxy configuration, select SOCKS v5, and provide the host and port number of your SOCKS5 proxy server.
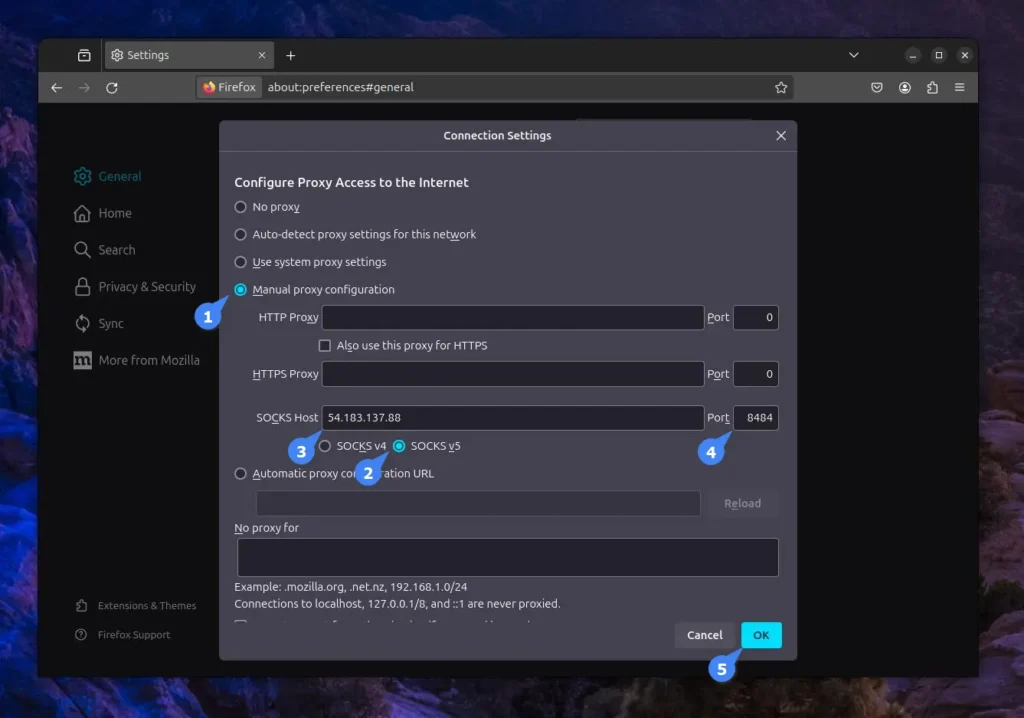
Your Firefox is now configured with the MicroSocks proxy server, so all your browsing will go through the proxy server. If you encounter a connection failure error, make sure to re-execute the previous curl command.
To connect your local machine (running on GNOME) with the MicroSocks proxy server, first open “Settings“, navigate to “Network“, and then “Proxy“.
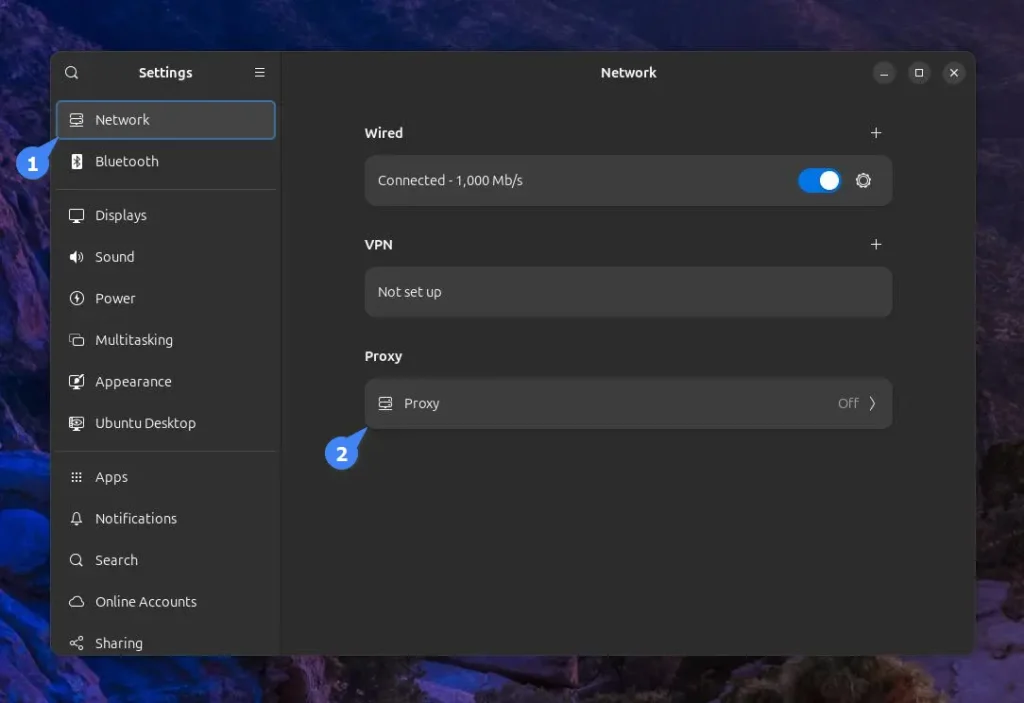
Next, toggle the “Network Proxy” and choose the “Manual” configuration.

Finally, enter the host and port of your MicroSocks proxy server in the “SOCKS5 HOST” section and save the changes.
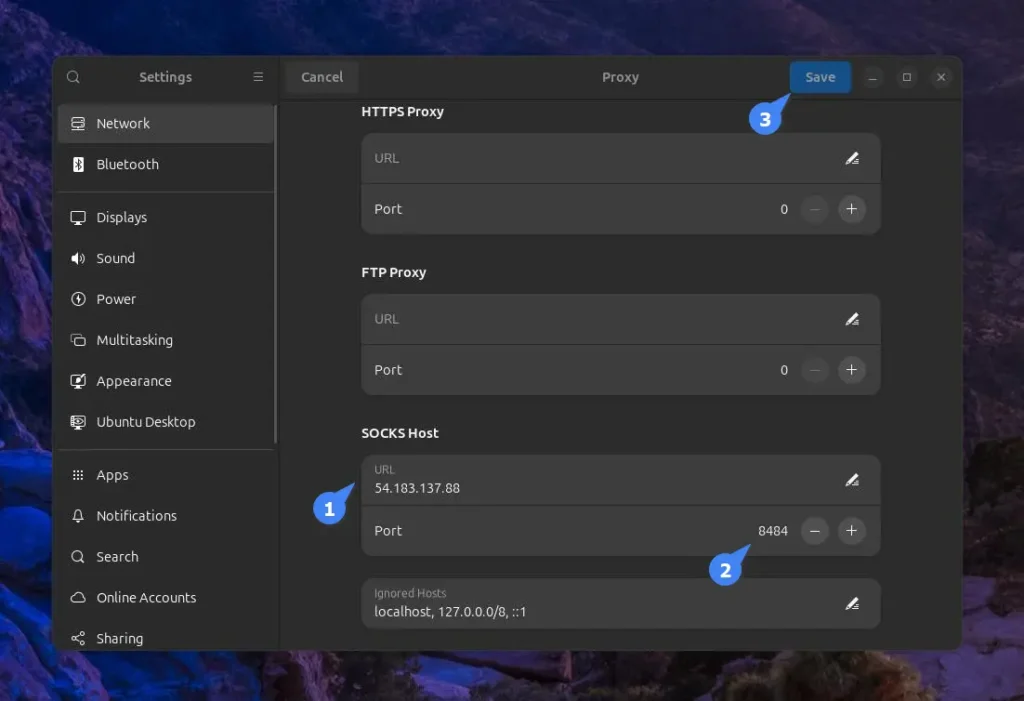
You now have your system running on GNOME, connected to your MicroSocks proxy server.
Allow MicroSocks Proxy Server Listening Port on Firewall
If you are running an Ubuntu system with UFW (Uncomplicated Firewall), you need to open the port your proxy server listens on. First, check the firewall status:
$ sudo ufw statusIf it’s active and running, then open the port for the MicroSocks proxy server, which by default is 1080; however, since I’ve opted for a custom port of 8484 using the “-p” option, I need to allow this port with the following command:
$ sudo ufw allow 8484/tcpOutput:

Create MicroSocks Proxy Server Systemd Service
To keep the MicroSocks proxy server running in the background and autostart on boot without any manual intervention, you can create a Systemd service.
To begin, open your terminal and create a Systemd service file using the command below.
$ sudo nano /etc/systemd/system/microsocks.serviceThen copy-paste the following snippet.
[Unit]
Description=microsocks SOCKS5 server
Documentation=https://github.com/rofl0r/microsocks
After=network.target auditd.service

[Service]
EnvironmentFile=/etc/microsocks.conf
ExecStart=/usr/bin/microsocks -1 -u ${MICROSOCKS_LOGIN} -P ${MICROSOCKS_PASSW}

[Install]
WantedBy=multi-user.target
Save and close the file, then create a MicroSocks configuration file for the user and password variables used in the above Systemd service file.
$ sudo nano /etc/microsocks.confCopy and paste the following snippet, ensure to replace the user and password information with the correct MicroSocks proxy server details. Also, if you’ve customized the port or restricted IP in the Systemd service file, set their values accordingly in this configuration file.
# used by the systemd service file
MICROSOCKS_LOGIN="proxy-user"
MICROSOCKS_PASSW="proxy-password"
Save and close the file, then use the following command to enable and start the service:
$ sudo systemctl enable --now microsocks.serviceTo verify the status of the service, run the “systemctl status microsocks” command.

Uninstall MicroSocks from Linux
To uninstall the MicroSocks proxy server from your Linux system installed via the package manager, run:
# On Debian, Ubuntu, Kali Linux, Linux Mint, Zorin OS, Pop!_OS, etc.
$ sudo apt remove microsocks

# On Arch Linux, Manjaro, BlackArch, Garuda, etc.
$ sudo pacman -R microsocks
If you have installed it directly from the source, then run:
$ sudo rm /usr/local/bin/microsocksTo disable and remove the Systemd service, run:
$ sudo systemctl disable --now microsocks.service
$ sudo rm /etc/microsocks.conf
If you’ve allowed the MicroSocks listening port on UFW, then execute the following command to locate its index number:
$ sudo ufw status numberedThen remove the corresponding port using the “sudo ufw delete [no]” command.


Join The Conversation
Users are always welcome to leave comments about the articles, whether they are questions, comments, constructive criticism, old information, or notices of typos. Please keep in mind that all comments are moderated according to our comment policy.