
Linux provides a robust way for memory management by providing an advanced mechanism like buffering and caching to hold repeating data once in memory rather than directly serving it on demand.
In the future, when the data is demanded, it will be taken from memory rather than from its original source to speed up the process. To properly understand their differences, check out this.
Difference Between the Buffer and Cache
To learn the difference between buffer and cache in more depth, check out our article. Yet, for beginners to conclude the difference between them, you can say that.
Buffer: A buffer is temporary storage for data being transferred within a computer or between a computer and external devices. It acts as a middleman, smoothing out data flow and preventing interruptions. For instance, in online video streaming, data is downloaded into a buffer to ensure smooth playback despite network fluctuations, ensuring a consistent user experience.
Cache: Cache is a high-speed memory between RAM and the CPU that stores frequently used data. When the CPU needs data, it checks the cache for faster retrieval, speeding up computer tasks by avoiding slower main memory or storage devices.
Overall, both are a kind of cache in terms of their goal, so for the rest of the article, we will focus on cache rather than focusing on them separately.
Should You Clear the Cached Data?
Linux automatically frees cache space as needed; for instance, if there are ten cached applications and you launch an eleventh one, Linux will remove one of the previously cached applications to accommodate the new cache.
In this process, Linux autonomously manages data by caching and clearing as needed to enhance data transfer speed. So, manually clearing them involves deleting the ten cached applications; when they are needed again, Linux will cache them, slowing down the operation.
So, you can say it’s safe to clear cache as they will again be cached when demanded, but it is not recommended to perform these steps on the production server as it may cause degradation of service performance.
How to Clear Cache on Linux
There are many ways to clear cache, but the recommendations are mentioned below. It’s important to note that each command clears different types of cached data, and their respective dos and don’ts are detailed in their own sections.
Clear PageCache on Linux
Page cache (also referred to as disk cache) is a cache of file system data (the contents of files) that the kernel has read from disk and stored in memory for faster access. To clear the page cache, execute the following command:
$ sync; echo 1 > /proc/sys/vm/drop_cachesYou can also execute the following command, compare its output before and after executing the above command, and observe the change in cache memory size after clearing.
$ free -mhOutput:
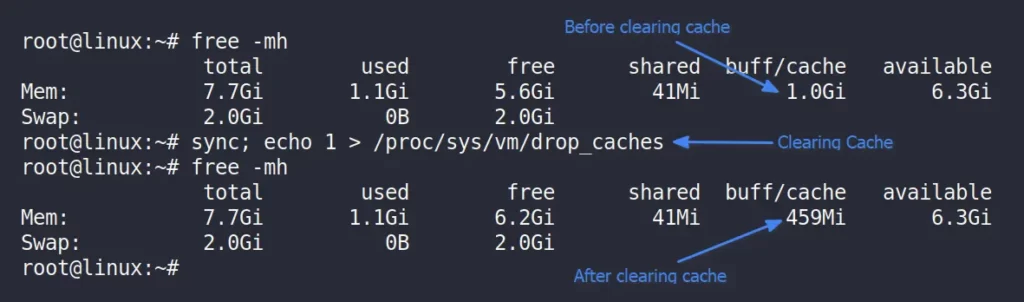
Command breakdown;
In Linux, the “drop_caches” interface allows the user to free up memory used by the kernel for caching various types of data. This various type of cached data can be cleared by specifying different values to the “drop_caches” file.
For example, we used Value 1, which does not impact any running applications and gently clears the cache, and the difference in cached memory size can be observed using the free command.
The sync command, when piped with echo, guarantees that pending changes are written to disk, while echo is utilized to send instructions or values for the “drop_caches” operation in the same line.
Clear Dentries and Inodes on Linux
The dentries data is used for storing the directory cache, and inodes are part of the Linux filesystem used to store metadata information about a file or a directory like size, location, permissions, ownerships, etc.
To clear dentries and inodes together, run the following command:
$ sync; echo 2 > /proc/sys/vm/drop_cachesClear PageCache, Dentries, and Inodes
To clear the PageCache, dentries, and inodes all together in one command, simply run the following command:
$ sync; echo 3 > /proc/sys/vm/drop_cachesPerform All the Above Steps as a Sudo User
Note that the steps mentioned earlier for clearing page cache, dentries, and inodes must be executed within the root account. However, if you have access to an account with sudo privileges, use the following command instead:
$ sudo sh -c 'echo 1 >/proc/sys/vm/drop_caches'                                 #PageCache Only
$ sudo sh -c 'echo 2 >/proc/sys/vm/drop_caches'                                 #Dentries and Inodes
$ sudo sh -c 'echo 3 >/proc/sys/vm/drop_caches'                                 #PageCache, Dentries, and Inodes
Alternatively, you can also trigger cache-dropping by using the “sysctl -w vm.drop_caches=[number]” command.
vm.drop_caches” may lead to a deadlock during heavy memory and I/O usage situations!$ sudo sysctl -w vm.drop_caches=1 #PageCache Only
$ sudo sysctl -w vm.drop_caches=2 #Dentries and Inodes
$ sudo sysctl -w vm.drop_caches=3 #PageCache, Dentries, and InodesClear Swap Space (optional)
Swap space, also known as a swap file or swap area, is a designated space on a computer’s hard drive or SSD (Solid State Drive) that the operating system uses as a temporary extension of the computer’s physical memory (RAM).
In certain scenarios, you may wish to clear it as well; to do so, just execute the following command:
$ sudo swapoff -a
$ sudo swapon -a

#OR

$ sudo swapoff -a && sudo swapon -a
Whereas;
- “
swapoff -a“: Disables swapping. - “
swapon -a“: Enables swapping again.
Be sure to check the difference in swap size from the free command before and after the above command execution.
Final Word
In this article, you learn how to clear cache using different methods, but note that if your intent is to free up disk space, then limiting yourself to this method will not be enough. You should also clear up the cache data used by the package manager by following their independent instructions.
Now, if you have any questions or queries related to the article, do let us know in the comment section.
Till then, peace!


