
Tired of encountering the error “Connecting to raw.githubusercontent.com IP_ADDRESS:443 failed: Connection refused” when downloading files from GitHub via Wget or any other CLI tool?
$ wget https://raw.githubusercontent.com/LunarVim/LunarVim/release-1.3/neovim-0.9/utils/installer/install.sh
--2023-12-15 14:56:05--  https://raw.githubusercontent.com/LunarVim/LunarVim/release-1.3/neovim-0.9/utils/installer/install.sh
Resolving raw.githubusercontent.com (raw.githubusercontent.com)... 49.42.72.236, 2405:200:1607:2820:41::36
Connecting to raw.githubusercontent.com (raw.githubusercontent.com)|49.42.72.236|:443... failed: Connection refused.
Connecting to raw.githubusercontent.com (raw.githubusercontent.com)|2405:200:1607:2820:41::36|:443... failed: Network is unreachable.
Then, don’t worry, as you’ve come to the right place; this annoying error related to GitHub can be easily solved (or fixed) using multiple solutions (or methods) that you can apply immediately.
Before jumping straight to the solution, it might be better to identify the root cause of this irritating error, as the output indicates a problem when making a connection from your system to the GitHub server.
Upon inspection, I’ve found that it could be attributed to one of the reasons listed below.
- The ISP blocked “raw.githubusercontent.com” at the DNS level (most common).
- The personal or work system you are using is configured with a firewall or proxy that prevents access to the requested domain (very rare).
- GitHub might be experiencing downtime or have issues (very, very rare).
So, fixing this error is easily achievable by applying a solution that you can learn from below.
Solution for raw.githubusercontent.com PORT 443: Connection refused
If you are a non-technical person, pointing out the cause of this error from the previous list of common reasons for this error in your system could be challenging to find out.
For that reason, I have provided the most common solution for this error first.
1. Change the DNS Server
There might be an issue with your current DNS (Domain Name System) resolution that might cause this issue, for which you can switch to a different DNS server, such as Google DNS Server.
This solution can be applied through either CLI or GUI; however, in Linux, where multiple DEs coexist, their methods vary, because of which I’ve provided you with the command-line solution.
So, to begin, open your terminal, ensure you have root or sudo access, and then edit the “/etc/resolv.conf” file using the following command:
$ sudo vim /etc/resolv.confWhen the file is open, navigate to the end, and if any existing “nameserver” is in use, comment on it by adding the “#” prefix. Finally, include the following two lines for the Google Global DNS server at the end of the file:
nameserver 8.8.8.8
nameserver 8.8.4.4
Output:
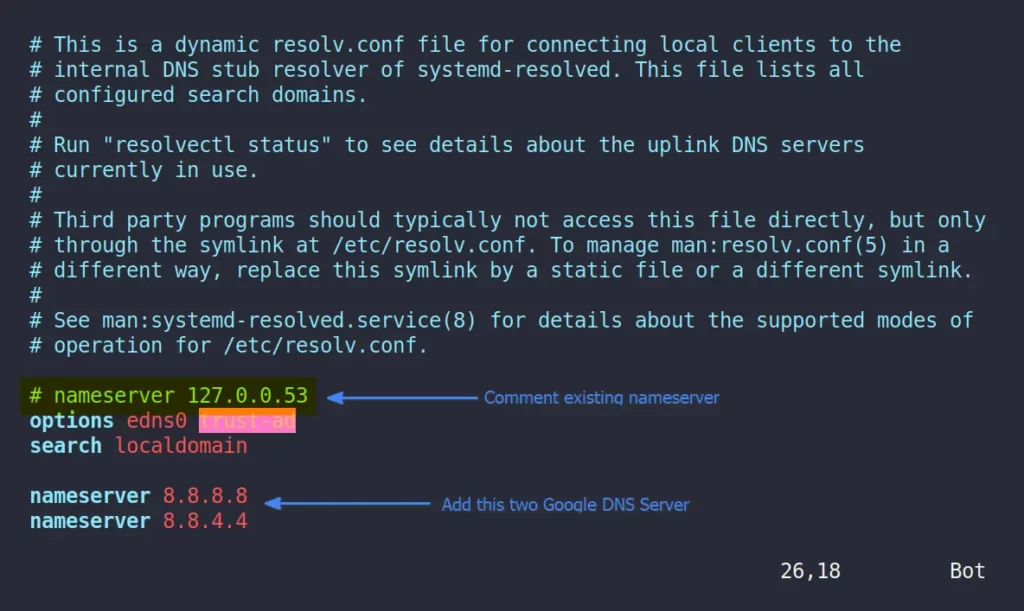
Save and close the file; additionally, it would be advisable to restart your system after applying this solution. Feel free to test it before restarting, as it worked without requiring a system restart.
In most cases, the problem will be resolved after applying this solution, but in some rare cases, if the error persists, then try out our next solution.
2. Add the Entry of Blocked Domain in /etc/hosts file in Linux
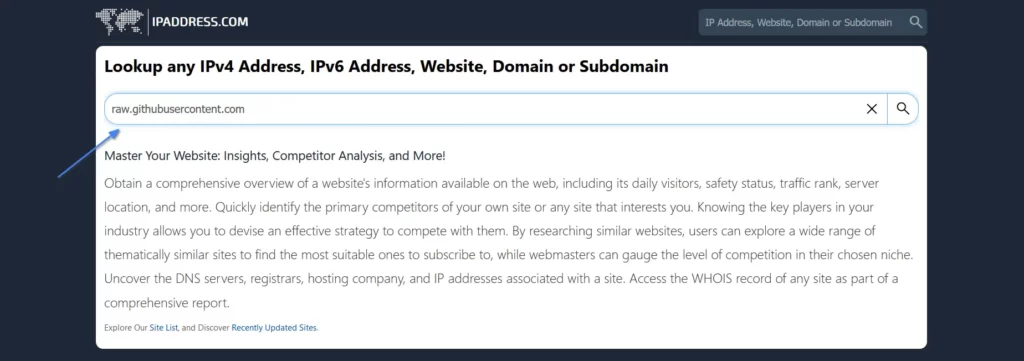
If the above solution did not work for you, you can try this method, which solved this annoying error for me in some instances. To do that, you first need to find out the IP address that the blocked domain is requesting.
1. Visit the ipaddress.com site and paste the domain (in our case, “raw.githubusercontent.com“) that you are attempting to connect to but are experiencing “Connection refused” failures.
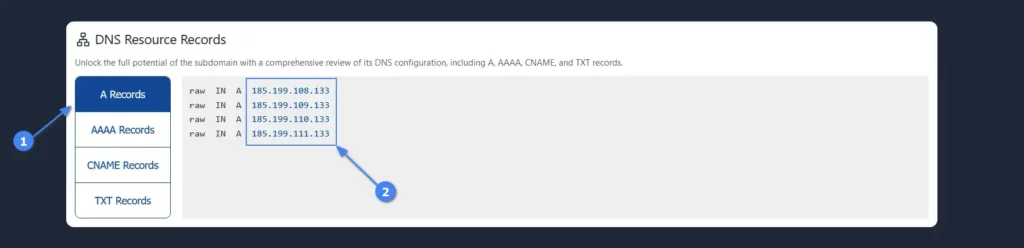
2. Scroll down to the “DNS Resource Records” section, ensure that the “A Records” option is selected, and make a note of all the provided IP addresses.
3. Open your terminal, edit the “/etc/hosts” file using your choice of text editor with root or sudo privileges, and add the noted IP address with the corresponding domain.
$ sudo vim /etc/hostsOutput:
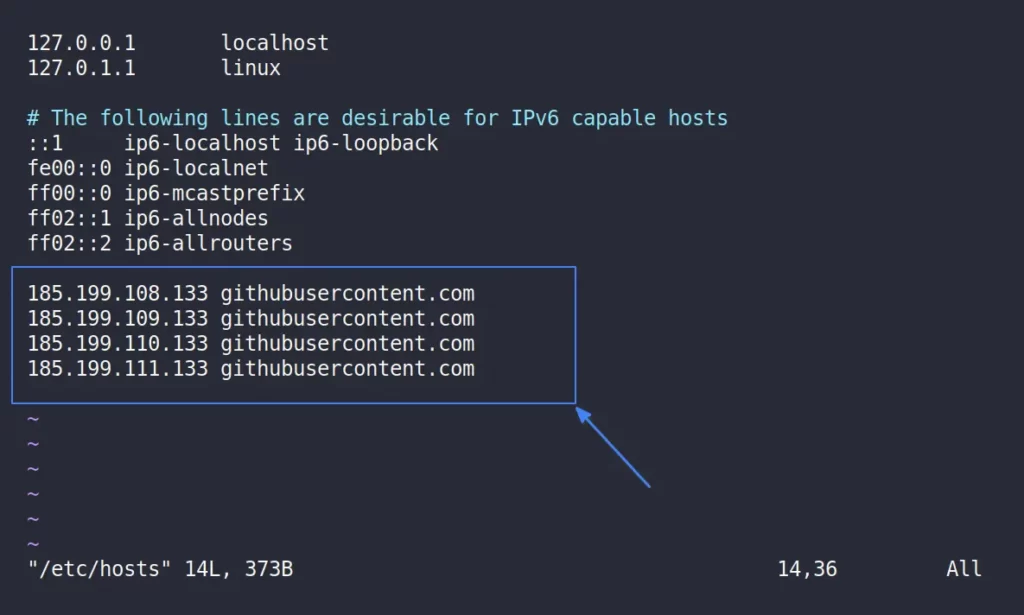
Save the file, close it, and restart your system to apply the changes.
3. Set up Your Proxy Settings in Your Git Configuration
If you’re behind a proxy configured for your personal or work system, you may need to request the proxy details, including the proxy server, port, username, and password, from the system administrator.
Once you have that, execute the following command by replacing the “username“, “password“, “proxyserver“, and “port” with the proxy details provided by your system administrator.
#Proxy Server with HTTP Protocol
git config --global http.proxy http://username:password@proxyserver:port

#Proxy Server with HTTPs Protocol
git config --global http.proxy https://username:password@proxyserver:port
4. Reset Your Proxy Settings to Default
If your local Git configuration is already configured with invalid (or dead) proxy settings, removing them from the configuration file might solve this issue.
To start, execute the following two commands to immediately remove (or unset) proxy settings configured using either an HTTP or HTTPS protocol:
$ git --global --unset http.proxy
$ git --global --unset https.proxy
Alternatively, you can set the proxy setting to an empty string by executing the following two commands:
$ git config --global http.proxy ""
$ git config --global https.proxy ""
Final Word
I hope the solution provided in this article helped resolve the issue; it would be even better if you could comment below indicating which solution worked for you.
Till then, peace!


