
The “du” utility is quite useful for estimating and summarizing file and directory usage. However, a new user may find it overwhelming, in which case they can turn to a new tool named Dust.
Dust (“du” + “rust” = “dust“) gives a fresh look to the conventional “du” output, representing files and directories in a tree-like structure and categorizing them based on disk usage.
You can take a quick sneak peek at the following picture of how Dust represents disk usage:

If you look carefully, you will find that without using any additional options, it beautifully categorizes the files and directories in a tree hierarchy based on their directory structure and disk usage. It mentions the size of each directory next to it, along with a progress bar for graphical representation.
Note that this output shows the stats of the current working directory, where “.cache“, “.cargo“, “.local“, and “snap” are parent directories, while “firefox” and “common” are subdirectories of “snap“.
The picture attached above shows the “dust” command output without any options, but you can use additional options to customize the output according to your preferences. For instance, you can specify the scan depth, number of lines to display, show or hide the absolute path, ignore directories, display or hide the file count, and much more.
So stick with this article till the end to find out how you can install Dust on your preferred Linux system with command-line usage.
Tutorial Details
| Description | Dust |
| Difficulty Level | Low |
| Root or Sudo Privileges | No |
| OS Compatibility | Ubuntu, Manjaro, Fedora, etc. |
| Prerequisites | – |
| Internet Required | Yes (for installation) |
How to Install Dust on Linux
The Dust can be installed in many different ways, but the one I find easiest and personally recommend to everyone is via Cargo or Homebrew if it’s installed on your system.
If it’s installed, then great; otherwise, you can follow our separate article on it. Once you’re ready, open your terminal and execute one of the following commands to begin the installation.
$ cargo install du-dust

#OR

$ brew install dust
Once the installation is complete, you can verify it by checking its version.
$ dust --versionOutput:

How to Use Dust on Linux
Once the installation is complete, you can begin using Dust to check your disk usage. Here are all the possible ways to use Dust for estimating file and directory usage.
#Scan the current directory and return the result in a tree hierarchy.
$ dust

#Scan the root directory, which will take some time and might require root privilege.
$ dust /

#Scan the directory and return the results based on the specified options.
$ dust [options] [path]
The “dust” command output without any options is already attached at the beginning of this article. So I’ll directly begin explaining the usage of its various options to get your desired output.
Set the Scan Depth
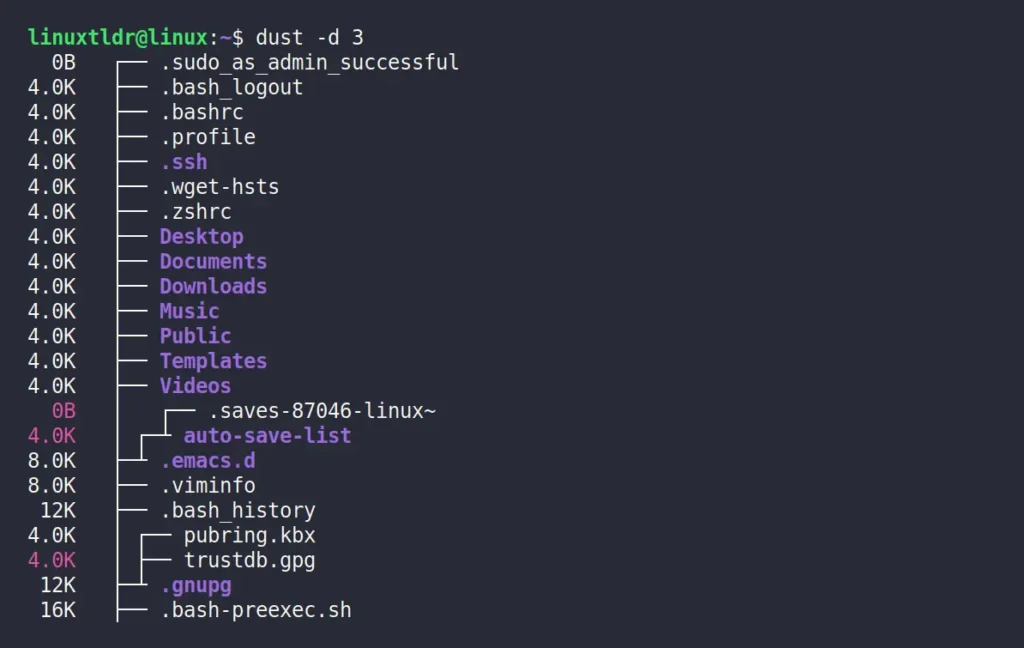
The subdirectories shown in the result are limited to a certain number, but you can set a custom limit to the scan depth by using the “-d” option.
$ dust -d 3The above command will display the three levels of subdirectories.
Limit the Number of Entries
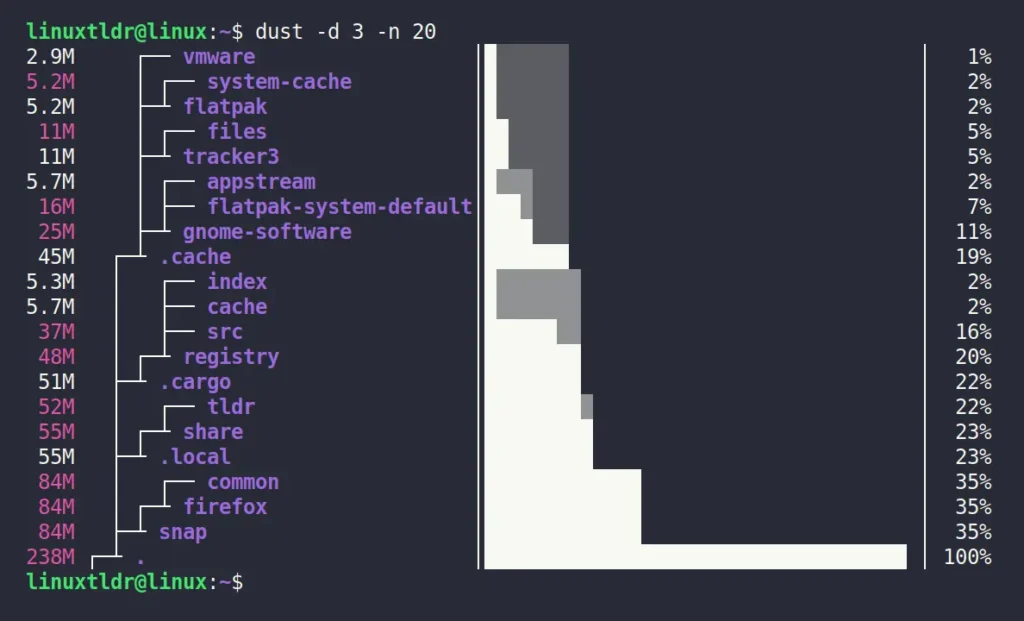
In the previous example, where you specified the scan depth, the output was too large, requiring scrolling. To trim the output to a limited number of entries, you can use the “-n” option.
$ dist -d 3 -n 20The above command will only display the twenty entires in the output.
Print the Absolute Path of Entries
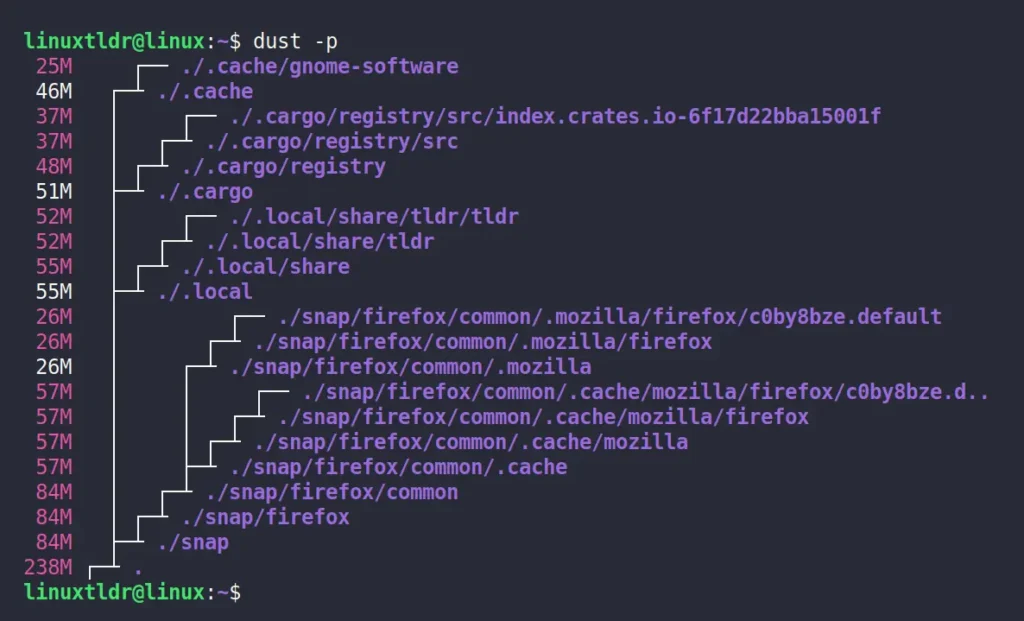
The default behavior of Dust is to print the relative path of files and directories (means their filename), which absolutely makes the output clean. However, if you want to check the absolute path of all listed entries, you can use the “-p” option to do so.
$ dust -pThe above command will display the entries with their absolute path.
Exclude Matching Result from the Entries
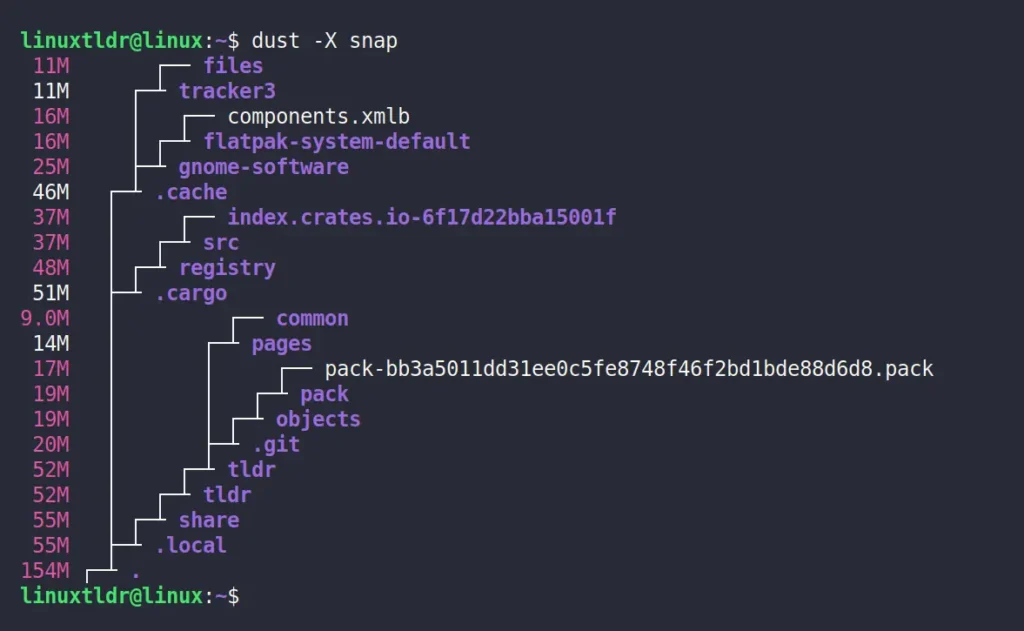
When issuing the “dust” command without any options, it will list the disk usage in a tree hierarchy for all the files and directories in the present directory. If you want to ignore certain files or directories, you can exclusively specify their name using the “-X” option.
$ dust -X snapThe above command will remove all entries containing the “snap“.
Hide the Percent Bars
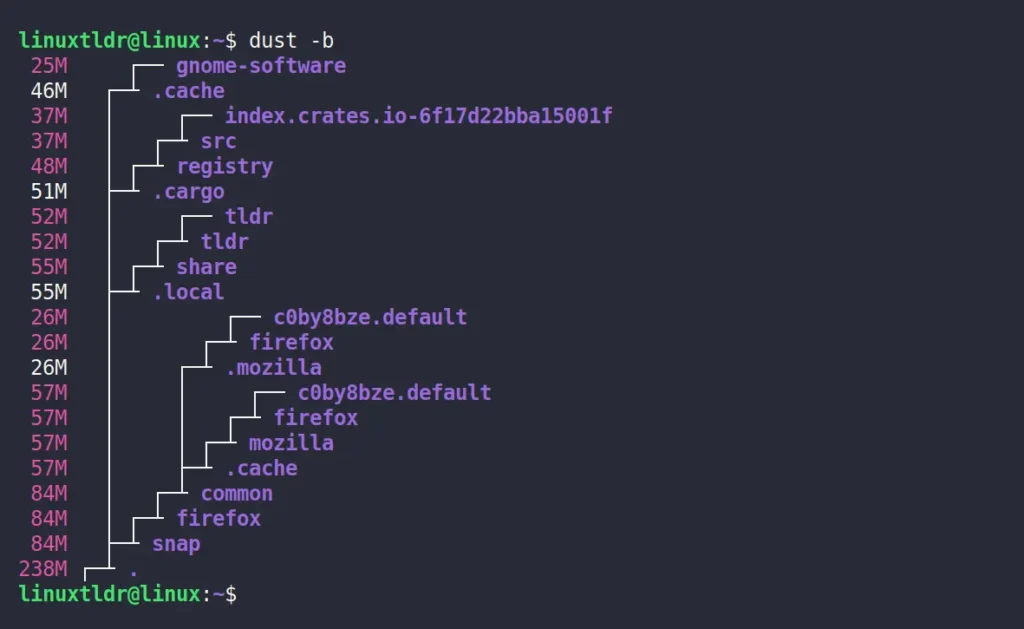
If the right-side percentage bar bothers you, you can easily remove it using the “-b” option.
$ dust -bThe above command will hide the percentages.
Print the Entries for Screen Reader
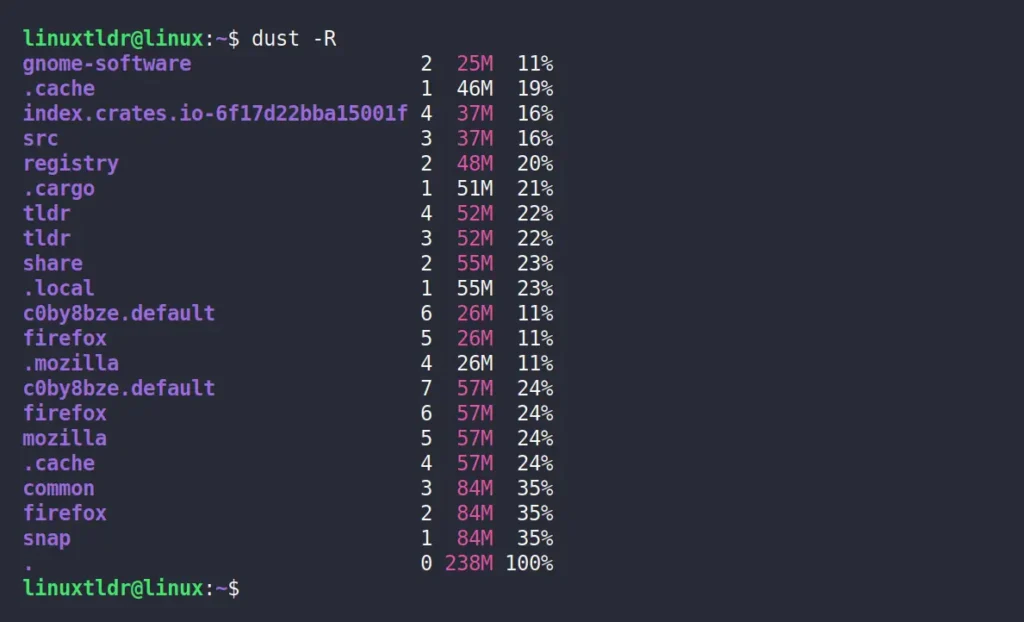
The screen reader mode can be enabled using the “-R” option, although this option is typically used for screen readers. However, regular use of this option makes it easier for the user to find disk usage, as it lists all files and directories in one column, accompanied by counts of child directories, size, and disk usage percentage.
$ dust -RThe above command will enable screen reader mode.
Reverse Sort the Entries
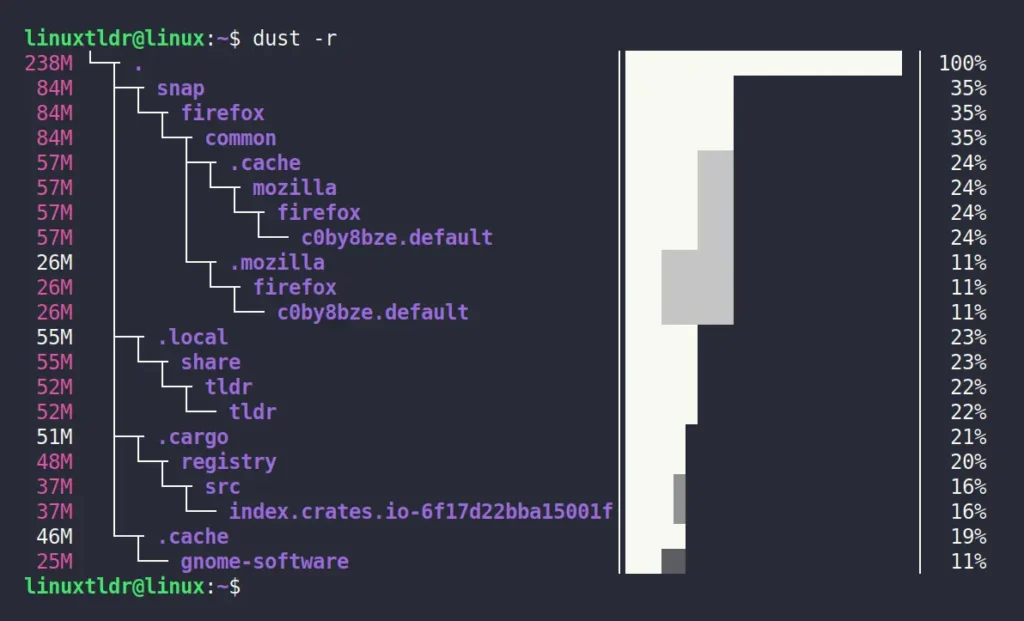
The entries in the “dust” command output are sorted from small to large size, but they can be reversed using the “-r” flag to sort from large to small size, making it easier for you to find the largest file first.
$ dust -rThe above command will sort the entries with the largest file first.
Ignore Hidden Files and Directories
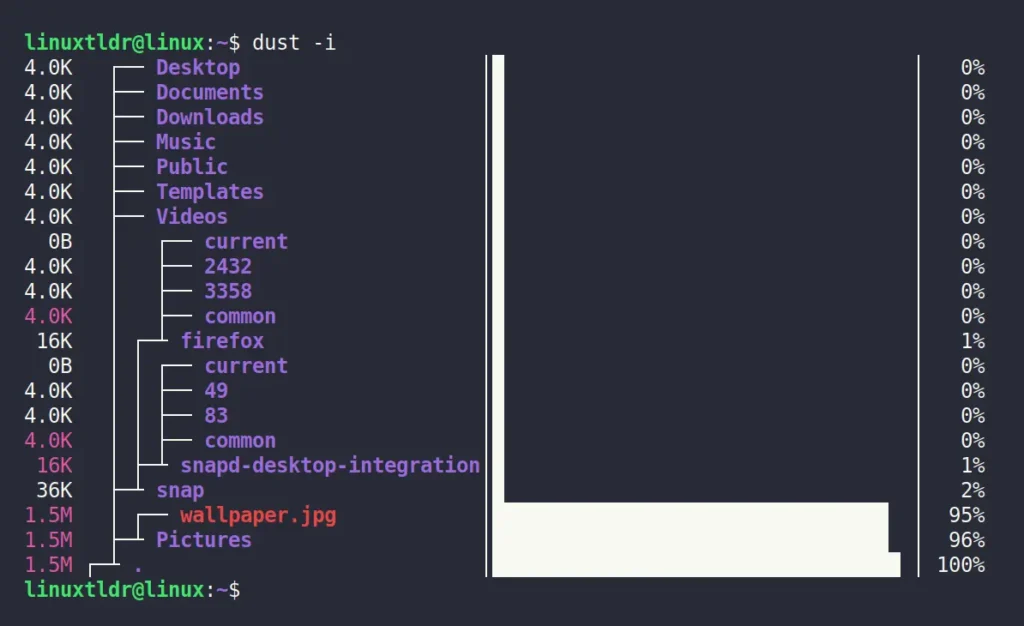
The “dust” command output displays hidden files and directories (prefixed with “.“). This can be useful at times, but often you may prefer to skip them using the “-i” option.
$ dust -iThe above command will ignore the hidden files and directories.
Here, I’ll end this article with the uninstallation step, but note that there are a lot more options you can use with Dust in combination with each other. To get the complete list of options, you can check its help section using the “dust --help” command.
How to Remove Dust from Linux
To remove dust from your Linux system, you can execute one of the following commands, depending on the command you used for installation.
$ cargo uninstall du-dust

#OR

$ brew uninstall dust
Final Word
Dust is a simple yet amazing tool for quickly finding disk usage. Although this command is user-friendly, for beginners, I would suggest first learning to use the “du” command, then swifting to Dust.
Finally, if you know of any other tools like this, then let me know in the comment section, including your thoughts and opinions.
Till then, peace!


