
The cd command is a very popular tool for navigating through multiple directory paths in the Linux filesystem, but there is one problem with that, what?
A directory with a short path can be easily navigated, but a directory with a long path might become troubling while going back and forth multiple times.
It’s true, you can create an alias for directories with a long path, but when you interact with multiple directories nested deeply inside your filesystem, your only option is the cd command.
But it is not anymore after you read this article and discover the most amazing Linux tools: “pushd” and “popd“.
Tutorial Details
| Description | Pushd and Popd |
| Difficulty Level | Low |
| Root or Sudo Privileges | No |
| OS Compatibility | Ubuntu, Manjaro, Fedora, etc. |
| Prerequisites | pushd, popd, dirs |
| Internet Required | No |
What is the Pushd, Popd (and Dirs) Commands in Linux?
The pushd and popd commands are ways to efficiently navigate between different directory paths by stacking them in memory and popping them out when they are required using the index number.
It works on the principle of “LIFO” (last in, first out), which means to push an item into the stack and pop an item out of the stack.
Surely, you are not going to stack a single directory path in a stack (otherwise, you wouldn’t require this tool), so you can use the dirs command to list the stacked path in memory to help you figure out their index number.
All commands and their definitions are listed below:
pushd: Place a directory on a stack so it can be accessed later.popd: Remove a directory placed on the directory stack via the pushd command.dirs: Displays or manipulates directory paths in the stack.
With that, let’s check out their usage in a practical way.
How Pushd and Popd Commands Work in Linux
Let’s start with the pushd command that lets you add directory paths to the stack (list or history) and later lets you easily navigate between them (from list or history).
The following is an example of the pushd command.
$ pushd ~/Documents/
$ pushd ~/Downloads/
$ pushd /var/www/html/
$ pushd ~/Desktop/
Output:
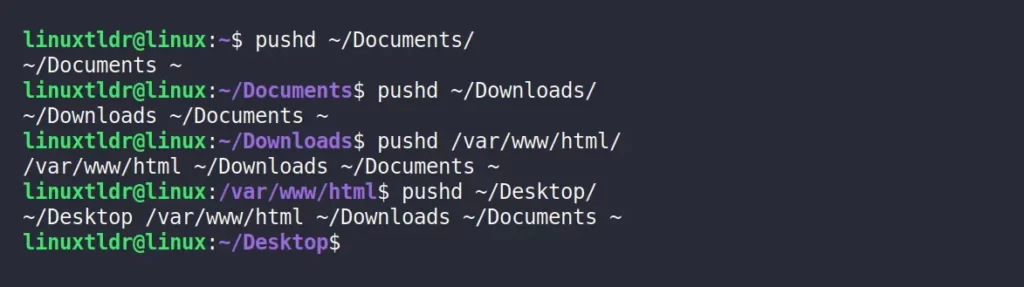
As you can see above, when you add a directory path to the stack, it will redirect you there and echo the already-existing and pushed path. These stacked paths are also temporary and will be gone when you restart your system or terminal session.
One more thing you should note is that whenever you add a directory to the stack, its index starts in reverse order.
- Index 0 = “
~/Desktop/“ - Index 1 = “
/var/www/html“ - Index 2 = “
~/Downloads/“ - Index 3 = “
~/Documents/“
If you add another directory path to the stack, the new stacked directory path index will be “0“, and the rest of the stacked directory index will be increased by one.
Currently, the stack echoes their path in the output so you can figure out their index number, but while working and executing a series of commands, these echoes will fade output in between, making it a little more difficult for you to recall the index position of paths.
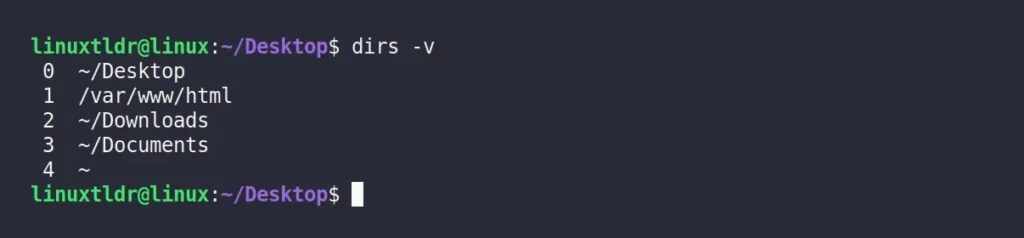
Or, list the stacked directory path with one entry per line and its index position in the stack using the “-v” flag.
$ dirsOutput:

Or, list the stacked directory path with one entry per line with its position in the stack using the “-v” flag.
$ dirs -vOutput:
So, from earlier, you know that each stacked entry is assigned an index number (from 0 to nth), so to switch between different directories like “/var/www/html“, you use the index number (that is, 1) in the form of “pushd +n” format.
$ pushd +1Output:
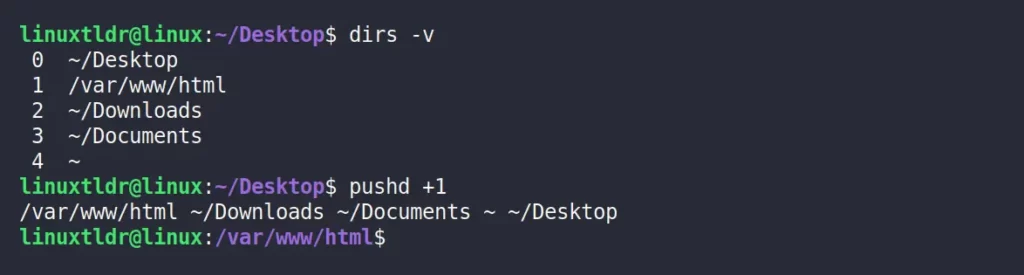
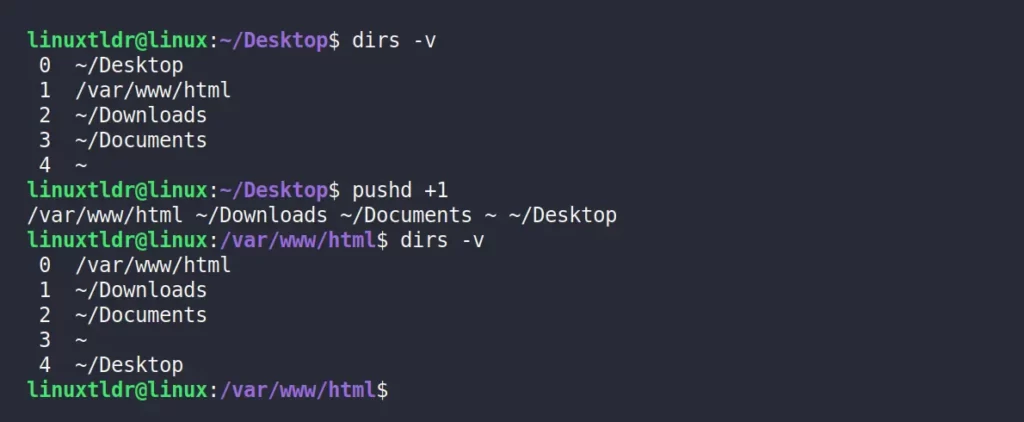
Note that after switching to a stacked directory path, the stack index number will change, so the path will be echoed when you switch, or you can again use the dirs command, as shown.
$ dirs -vOutput:
For example, if you want to switch to the “~/Documents” path, then use 2 as the index number with the pushd command.
$ pushd +2Output:
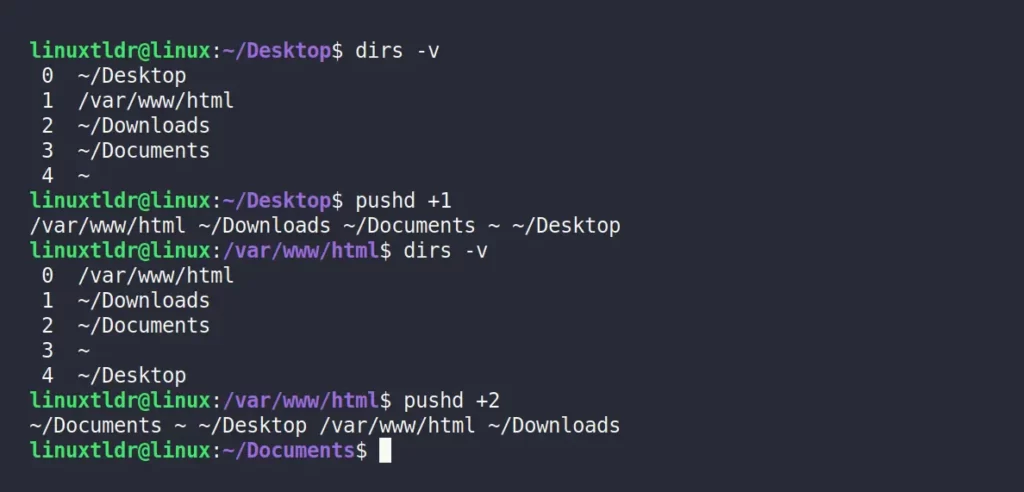
Again, the index numbers for the directory paths will change, and it might look confusing for a beginner, but surely you will get used to it after two or three tries.
Removing Item From Stack
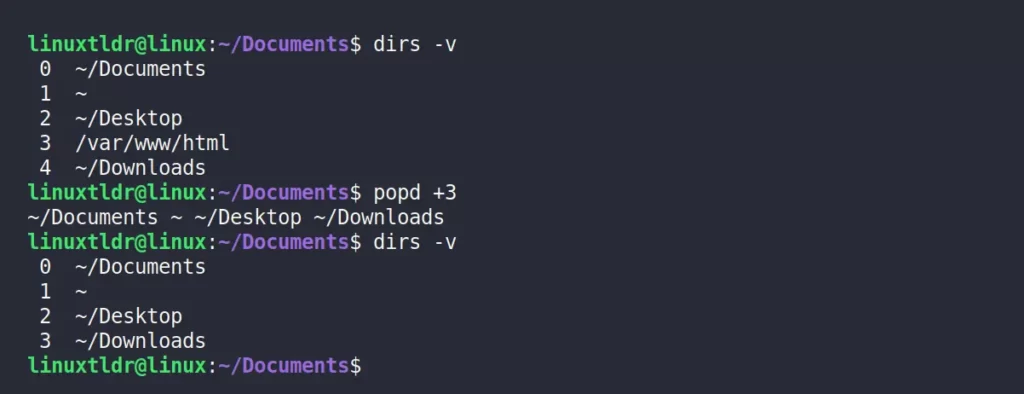
Every directory path you put/add to the directory stack might become unnecessary afterward, so at that time you can easily remove it using its index number, except this time you will use the popd command.
For example, the following is the list of existing stack directory paths, and I removed the “/var/www/html” using its index number 3 in “popd +n” format.
$ popd +3
$ dirs -v
Output:
Or use the “dirs -c” command to remove all the stacked directory paths.
$ dirs -cOutput:

That was all about the stacking directory paths.
If you have any doubts or questions regarding this topic, feel free to ask them in the comment section.


If you use dir -v you have a list with an index.
IMHO better option.
True, Thanks for the suggestion!