
In Linux, there are multiple tools for task scheduling, and one of the well-known options that you might have heard of is the cron job.
Today’s discussion centers on the “at” command, a specialized task scheduling tool designed for executing one-time tasks, the opposite of recurring jobs handled by cron, which repeat at fixed intervals such as daily or weekly.
So, stick with this article to learn the difference between “at” and “cron” and how to use the “at” command in your daily Linux computing with practical examples.
Tutorial Details
| Description | At Command |
| Difficulty Level | Low |
| Root or Sudo Privileges | Yes (for installation) |
| OS Compatibility | Ubuntu, Manjaro, Fedora, etc. |
| Prerequisites | – |
| Internet Required | Yes (for installation) |
The Difference Between At and Cron
It’s crucial to grasp the differences between “at” and “cron” to make informed choices and select the most appropriate one according to your needs.
The following are short and precise differences between both of these tools:
| At | Cron |
|---|---|
| It excels at handling single-instance tasks or jobs that do not require frequent repetition. | It’s designed for repetitive tasks requiring daily, weekly, or similar execution. |
| Scheduling tasks to run once at a specific time with this command involves straightforward and uncomplicated syntax. | Even for basic tasks, a solid understanding of cron expressions is necessary for scheduling. |
| You can schedule tasks for immediate execution by indicating a time relative to the current time (e.g., “now + 2 hours”). | It requires specific time patterns defined in cron expressions for scheduling tasks that will be executed based on the time pattern. |
Apart from the difference, you may have already noticed that “at” excels at scheduling one-time tasks. As for limitations, it lacks the flexibility to schedule complex tasks; “cron” is a better choice here.
Now, let’s learn the installation process for this tool on your chosen Linux distribution.
How to Install At Command on Linux
The availability of the “at” command depends on your Linux distribution, but it’s commonly included, and if not, you can easily install it using the default package manager for your distribution.
$ sudo apt install at                                                                                      #For Ubuntu, Debian, Linux Mint, etc
$ sudo dnf install at                                                                                      #For Red Hat, Fedora, CentOS, etc
$ sudo pacman -S at                                                                                    #For Arch, Manjaro, EndeavourOS, etc
Once installed, you can run the following command to confirm the successful installation and accessibility from your terminal:
$ at -VOutput:

Additionally, ensure the “at” daemon is active in the background by executing:
$ sudo systemctl status atdOutput:
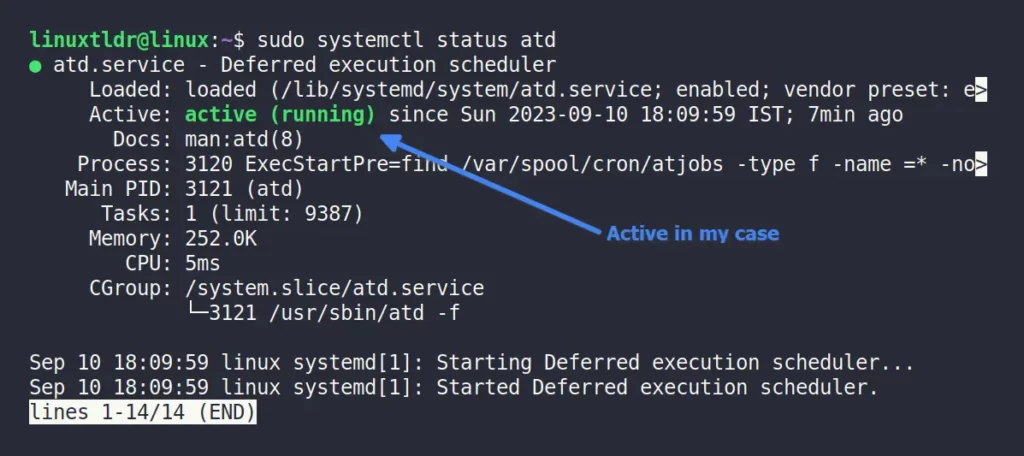
In the image above, you can observe that the scheduling daemon is active in my situation. If it’s inactive in your case, simply execute the following command to activate it and configure it for automatic startup during system boot.
$ sudo systemctl start atd
$ sudo systemctl enable atd
Scheduling Our First One-Time Job
The following is a typical look when a job is scheduled via pipe or file:
at [runtime]“. To exit the interactive prompt and save the scheduled job, use “Ctrl + D” or “Ctrl + C” to cancel the job.$ echo "command_to_run" | at [runtime] #Execute piped command
$ at [runtime] -f ./myscript.sh #Execute command defined in "myscript.sh"Additionally, consider these helpful flags when using the “at” command.
| flags | description |
|---|---|
-f | Specifies a file containing the series of commands to be executed. |
-t | Specifies the time at which to run the commands using a Unix timestamp. |
-m | Send an email to the user when the job has been completed. |
-q | Specifies a queue in which to place the job. |
To execute your one-time tasks, you can specify the desired time for execution using the following time formats:
- Relative time: “now + 1 hour” or “now + 30 minutes”
- Absolute time: “5:30 PM” or “10:00”
- Date and time: “09:00 AM tomorrow” or “10:00 6/26/2024”
Here are some examples of how to use the “at” command in Linux:
1. To create a file containing “Hi, Linux TLDR” in the “/tmp” directory after one hour.
-m” option alongside the “at” command, resulting in a command like “at -m now + 1 hour“. This way, you’ll receive email notifications whenever your jobs are executed.$ echo "echo 'Hi, Linux TLDR' > /tmp/greeting.txt" | at now + 1 hour Output:

In the output, you’ll receive a warning that the command will run with “/bin/sh“, but you can simply ignore it.
The next line will display the job count (incrementing as you schedule more jobs) along with the corresponding execution timestamp for each scheduled job.
2. To shut down the system at 20:30 today.
$ echo "shutdown -h now" | at 20:30Output:

Here, the job count is changed to “2“, indicating it’s our second job following the previous command, along with the timestamp for its execution.
Listing and Managing Scheduled Jobs
After scheduling your jobs, you can track or list all the scheduled jobs for the current user using the “at -l” or “atq” command.
$ at -l

#OR

$ atq
Output:

If you are aware of job IDs for all scheduled jobs but can’t recall their scheduled timestamps, input the job ID into the following command:
$ at -l 1

#Or

$ atq 1
Output:

To view the scheduled jobs of all users on the current Linux system, prefix the “at -l” or “atq” command with “sudo” to execute it with superuser privileges.
$ sudo at -l

#OR

$ sudo atq
Output:

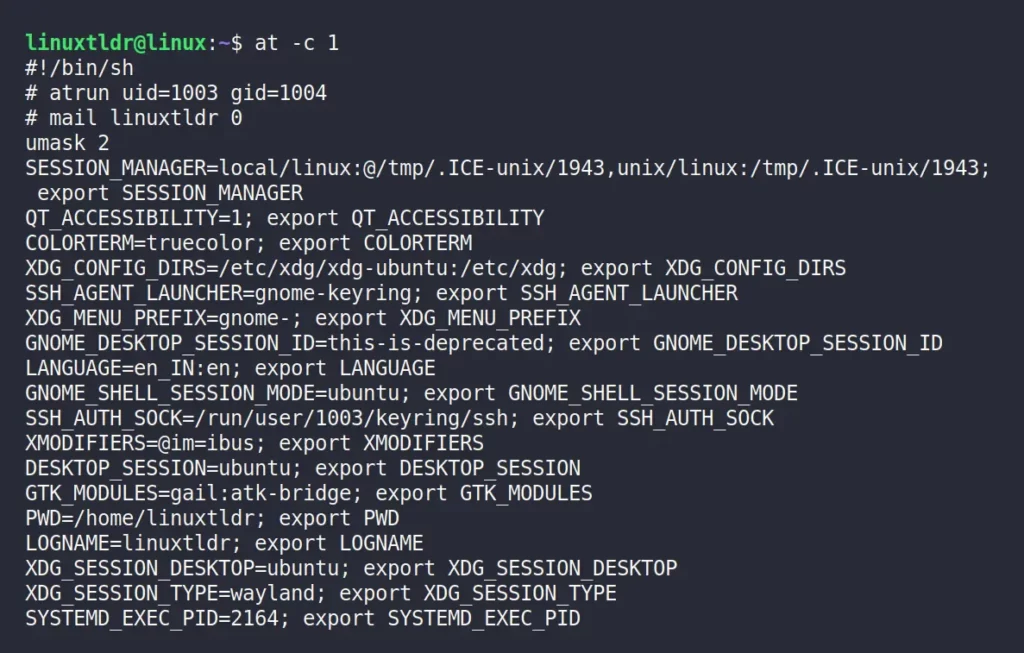
Use the “at -c” command along with the job ID to reveal additional content for scheduled jobs.
$ at -c 1Output:
Removing a Scheduled Job
To delete a particular scheduled job, you can provide the job ID as an argument to the “at -r” or “atrm” command.
$ at -r 2

#OR

$ atrm 2
Output:

A Few More Examples of At Command
Here are additional examples (or templates) to help you grasp various methods of configuring timestamps within the “at” command.
1. Create a text file with “Linux TLDR” without delay.
$ echo "Linux TLDR" >> example.txt | at now2. Create a text file with “Linux TLDR” in the next 30 minutes.
$ echo "Linux TLDR" >> example.txt | at now + 30 minutes3. Create a text file with “Linux TLDR” at 10:00 AM tomorrow.
$ echo "Linux TLDR" >> example.txt | at 10:00 AM tomorrow 4. Schedule the task at 10:00 AM on Sunday.
$ at 10:00 AM Sun 5. Schedule task at 10:00 AM on coming 25 May.
$ at 10:00 AM May 25 6. Schedule the task at 10:00 AM on May 15, 2024.
$ at 10:00 AM 5/15/2024
$ at 10:00 AM 5.15.2024
7. Schedule tasks to be executed just after 1 and 2 weeks.
$ at now + 1 week
$ at now + 2 week
8. Schedule tasks to execute at midnight (typically at 12:00 AM).
$ at midnightFinal Word
I hope you find this article useful and have properly understood the “at” command usage. I would also suggest you read this article for more in-depth information related to this command.
Finally, if you have any questions or queries related to the topic, feel free to tell us via the comment section.
Till then, peace!


