
Uncomplicated Firewall (UFW) is a built-in command-line tool for Ubuntu and Ubuntu-based distributions that allows users to easily and quickly create and manage firewalls.
If you are planning to allow or restrict incoming/outgoing traffic for HTTP, HTTPS, SSH, FTP, and various other protocols, you can use this program.
Today, I’ll show you how to set up the UFW firewall on Ubuntu and use it to manage your system firewall in a simple way.
How to Install UFW on Ubuntu
Why should include this installation step when UFW is preinstalled on Ubuntu? To be honest, it might be installed, and you can verify that by using the “ufw –version” command, but if you are using the minimal or stripped version of Ubuntu, then it might not be included. In that case, you can use the following command to install UFW on Ubuntu:
$ sudo apt install ufwWait for the installation to complete, and then move on to the next step.
How to Configure UFW on Ubuntu
The first thing you have to do is make sure that your UFW status is active.
$ sudo ufw statusOutput:

As you can see, it’s not active in my case, so to activate/enable the UFW on Ubuntu, run.
$ sudo ufw enableOutput:

You can now move forward and configure different types of firewall rules in UFW.
Configure UFW to Support IPv6
If your system and network support IPv4/IPv6, then make sure the IPv6 protocol is enabled in the UFW configuration by using this command:
$ sudo nano /etc/default/ufwOutput:
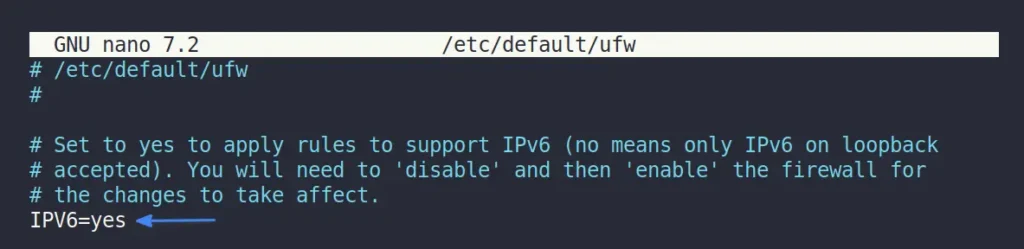
If the IPv6 value is set to “no“, then replace it with “yes“, save, and close the file.
Allow TCP/UDP Ports in UFW
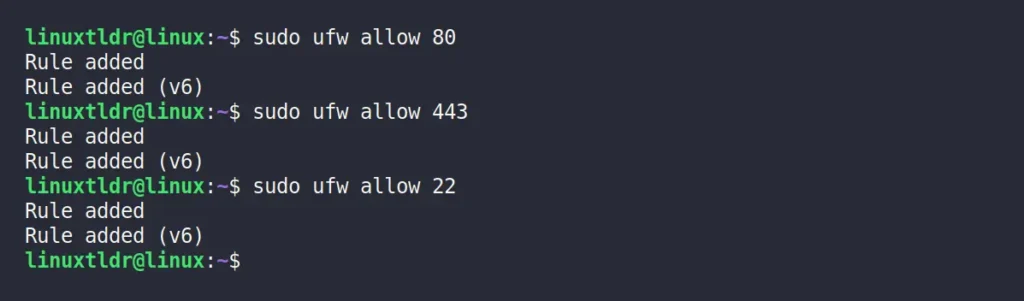
Let’s assume you’re working on a server that runs various services like Apache and SSH using ports 80, 443, and 22, respectively. To avoid any interruption for these services, you can execute the following command to create a new inbound/outbound rule for them:
$ sudo ufw allow 80
$ sudo ufw allow 443
$ sudo ufw allow 22
Output:
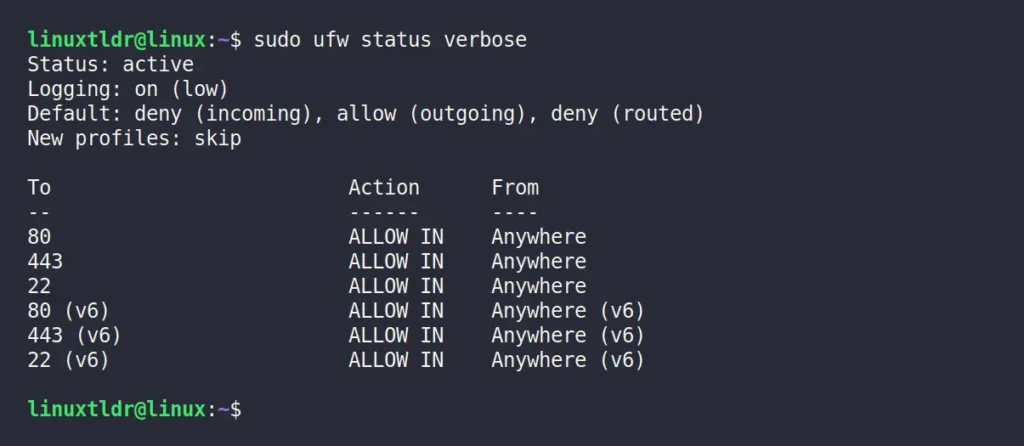
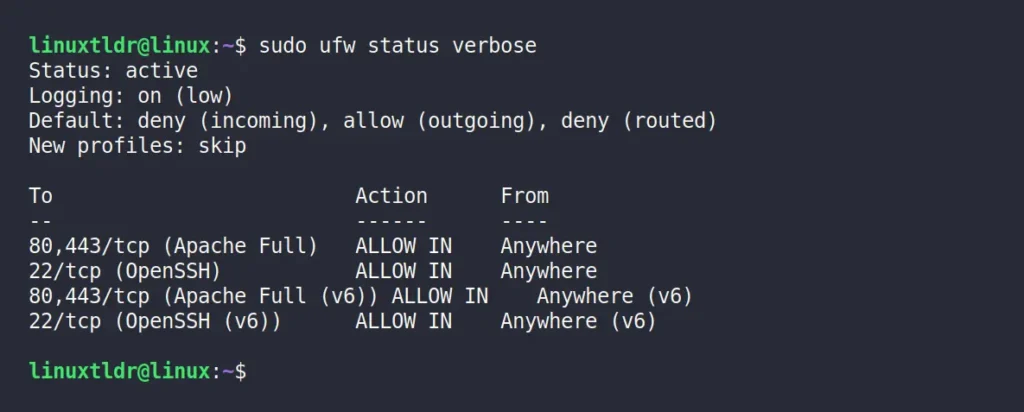
To verify the successful creation of the rules, you can use the following command:
$ sudo ufw status verboseOutput:
Application Profiles in UFW
In the previous example, you learned how to create a firewall rule for ports 80, 443, and 22, respectively, for Apache and SSH services. However, instead of specifying individual ports, you can use the application profile names.
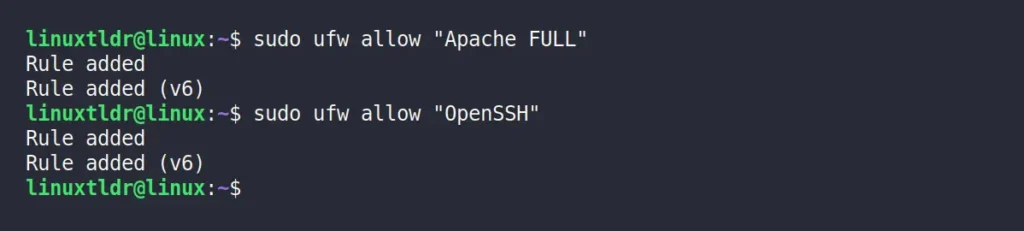
Let’s say I want to allow the HTTP/HTTPS protocol for Apache and the default port for SSH. For this purpose, I can execute the following command, which will create a firewall rule for ports 80 (HTTP), 443 (HTTPS), and 22 (SSH).
$ sudo ufw allow "Apache FULL"
$ sudo ufw allow "OpenSSH"
Output:
You can check the list of active firewall policies to find the application name along with the ports.
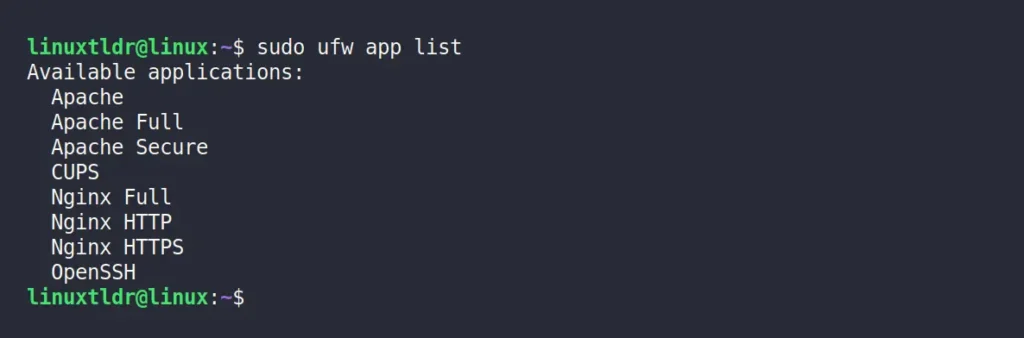
To get a list of all available application profiles that you can use to quickly create firewall rules, run.
$ sudo ufw app listOutput:
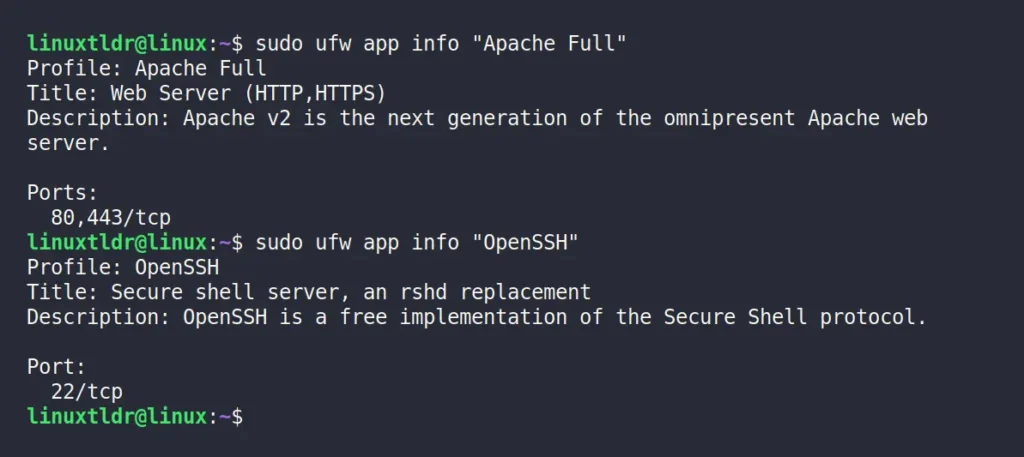
To get details on a specific application profile, you can specify its name in the command below:
$ sudo ufw app info "Apache Full"
$ sudo ufw app info "OpenSSH"
Output:
Delete UFW Rules
To remove a created UFW firewall, you first need to identify its index number, which you can find using the following command:
$ sudo ufw status numberedOutput:
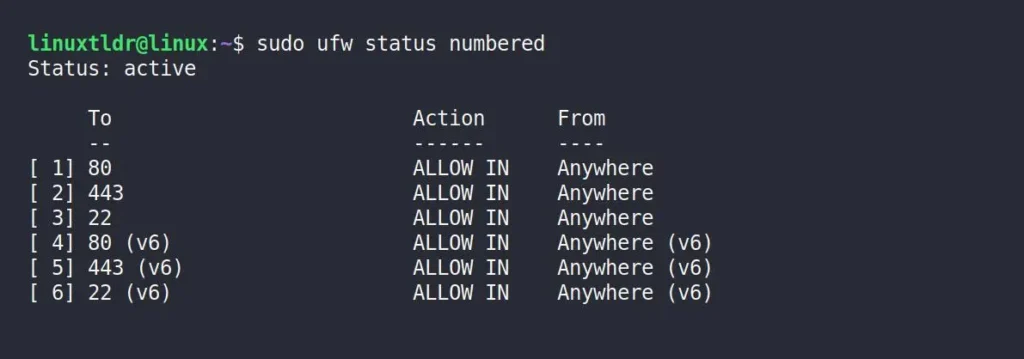
Let’s assume you want to remove the UFW firewall rule for port 80 IPv4/IPv6. To do so, we can use their respective index numbers: 1 for port 80 IPv4 and 4 for port 80 IPv6.
sudo ufw delete 1 4Output:

After deleting the UFW firewall rule, you can verify its removal by checking its status. Remember that if you’ve created the rule using application names, you still need to use their index numbers to delete the firewall rule.
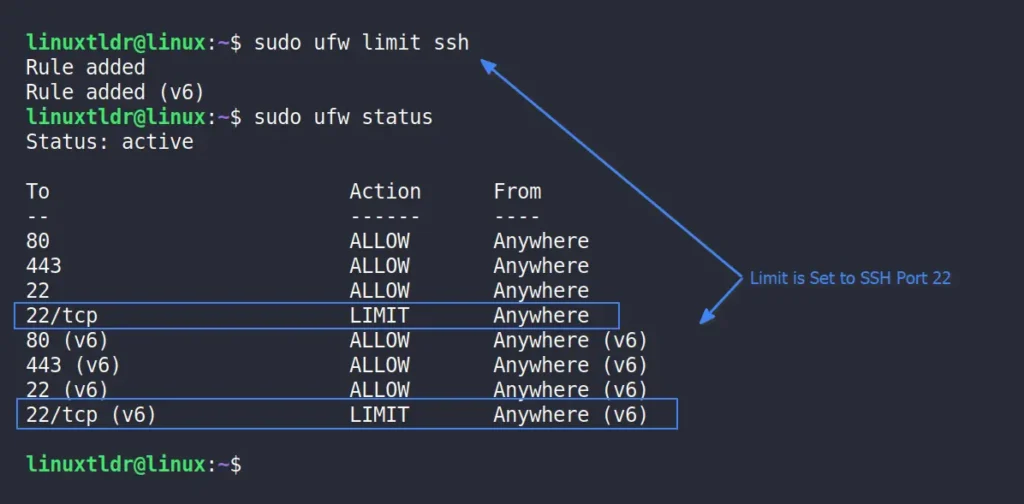
Limit the SSH Port Access
If you’re managing the remote server, you might be using the SSH service for connection. In that case, you should restrict access to the SSH port to combat bots by running:
$ sudo ufw limit sshOutput:
Add Comment to Firewall Rule
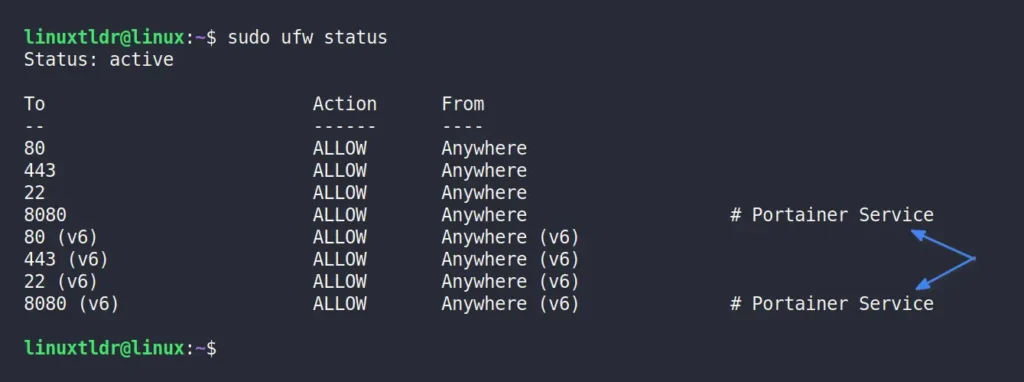
While managing UFW firewall rules, the list may quickly become too extensive, and you might find yourself managing various ports for different applications, services, and so on. Upon returning from a long vacation, revisiting the UFW firewall rules list might leave you confused about which service a particular port was allowed for.
Indeed, there’s a method to determine the process behind a listening port. However, if the process runs on a schedule, it would become difficult to identify. To avoid such scenarios, you can add a comment to your firewall rules during creation. This makes it easier to identify the purpose of specific UFW firewall rules when revisiting them in the future.
Let’s say I want to create a firewall rule for a Portainer service running on port 8080. I can use the “comment” syntax to include a note explaining the reason behind implementing this firewall rule.
$ sudo ufw allow 8080 comment 'Portainer Service'Output:

You’ll find the attached comment when checking the status of the created UFW firewall rule.
Manage Connections
To allow all connections from a specific IP address, run:
$ sudo ufw allow from <IP address>To allow connections from a specific IP address to a particular port, run:
$ sudo ufw allow from <IP address> to any port <port number>To allow access to a range of ports, run:
# It will allow connection for TCP protocol.
$ sudo ufw allow 2000:2004/tcp

# It will allow connection for UDP protocol.
$ sudo ufw allow 2000:2004/udpDeny Incoming Connections
To restrict all connections to a specific IP address, run:
$ sudo ufw deny from <IP address>To restrict connections from a specific IP address to a particular port, run:
$ sudo ufw deny from <IP address> to any port <number>Set Up Default UFW Rules
If you ever mess up with a UFW firewall rule, remember you can always use the following command to revert all changes back to the default settings.
$ sudo ufw resetThe above command will prompt you to agree by pressing “y” for yes.
Disable UFW
If you feel like UFW isn’t your thing, then you can quickly disable it to make things normal.
$ sudo ufw disableFinal Word
UFW is truly a user-friendly tool that simplifies firewall rule management compared to the previous method of directly editing iptables. I’ve aimed to explain it as simply as possible, but if there’s anything confusing, feel free to ask in the comments.
Till then, peace!


