
At some point, everyone, particularly those in IT, will have to start their cloud journey with one of the many popular providers available, such as AWS, GCP, Azure, and more.
AWS was the pioneer in the cloud computing arena, establishing itself as the top player, while others also gained recognition as reputable providers.
It’s leading cloud provider for several compelling reasons, with two particularly noteworthy factors being its high demand and its beginner-friendly free-tier option.
Many individuals opt for the free tier but encounter challenges when trying to launch their first AWS EC2 instances, and this article aims to demonstrate just how simple it is to create and launch your first AWS EC2 instance.
How to Create and Launch an AWS EC2 Instance
To set up and deploy an AWS EC2 instance, several sequential steps need to be completed. This involves accessing the AWS dashboard, then configuring security groups and generating key pairs, and finally launching the AWS EC2 instance.
All these steps are displayed, subsequently followed by…
1. Accessing the AWS Dashboard
I assume you already have an AWS free tier account, so just log in to your AWS account, and you’ll find yourself on a dashboard that will look like the one below.
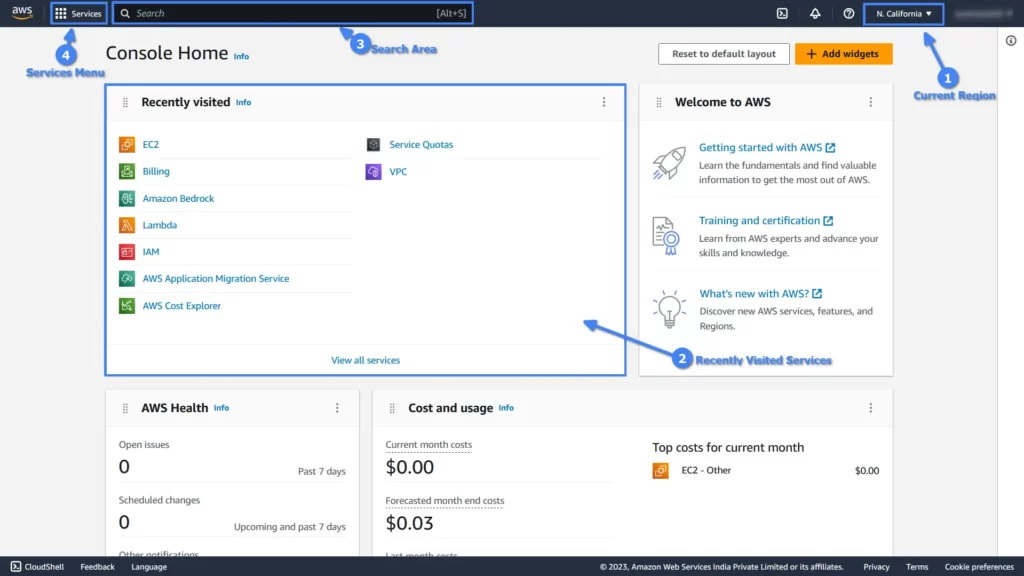
In the above image, there are four important things to understand:
- Current region is the most important thing to know. Whenever you login, first check the selected region in the highlighted area. To give you a rough idea, AWS has data center all across the globe. “N. California” is one of them and is closest to me. You can click on it and choose the one closest to your location.
- Recently Visited section typically shows all the services you’ve previously used, but for a new account, it will be entirely empty.
- Search Area is the go-to section for newly registered users, offering a quick and easy way to immediately locate various AWS services.
- Services Menu will show categories of AWS services similarly to your operating system menu.
As a newcomer, you may find the “Recently Visited” section empty, and the “Services Menu” can be overwhelming, so just perform a quick search for “EC2” in the “Search area“.
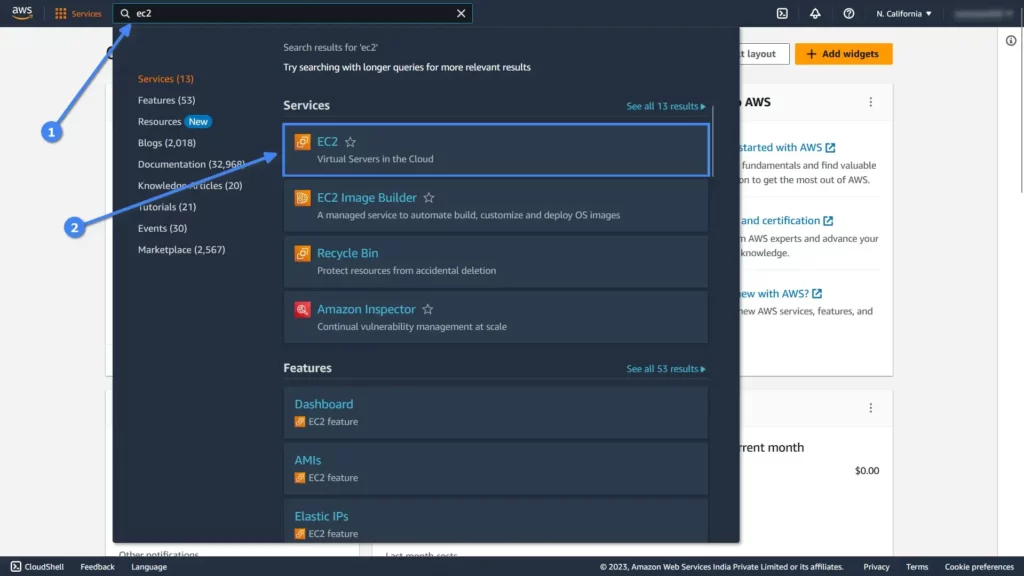
After selecting “EC2” services from the search results, you’ll be taken to an EC2 dashboard that will look like the one below.
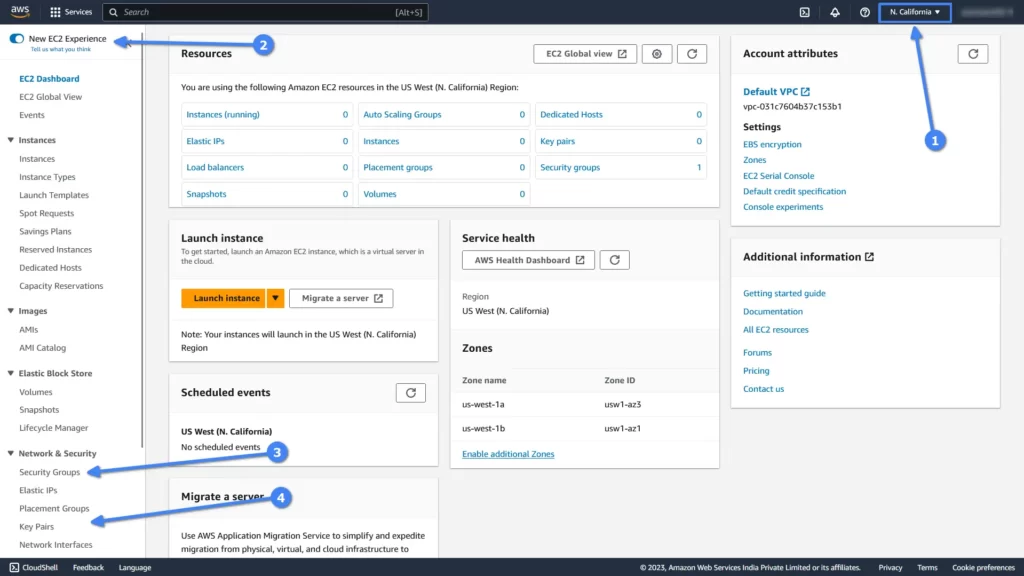
As a beginner aiming to launch their first AWS EC2 instance, you can focus solely on the four key points highlighted in the image above, ignoring the rest of the other information.
- Ensure that your chosen region remains unchanged.
- The new EC2 Experience should be checked; otherwise, the old EC2 dashboard will be presented to you.
- Security groups allow you to control inbound and outbound port permissions.
- Key pairs allow you to assign the SSH public key for remote access to your AWS EC2 instance from your local system.
2. Creating a New Security Group in AWS
To begin, just click the “Security Groups” option, and you’ll be taken to the next page, as shown.
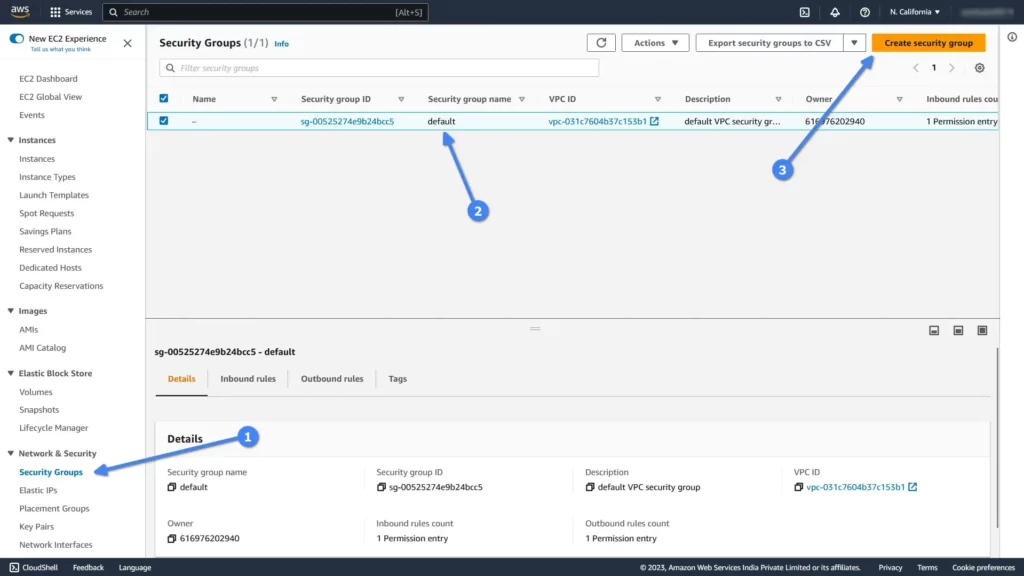
In the “Security Group” section, you’ll come across an AWS-generated security group called “default“. Currently, I recommend creating a new security group by clicking the button indicated with point “3“.
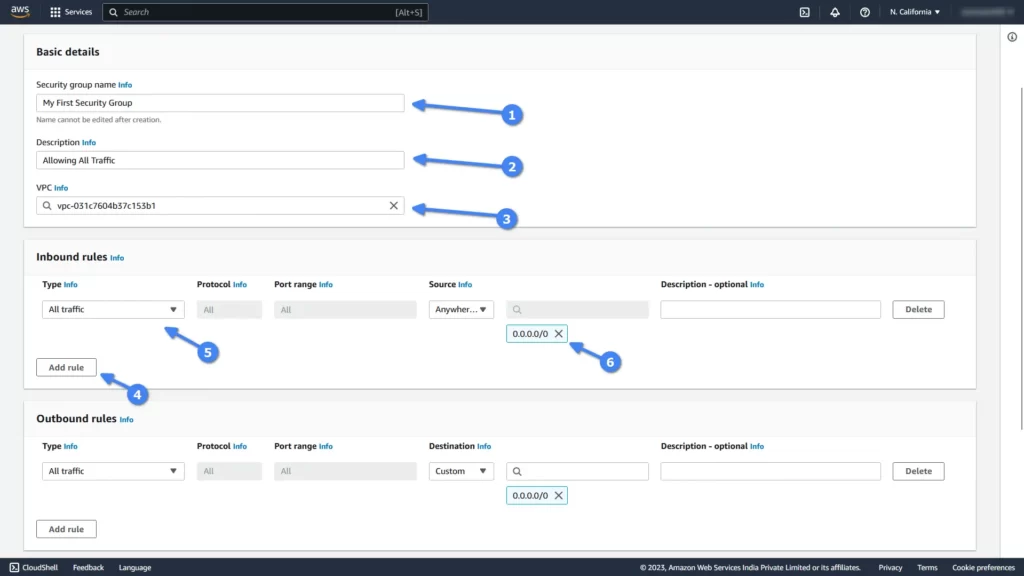
In this step, you’ll need to provide essential information for your new security group:
- Choose a Security Group name that aligns with your requirements.
- Describe the security group’s purpose in the description.
- The VPC is automatically detected, so no changes are required.
- Adding a rule will create a new blank Inbound rule.
- Select “Allow All Traffic” to enable TCP/UDP access for AWS EC2 instances associated with this security group.
- Specify the inbound source IP as “0.0.0.0/0” to allow traffic from all sources.
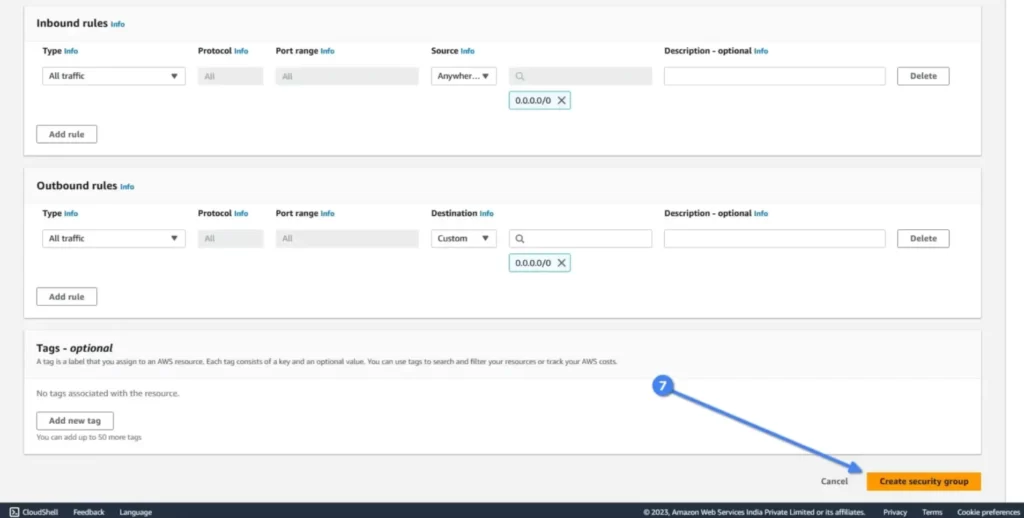
After completion, click the “Create security group” button in the lower right corner.
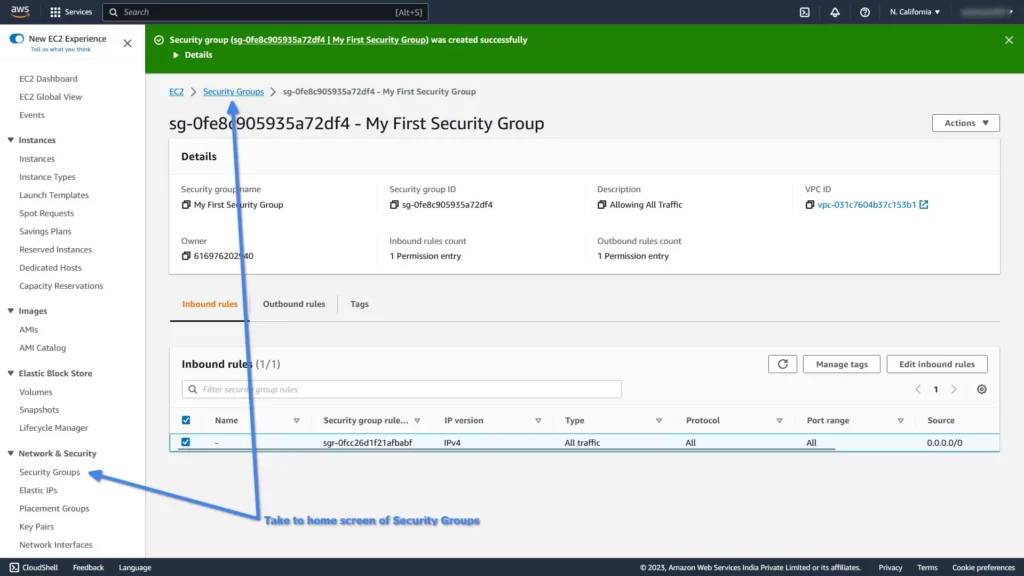
You will be redirected to your newly created security group page, as shown.
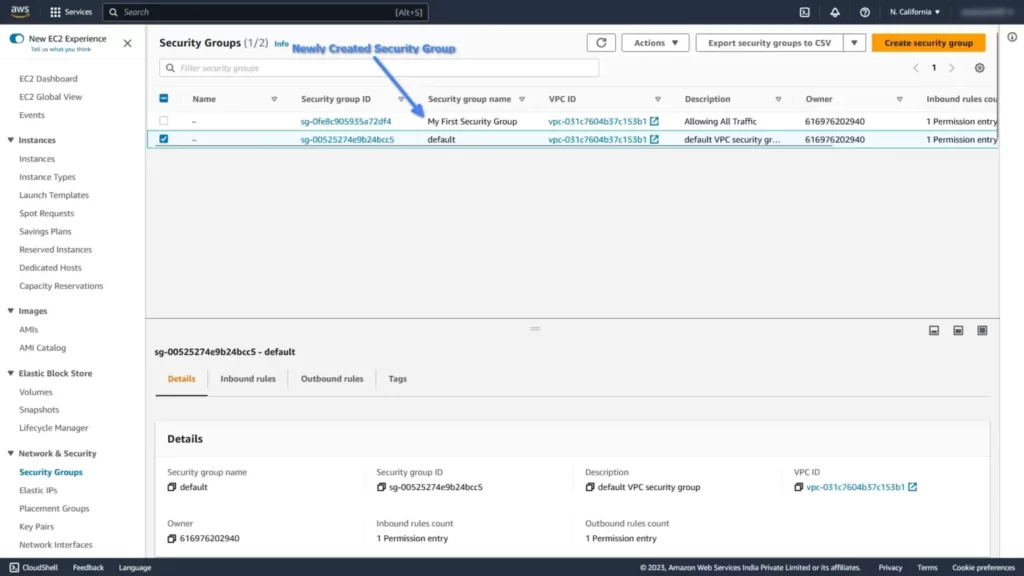
Upon returning to the “Security Groups” dashboard, you’ll notice your new security group positioned above the default security group.
3. Creating a New Key Pair in AWS
Click on the “Key Pairs” option in the left side menu, as shown with point “1” in the following image.

Upon doing so, you will be directed to the aforementioned page, which will initially appear blank. However, from this point on, you have the option to either import a new SSH public key from your system or generate a new key pair.
If you possess a local SSH public key, I assume you can handle this step independently. For other users, just click the “Create key pair” button as indicated in step “3“, and it will take you to the following page.
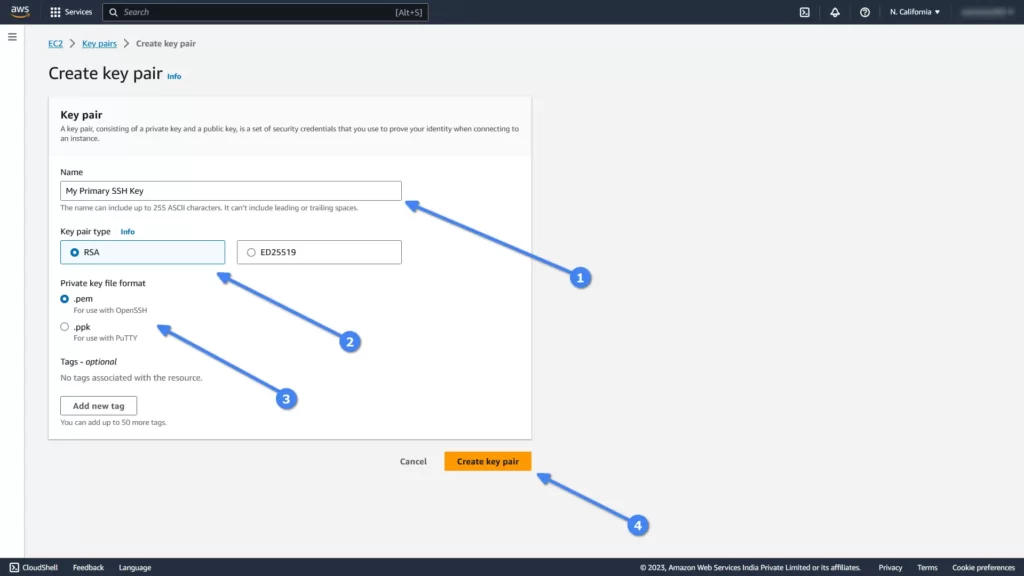
Here, it will ask you to input essential information for your new key pairs, such as:
- Choose a name according to your preferences.
- Leave the key pair type as “RSA“, as it’s the default.
- Select the “.pem” file format for the output file.
- Click the “Create key pair” button to download your new key pair.
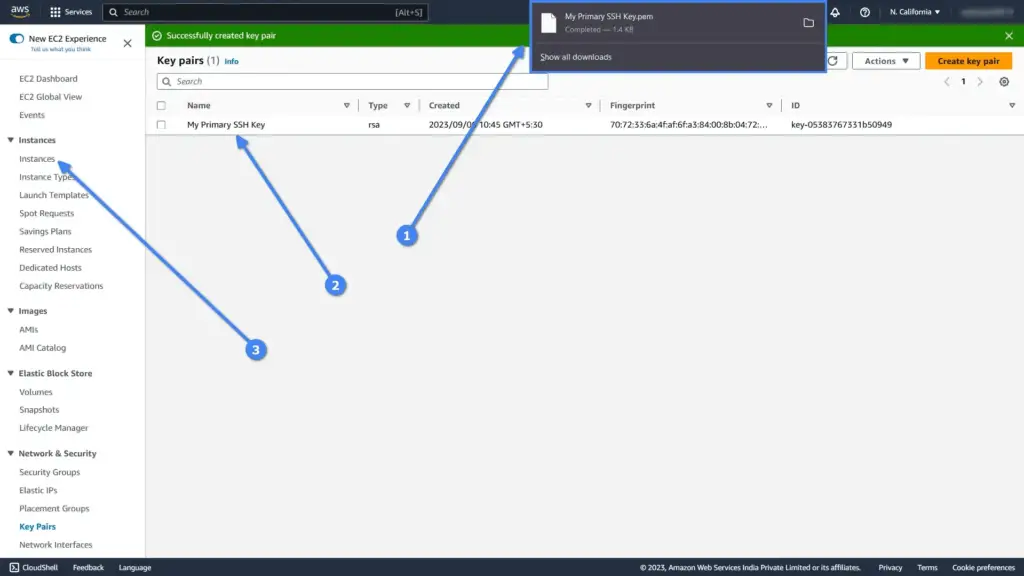
The “1” in the image above indicates that our new key pair has automatically downloaded, and the “2” in the image indicates where you can find your new key pairs in the list.
4. Creating a New AWS EC2 Instance
Finally, it’s time to create our first AWS EC2 instances, so begin by clicking on “Instance” in the left-side menu, as shown in the previous image labeled “3” or “1” in the following.
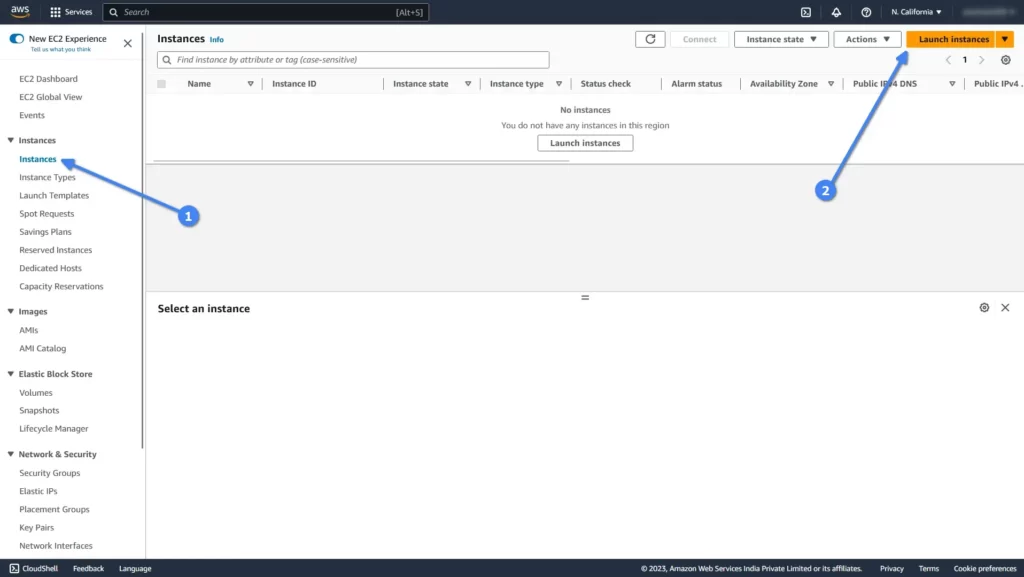
From this point, just click the “Launch Instances” button, and it will take you to the next page.
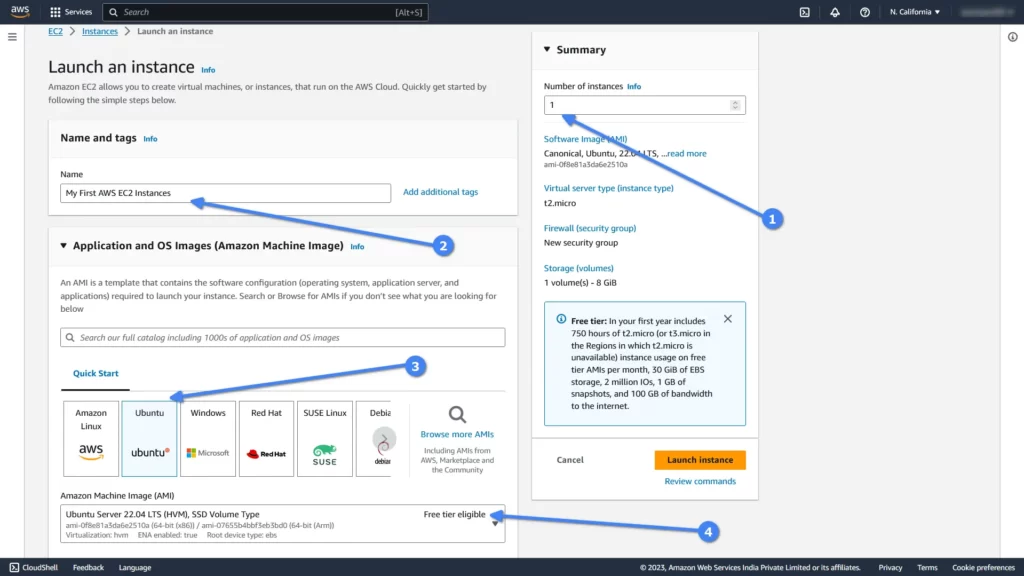
Here, you have to fill in some necessary information for your AWS EC2 instances.
- Set the instance count to “1” to prevent the creation of multiple instances.
- Assign a suitable name to your instance.
- Select a preconfigured AMI (Amazon Machine Image) available in the free tier; “Ubuntu” is among the options.
- Double-check that the chosen AMI is eligible for the free tier.
Next, scroll down a bit for other options, as shown.
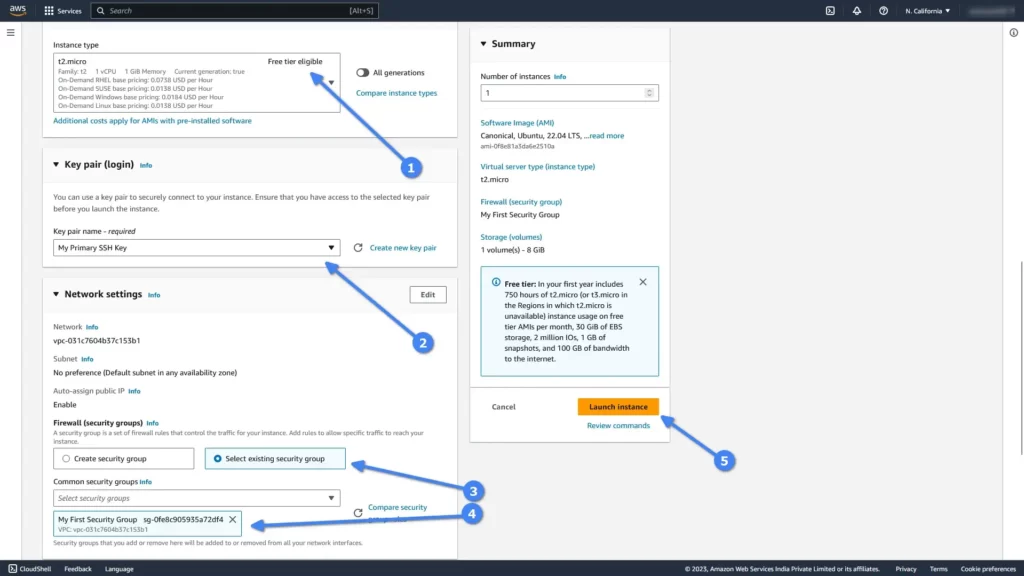
During this step, ensure the following:
- The instance type is configured to be eligible for the free tier.
- Select the SSH key pair generated in step 3.
- Opt for the “Select existing security group” option.
- Choose the security group established in step 2.
- Click the “Launch instances” button to initiate your first AWS EC2 instances.
Starting February 1, 2024, AWS will begin charging approximately $0.005 per hour for all public IPv4 addresses associated (or not) with services such as EC2, RDS, EKS, and others.
The AWS Free Tier for EC2 will continue to provide 750 hours of public usage per month for the starting 12 months, and you will not incur charges for owned IPv4 addresses from Amazon BYOIP.
For monitoring, analyzing, and auditing your usage of public IPv4 addresses, refer to Public IP Insights.
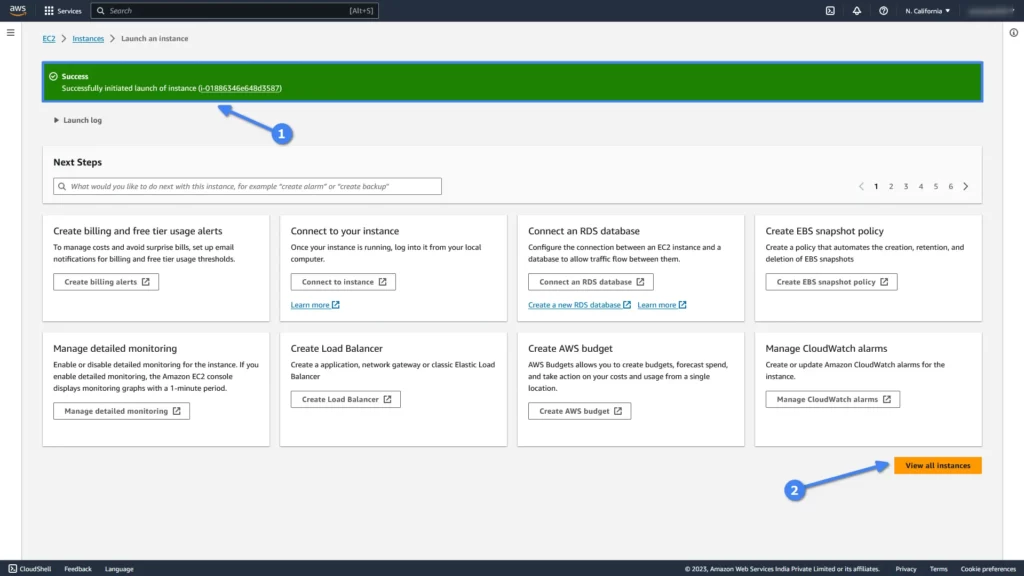
Great job! Your first AWS EC2 instances have been successfully created. To return to the instances dashboard, just click on the “View all instances” button.
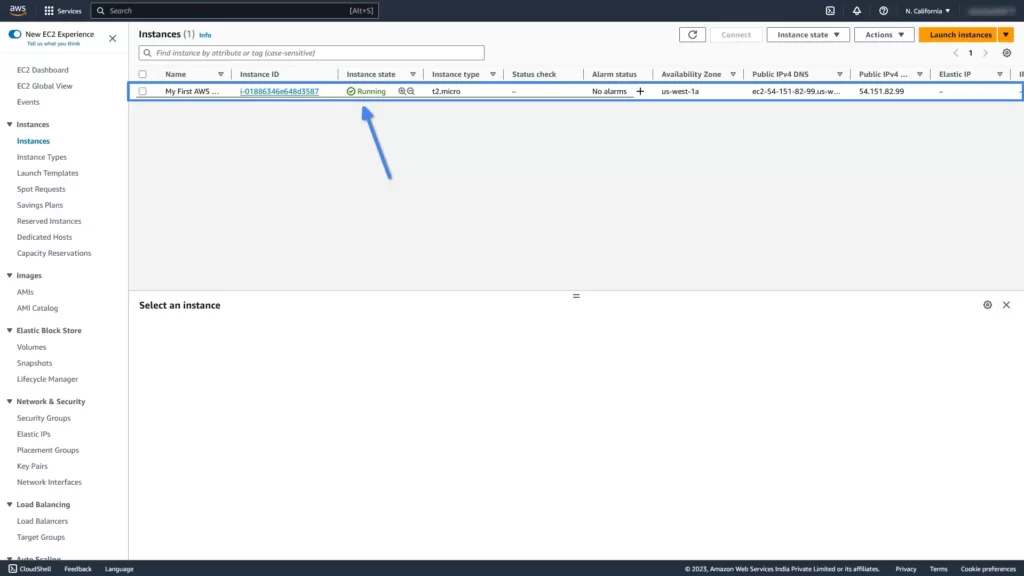
Here, your instances will initially appear as “Pending“, but within a matter of seconds, they will transition to a “Running” state, displayed in green text.
5. Connecting to the AWS EC2 Instance
To establish a connection with your AWS EC2 instances, you have the option to use the AWS native web interface or establish a connection using the IPv4 address from your local system.
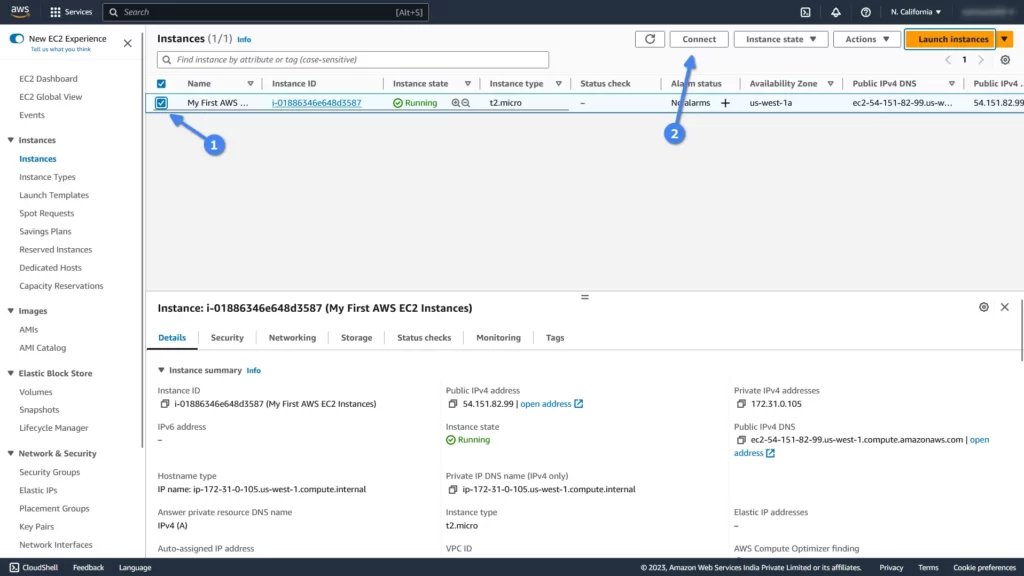
To establish a connection with your AWS EC2 instances through the native web interface, simply choose the AWS EC2 instances you wish to connect to and proceed by clicking on the “Connect” button, as shown.
Upon clicking the “Connect” button, you will be directed to the “Connect to Instances” page.
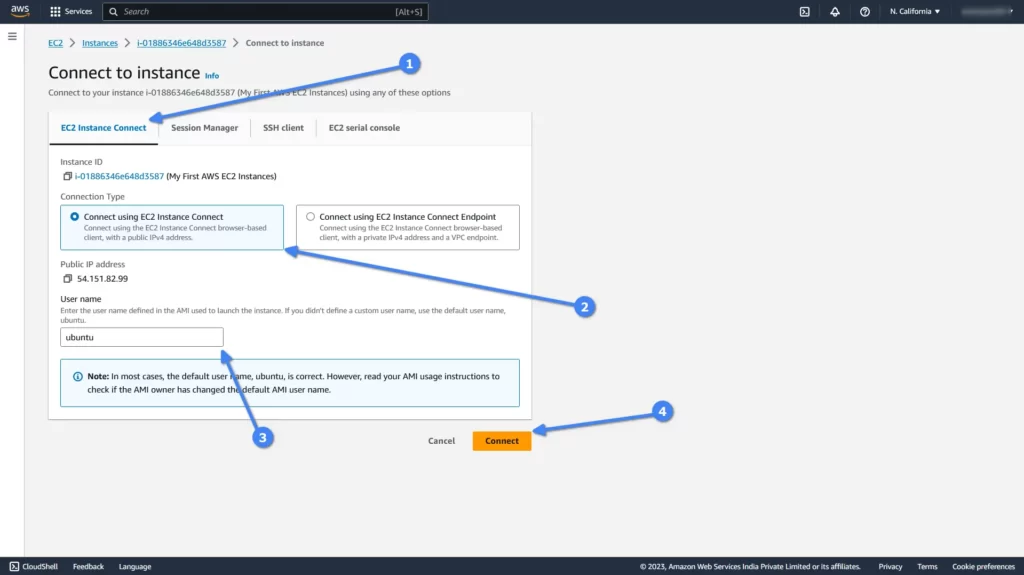
From here,
- Ensure you are in the “EC2 Instance Connect” section.
- Select the connection type (the default is typically the first option).
- Take note of the username; it will auto-detect the default, but if you have created multiple users for your AWS EC2 instances in the past, specify one.
- Finally, click the “Connect” button.
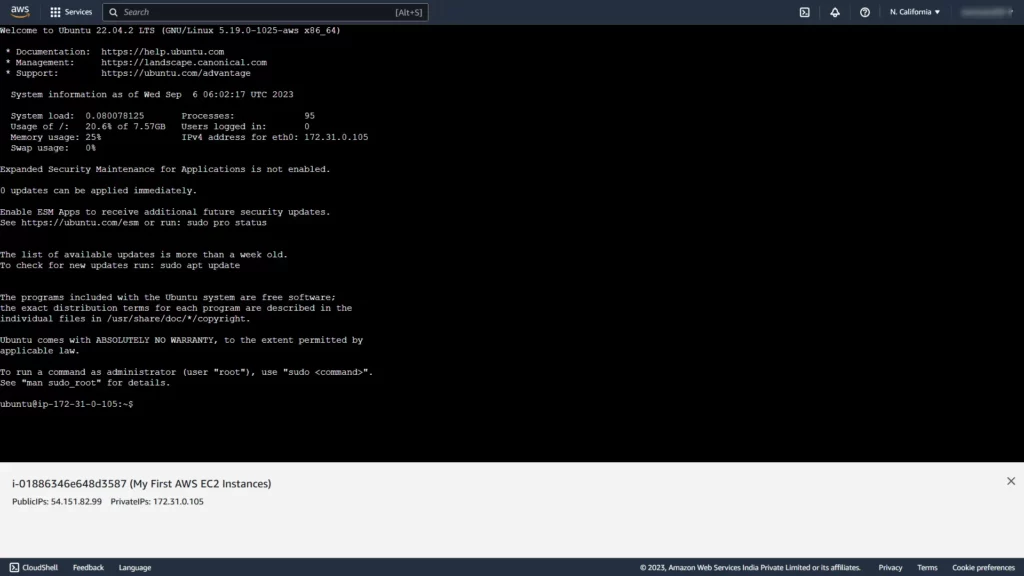
Tada!!! You have successfully connected to your AWS EC2 instances from the AWS native web interface.
If you wish to establish a connection from your local machine to your AWS EC2 instance, refer to the “SSH Client” section.
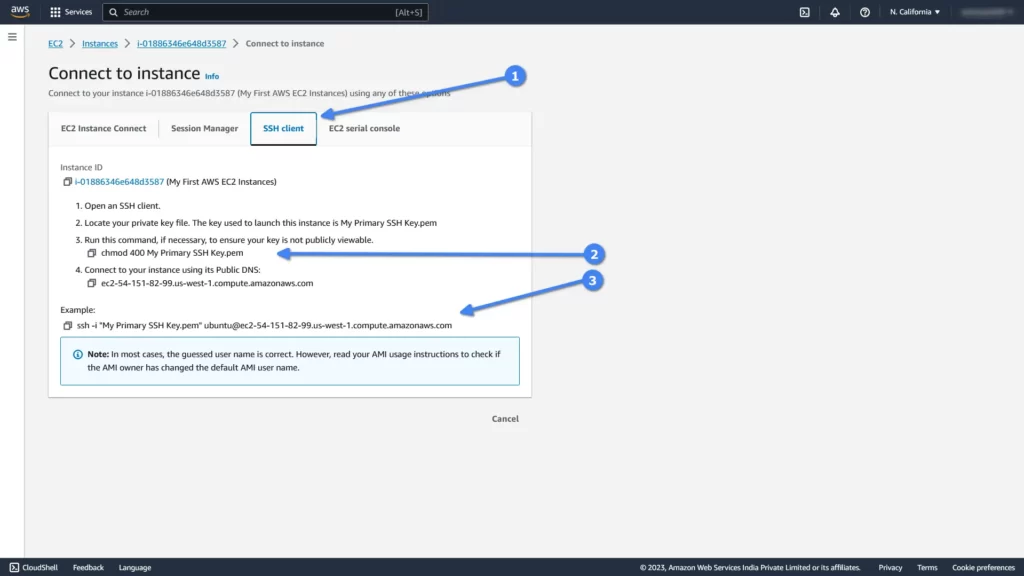
Here, it will ask you to assign permission to the downloaded SSH key pair during step 3.
Then ask you to specify the key pair to the ssh command with the “-i” flag and assign the AWS EC2 instance username (“ubuntu” in this case) with the provided hostname.
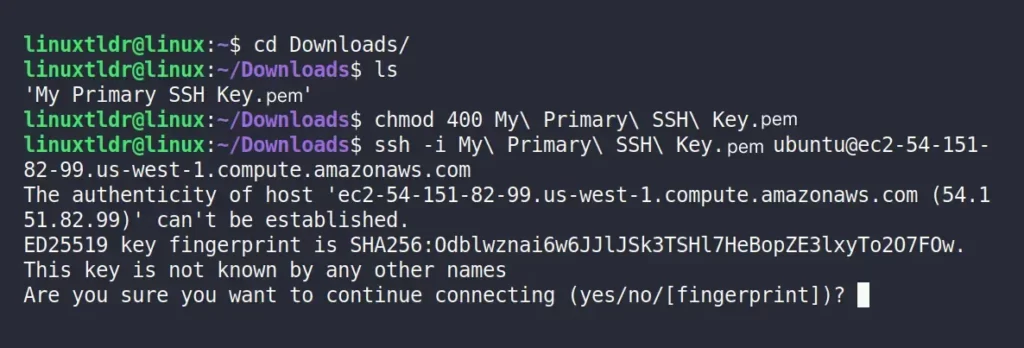
Let me show you each step one-by-one. First, open your terminal on the local machine where you downloaded the SSH key pair and navigate to the location where your SSH key is located (typically, its “~/Downloads/“).
$ cd ~/Downloads/Output:

Assign permission to this key pair.
\” in front of each space.$ chmod 400 My\ Primary\ SSH\ Key.pemOutput:

Lastly, connect to your instances with the provided key pair, username, and hostname.
$ ssh -i "My Primary SSH Key.pem" [email protected]Output:
Here, you are done connecting to your AWS EC2 instance remotely from your local system.
That’s the end of this article. If you have any questions or are stuck somewhere, do let us know in the comment section.
Till then, peace!


