
In this article, you will learn what the SSH protocol is, how it works, and a short history of this protocol. If you are only interested in the installation part, then click here.
Tutorial Details
| Description | OpenSSH |
| Difficulty Level | Moderate |
| Root or Sudo Privileges | Yes |
| OS Compatibility | Ubuntu, Manjaro, Fedora, etc. |
| Prerequisites | openssh-client, openssh-server |
| Internet Required | Yes |
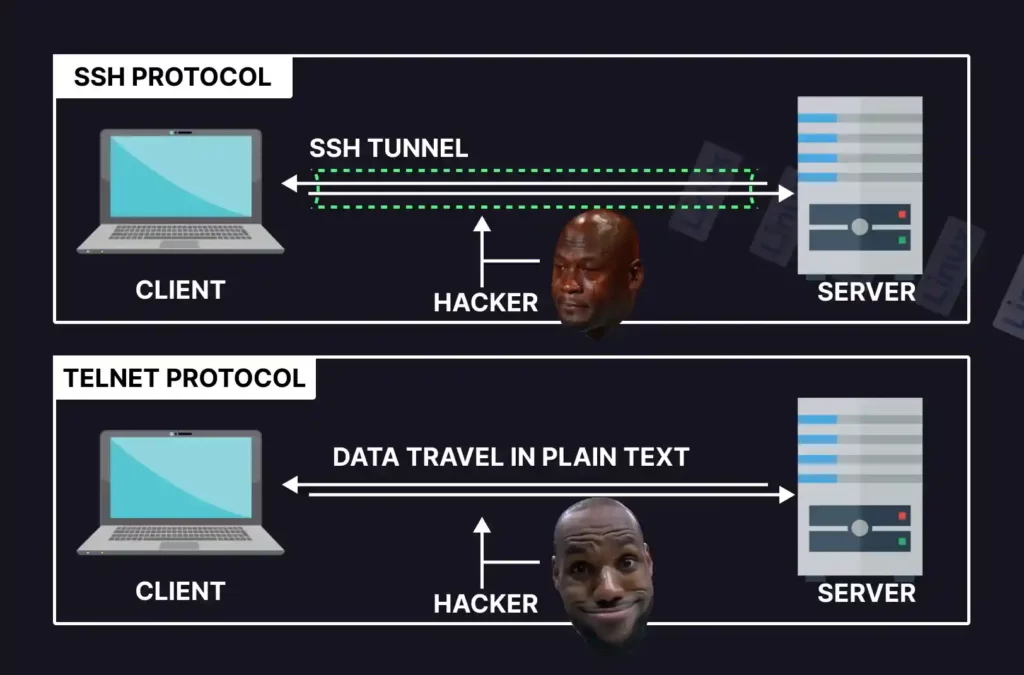
SSH (also known as Secure Shell or Secure Shell Protocol) is a cryptographic network protocol, particularly used by the system (or network) administration to securely communicate with a remote server over an unsecured network (unlike telnet).
However, SSH also refers to a utility that provides us with a server and client program; the server program is used to setup an SSH server on a remote machine, and the client program is used to connect with that server from your local machine.
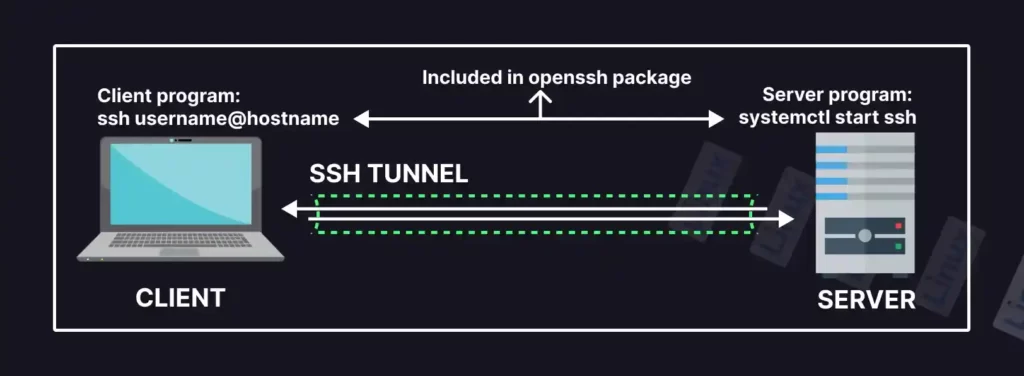
The default TCP/IP port 22 is used by SSH to establish the secure command-line interface between the client and remote machine. However, SSH can also tunnel other protocols on its own behalf, like running X Windows programs.
How Does the SSH Protocol Work and Secure Your Data?
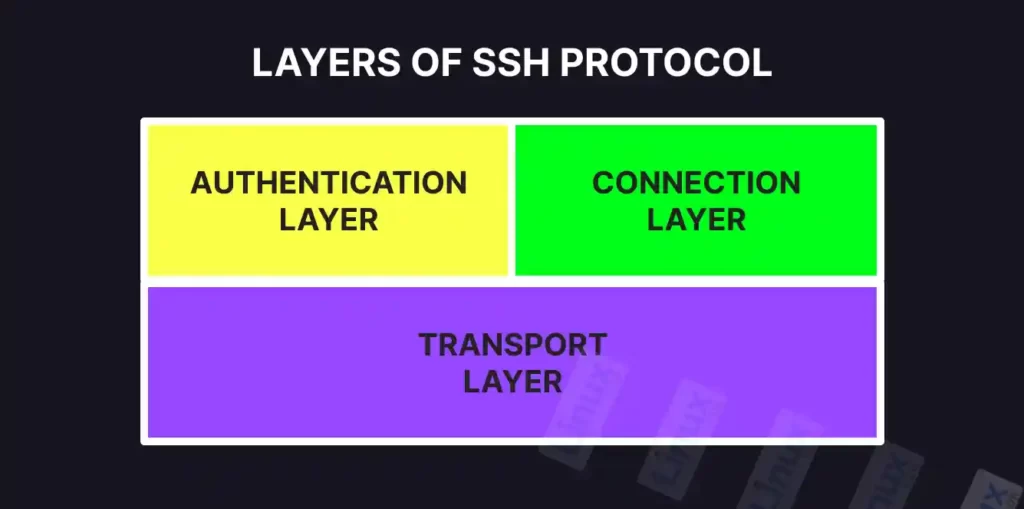
SSH was created to replace the traditional, unsecure protocols like telnet and rlogin by validating the user to the server (and establishing the secure connection) using the following three layers:
- The authentication layer: Authenticates the client’s identity.
- The connection layer: Manages the communication channels after the client’s identity is confirmed.
- The transport layer: It ensures the communication between the server and client is kept private using the public and private key, maintains the integrity of the connection, and also performs data caching and compression.
The following chart represents the above three layers:
The first interaction with a foreign server will require an exchange of the public keys to ensure the connection is encrypted between both parties and decrypted only with the respective private key.
The Short Story of the SSH Protocol
The SSH was developed by the Finnish computer scientist Tatu Ylönen back in 1995 to substitute the traditional Telnet, rlogin, and the unsecured remote Unix shell protocol, which transports the data in plain text.
Since it released multiple versions of SSH, there have been:
- Version 1: It was the first version of the protocol (also known as SSH-1) that provided exponential features and security and quickly became a major hit, gaining 2 million users by the end of 2000. After it became proprietary software, several issues became the reason for its depreciation.
- Version 2: A group of people from the Internet Engineering Task Force (IETF) assembled together to create the successor for the previous version, SSH-2, that was adopted as a standard protocol. It provided more features and security than the previous version, like Diffie–Hellman key exchange and strong integrity checking via message authentication codes. However, it lacks support and is incompatible with the previous version.
- Version 1.99: It was not the known upgrade of the previous two versions except that it provided a way to verify the backward compatibility.
- OpenSSH and OSSH: Later, the open-source community developed the OSSH version for this protocol based on version 1.2.12 of SSH-1. After a while, OpenBSD developers forked the OSSH and created OpenSSH, the one you might have heard of and the world’s most popular SSH implementation.
While I was writing this article, OpenSSH 9.1 was the latest version that resolved minor bugs and introduced multiple features, like strong validation for user authentication.
Why Should You Use SSH?
There are multiple reasons to use this tool, apart from its alternative, in different scenarios.
- Connecting with a remote server in a secured environment.
- Transfer files using this SFTP protocol (instead of FTP).
- Provide different ways to authenticate the user, like a password or authentication key.
- Forwarding X Window System from the server to the client.
- Tunnel other ports using the SSH protocol.
- Can also work like a VPN (Virtual Private Network).
Can SSH be Exploited, and How Do You Defend Against It?
The use of brute force can be a primary reason for SSH exploitation (in which an infinite number of forged requests are made to the server until the malicious user gets authenticated), which can easily be prevented by using the SSH key instead of a password.
However, poor management of an SSH key or usage of a leaked key can be more dangerous than brute force, so store your keys securely.
With that, let’s see how to install it on a Linux system.
How to Install and Configure SSH in Linux
OpenSSH is the most popular open-source package that provides SSH functionality on Unix/Linux, and BSD systems. Windows users can use a program like PuTTY to utilize this tool.
A successful SSH connection requires the following two components:
- OpenSSH-Server: It is used to setup machines that will act as remote servers.
- OpenSSH-Client: It is used to setup the local machine that will communicate with the remote server (by default provided in most Linux and BSD systems).
Follow the following steps to install OpenSSH-Server on a remote machine:
Step 1: Installing the Required Packages
Open your terminal and execute one of the following commands to install the OpenSSH-Server package on your remote machine (that will act as the remote server).
$ sudo apt install openssh-server                                                              #On Debian and Ubuntu
$ sudo dnf install openssh-server                                                              #On Red Hat and Fedora
$ sudo pacman -S openssh                                                                         #On Arch and Manjaro
Step 2: Checking the Status of the SSH Server
Execute one of the following commands to verify the status of the SSH server after installation has been successfully completed:
$ sudo systemctl status ssh                                                                          #On Debian and Ubuntu
$ sudo systemctl status sshd                                                                        #On Red Hat and Fedora
$ sudo systemctl status sshd                                                                        #On Arch and Manjaro
Output:
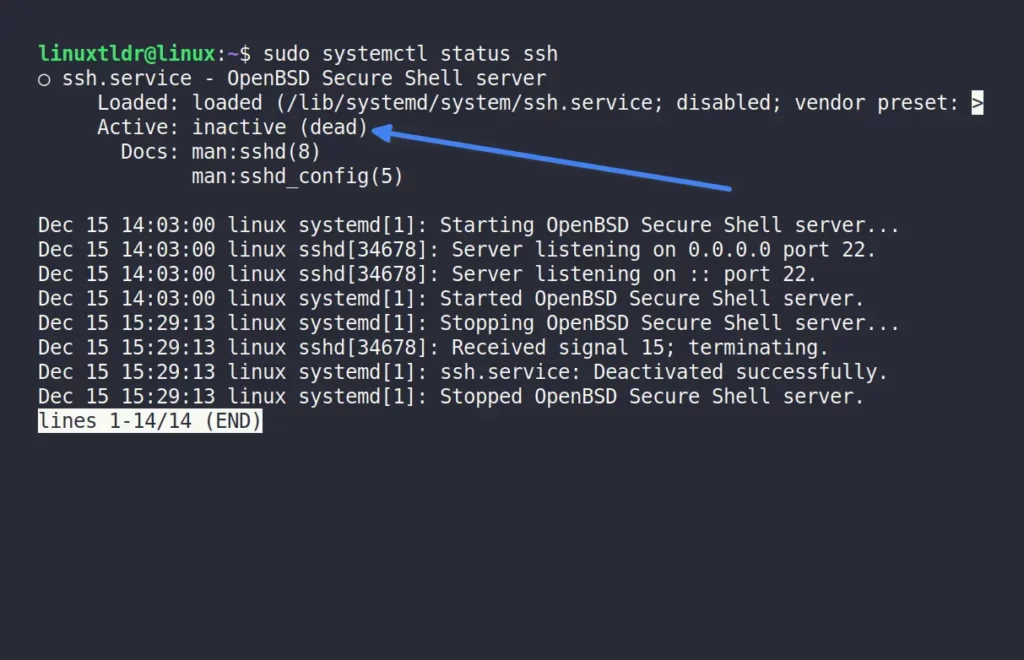
As you can see, the server is inactive (meaning it is not running), so execute the following command to start the server on the remote machine:
$ sudo systemctl start ssh                                                                          #On Debian and Ubuntu
$ sudo systemctl start sshd                                                                        #On Red Hat and Fedora
$ sudo systemctl start sshd                                                                        #On Arch and Manjaro
Output:

After starting the server, re-execute the one step previous command to verify the SSH server status.
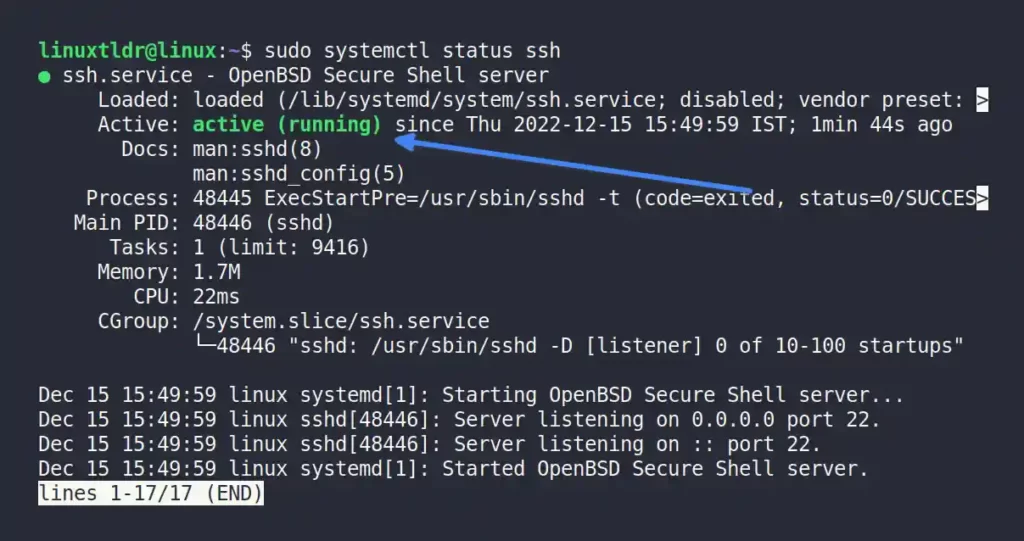
As you can see, the server has been started.
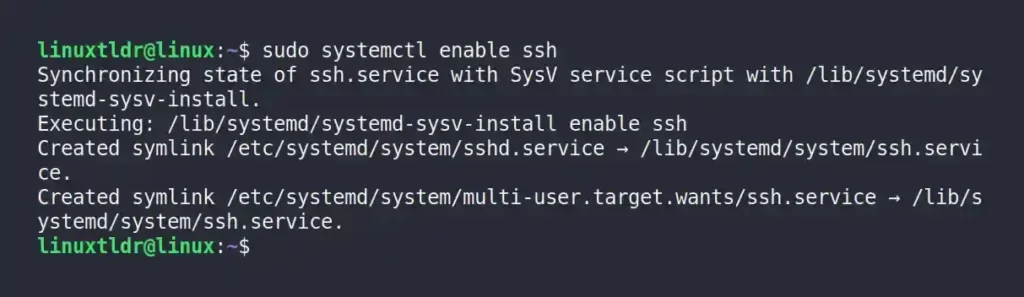
Also, execute one of the following commands that will automatically start the SSH server on system boot.
$ sudo systemctl enable ssh                                                                          #On Debian and Ubuntu
$ sudo systemctl enable sshd                                                                        #On Red Hat and Fedora
$ sudo systemctl enable sshd                                                                        #On Arch and Manjaro
Output:
Step 3: Allowing SSH through the Firewall
Many Linux systems (like Ubuntu) come with the built-in UFW (Uncomplicated Firewall) firewall tool that utilizes iptables to manage the network’s rules.
ufw --version” command to verify its existence.Execute the following command that will allow you to access the SSH server over the UFW firewall:
$ sudo ufw allow sshOutput:

The status of UFW can be checked using the “sudo ufw status” command.
Connecting to the Remote Server from the Client Machine
By default, most Linux distributions ship the OpenSSH-Client program; if it does not exist, execute any one of the following commands to install it on your local/client machine.
$ sudo apt install openssh-client #On Debian and Ubuntu
$ sudo dnf install openssh-clients #On Red Hat and Fedora
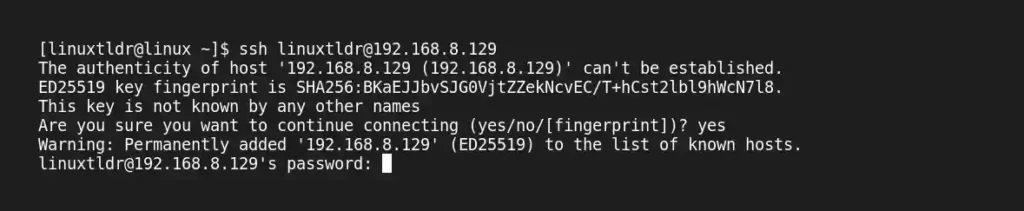
$ sudo pacman -S openssh #On Arch and ManjaroAfter the installation is complete, specify the remote machine username and hostname/IP (if you don’t know the IP address, execute the “ip addr” command in your remote server) to connect with it from your local/client machine.
$ ssh [email protected]The first time you connect to a remote server, it will ask for your permission to add the host. Type “yes” and hit the “enter” key.

Next, it will ask for a password. Enter the password for the respective username and hit the “enter” key.
Hail! You have now successfully logged into your remote server.
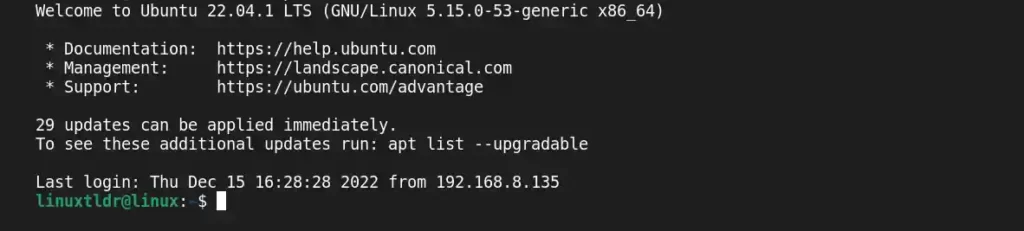
Now you can do all the stuff with your remote server (as a physical system).
Closing the SSH Connection
After you’re done with your work, just type “exit” and hit the “enter” key to close the connection between the remote and client machines.

Stopping, Disabling, and Removing the SSH
Execute one of the following commands to stop the SSH server on the remote machine:
$ sudo systemctl stop ssh                                                                          #On Debian and Ubuntu
$ sudo systemctl stop sshd                                                                        #On Red Hat and Fedora
$ sudo systemctl stop sshd                                                                        #On Arch and Manjaro
Then execute the following command to prevent the SSH server from automatically starting on system boot on the remote machine:
$ sudo systemctl disable ssh                                                                          #On Debian and Ubuntu
$ sudo systemctl disable sshd                                                                        #On Red Hat and Fedora
$ sudo systemctl disable sshd                                                                        #On Arch and Manjaro
Lastly, if you want to remove the SSH server from the remote machine, then execute the following command:
$ sudo apt remove openssh-server                                                             #On Debian and Ubuntu
$ sudo dnf remove openssh-server                                                             #On Red Hat and Fedora
$ sudo pacman -R openssh                                                                           #On Arch and Manjaro
And you do not have to remove it from your local/client machine, as it does not affect anything.
So that was the end of this giant article.
SSH is an amazing tool, and I tried to keep this article short (sorry, it went a little long) and friendly for beginners. However, if you have any suggestions or are stuck on any step, feel free to ask for help in the comment section.
Until then, sayonara!
Also read the following article to sharpen your skills:


