
The Dive tool is only helpful to individuals looking for a way to identify each layer of a Docker image. The reason could be reducing the image size or understanding the function of each layer.
Dive is an excellent tool, particularly for those who enjoy gaining insight into the changes made within a Docker image (on each layer) following the base image.
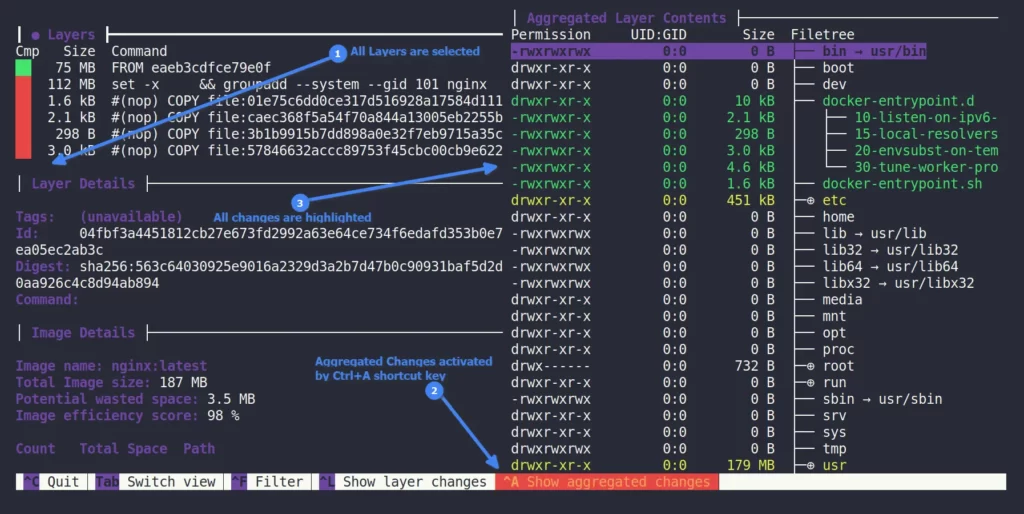
For a sneak peek, take a look at the following image!
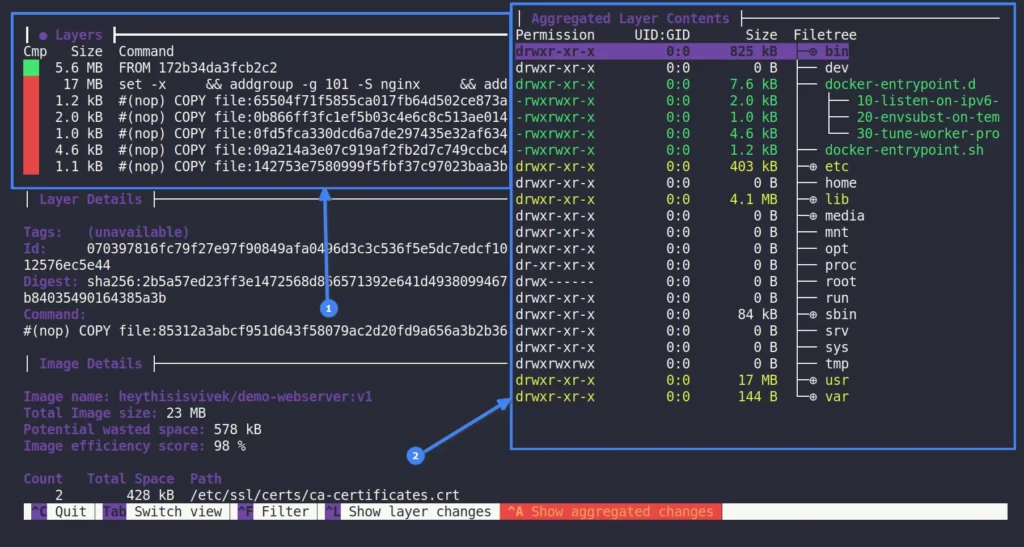
Don’t leave the article yet; I know the information shown in the above image might be overwhelming 🤯. I’ve highlighted the crucial part.
If you examine the first highlighted area, it displays all the layers within the chosen image, while the second highlighted area reveals all the modifications (marked in green and yellow) made by each layer.
While standard users may not find this information captivating, a prodigy can find it very interesting and can explore the inner workings of Docker images.
So stick with this article to learn how to install the Dive tool in your preferred Linux distribution and use it to explore each layer of your favorite Docker image.
Tutorial Details
| Description | Dive Tool |
| Difficulty Level | Moderate |
| Root or Sudo Privileges | Yes (for installation) |
| OS Compatibility | Ubuntu, Manjaro, Fedora, etc. |
| Prerequisites | docker |
| Internet Required | Yes (for installation) |
How to Install the Dive Tool on Linux
One of the great advantages of this tool is its flexibility in installation, offering you a handful of options. So, let’s begin by…
Installing Dive on an Ubuntu or Debian-based Distribution
The installation steps are very simple; just open your terminal and fire the following commands one after another, and you are done.
$ export DIVE_VERSION=$(curl -sL "https://api.github.com/repos/wagoodman/dive/releases/latest" | grep '"tag_name":' | sed -E 's/.*"v([^"]+)".*/\1/')
$ curl -OL https://github.com/wagoodman/dive/releases/download/v${DIVE_VERSION}/dive_${DIVE_VERSION}_linux_amd64.deb
$ sudo apt install ./dive_${DIVE_VERSION}_linux_amd64.deb
Installing Dive on a Fedora or Red Hat-based Distribution
To begin on RHEL and Fedora systems, open your terminal and execute the following commands in order:
$ export DIVE_VERSION=$(curl -sL "https://api.github.com/repos/wagoodman/dive/releases/latest" | grep '"tag_name":' | sed -E 's/.*"v([^"]+)".*/\1/')
$ curl -OL https://github.com/wagoodman/dive/releases/download/v${DIVE_VERSION}/dive_${DIVE_VERSION}_linux_amd64.rpm
$ rpm -i dive_${DIVE_VERSION}_linux_amd64.rpm
Installing Dive on an Arch or Manjaro-based Distribution
If you are an Arch user, then you have great news, as this tool is available in the Arch Extra repository and can be easily installed using Pacman, as shown.
$ pacman -S diveInstalling Dive via Homebrew
If you’re using a Mac or have the Brew package manager installed on your Linux system, you can use the following command to install Dive:
$ brew install diveInstalling Dive via Go
To run this, you need to have Go installed on your system. Please make sure it’s installed before proceeding.
$ go get github.com/wagoodman/diveInstalling Dive with the Docker Command
To set up Dive as a Docker image and use it, you can define the “dive” alias in your shell configuration file, as shown.
alias dive="docker run -ti --rm -v /var/run/docker.sock:/var/run/docker.sock wagoodman/dive"The Dive image will be downloaded the first time you execute the above command.
Usage of the Dive Tool
You can start by assigning a Docker repository to the Dive command; if the specified image is already present locally, it will be used; otherwise, it will be downloaded from Docker Hub (default).
$ dive nginx:latestOutput:
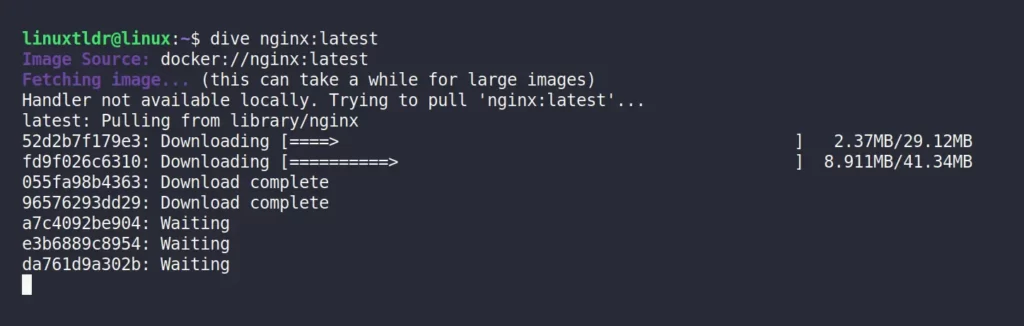
The image wasn’t found locally, so it started downloading it from the Docker hub.
While talking about image downloading, by default it uses Docker Hub as the source, but you can easily change it to a different source using the “--source” flag.
$ dive <your-image> --source <source>

#OR

$ dive <source>://<your-image>
Now, once your image is downloaded, you will be prompted to the following screen:

The Dive tool screen is primarily segmented into five sections; let’s understand them individually.
- Layers section displays all the various layers used in creating the final image, with the first layer typically being the base image 🍨.
- Current Layer Contents will show the base image (or first layer) directory structure, and changes made due to the selected layer in the base image will be highlighted.
- Layer Details will show the specific tags, id, digest, and command information of the selected layer.
- Image Details provides a concise overview of the selected image name, size, wasted space (less is good), and an efficiency score (more is good).
- Navigation area displays all the key bindings (where “^” = “Ctrl Key“).
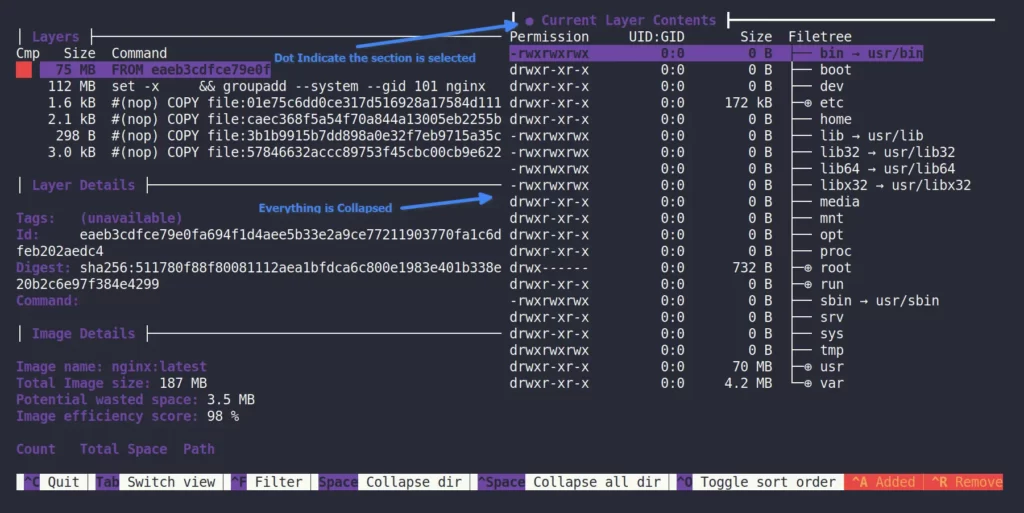
To begin, I recommend collapsing the expanded directory structure in the right section, which is also referred to as the “Current Layer Contents“, to make it easier for identifying each layer changes made to the base image.
To achieve this, just press the “Tab” key to change the view and then use the “Ctrl+Space” shortcut to collapse all directories.
Once again, use the “Tab” key to return to the “Layer” view and navigate to various layers using the Arrow key.
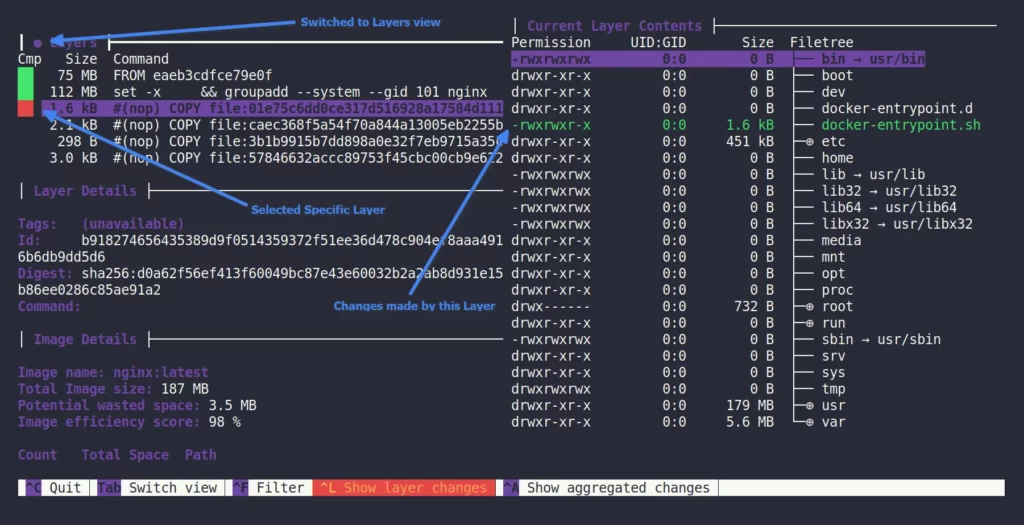
As you navigate through different layers, you have the option to pause at a particular layer (marked with a red box).
When you review the “Current Layer Contents” section, you’ll find that all modifications performed on the chosen layer are highlighted.
You can also view all the cumulative image modifications made by all the layers in one go by scrolling to the bottom of “Layers” and then using the “Ctrl+A” shortcut key.
You can also refer to the following list of shortcut keys that can be quite useful during the inspection process:
| Shortcut Key | Description |
|---|---|
| Ctrl + C | Quit |
| Tab | Switch between layer and filetree views |
| Ctrl + F | Filter files based on provided keyword |
| Ctrl + A | Display all the aggregated image modifications |
| Ctrl + L | Display current layer modifications |
| Space | Collapse/uncollapse a directory |
| Ctrl + Space | Collapse/uncollapse all directories |
| Ctrl + U | Show/hide only the modified files |
| Ctrl + B | Remove “Permission“, “UID:GID“, and “Size” column from layers content and only display the file attributes |
| Ctrl + R | Show/hide removed files |
| Ctrl + M | Show/hide modified files |
That would be enough to guide you through your further journey with the Dive tool.
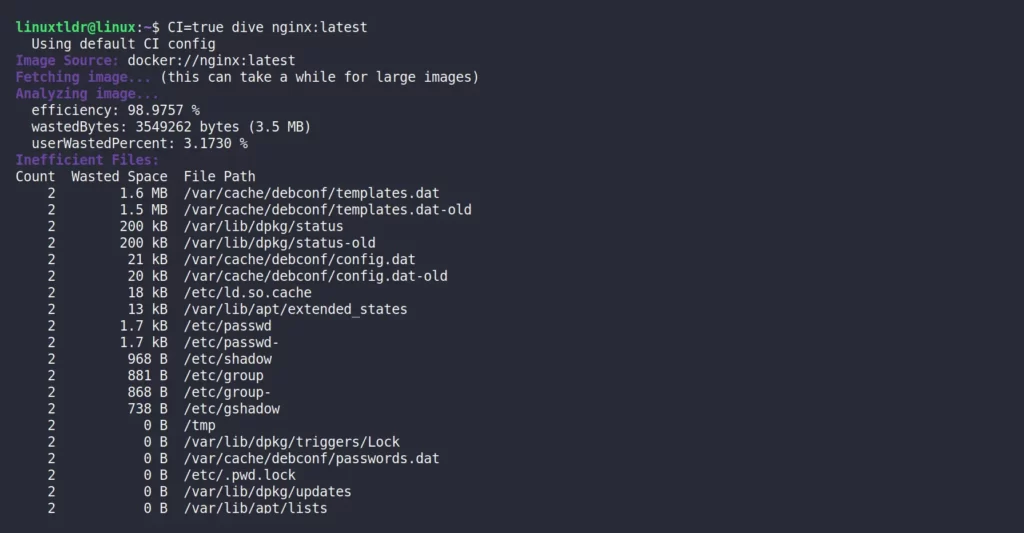
However, before concluding this article, I’d like to mention that you can also append “CI=true” to the “dive” command in order to examine all the waste files that occupy an unnecessary space in the selected image (this bypasses the need for the UI).
$ CI=true dive nginx:latestOutput:
And with that, we will end this article. Now the removal steps are skipped, as I consider users using Docker to be experienced enough to do it themselves.
However, if you have any questions or queries related to this article, then feel free to ask them in the comment section.
Till then, peace!


