
FFmpeg (a.k.a. Fast Forward MPEG) is a robust, free, and open-source framework packed with a vast suite of libraries and programs for handling basic to advanced multimedia processing.
It can perform tasks such as recording, converting, and streaming audio and video, making it the foundation for many GUI programs like OBS Studio, VLC Media Player, Handbrake, Zoom, Discord, and many others.
It is quite important to know that FFmpeg is a software suite that offers various other tools such as ffplay (lets you play audio/video files), ffmpeg (lets you convert files into a variety of formats), ffserver (lets you stream live broadcasts), and ffprobe (lets you analyze multimedia streams).
As I’ve stated earlier, many GUI programs use it as a backend, but if you are comfortable with the command line, you can perform almost all tasks related to multimedia processing directly in your terminal.
So, stick with this article to learn about the installation of FFmpeg on your preferred Linux system and lots of command-line examples of its usage.
Tutorial Details
| Description | FFmpeg (a.k.a. Fast Forward MPEG) |
| Difficulty Level | Moderate |
| Root or Sudo Privileges | Yes (for installation) |
| OS Compatibility | Ubuntu, Manjaro, Fedora, etc. |
| Prerequisites | – |
| Internet Required | Yes (for installation) |
How to Install FFmpeg on Linux
FFmpeg is a widely popular and mature application, available in most Linux repositories and easily installable via the default package manager.
So, simply launch your terminal and execute one of the following commands, based on your Linux distribution, to initiate the installation of FFmpeg.
$ sudo apt install ffmpeg                                                                           #For Debian, Ubuntu, Linux Mint, etc.
$ sudo dnf install ffmpeg                                                                           #For RHEL, Fedora, Alma Linux, etc.
$ sudo pacman -S ffmpeg                                                                         #For Arch, Manjaro, EndeavourOS, etc.
Once the installation is complete, you can move on to the next section to learn about its command-line usage.
Usage of FFmpeg with Examples
The command-line usage of FFmpeg is straightforward, and its options are easy to remember. However, always make sure to specify your input file with the “-i” option; files without this option will be automatically considered output files.
And also, do not place the output options before the input options; otherwise, it can lead to an error.
# Incorrect
ffmpeg -c:v libx264 -i input.mp4 output.mp4

# Correct
ffmpeg -i input.mp4 -c:v libx264 output.mp4
To prevent accidental damage to your files, always ensure the use of the “-n” flag to avoid overwriting without confirmation.
So, keeping all this in mind, let’s proceed with the first FFmpeg command-line example.
Get Media File Information
To get information related to a specific media file, specify it in the “ffmpeg” command using the “-i” option as the input file without specifying an output file.
$ ffmpeg -i video.mp4Output:
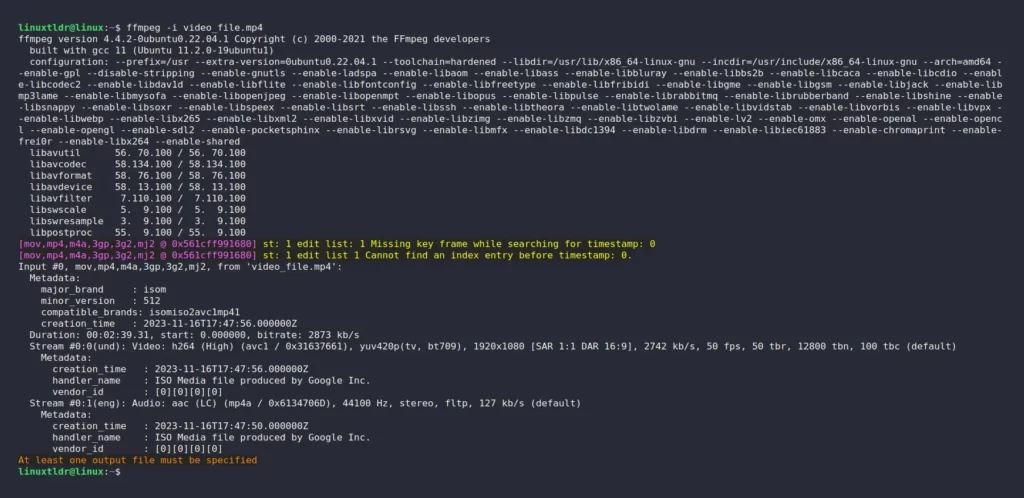
This way, you can also check information of other media files, such as MP3, as well as files like JPG, PNG, and many others.
$ ffmpeg -i audio.mp3
$ ffmpeg -i image.jpg
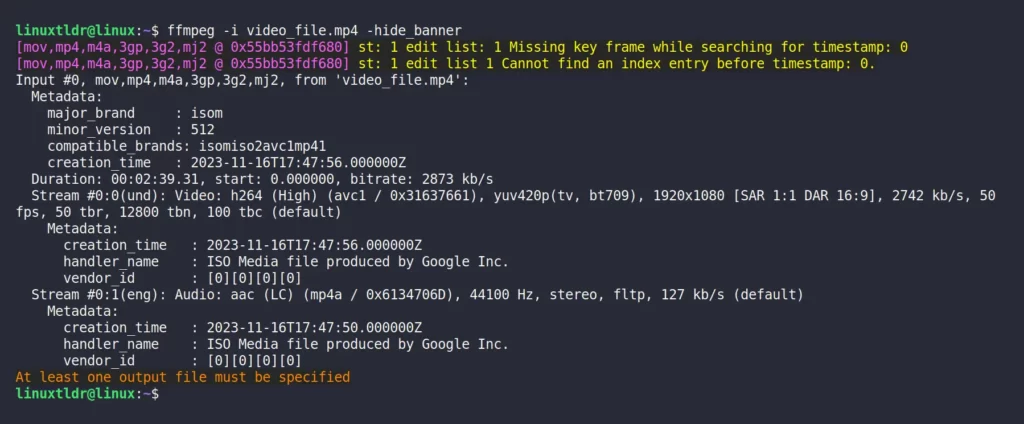
$ ffmpeg -i image.pngYou might assume that the information offered by FFmpeg is quite comprehensive, as it also includes details related to FFmpeg itself. Therefore, to prevent the printing of irrelevant information from FFmpeg, you can use the “-hide_banner” flag.
$ ffmpeg -i video.mp4 -hide_bannerOutput:
Convert Media Files
FFmpeg supports around 397 file formats, and if you exclude your existing file format, you can convert your existing file into 396 formats using the following single-line command:
$ ffmpeg -i input.avi output.mp4
$ ffmpeg -i input.flv output.mp4
$ ffmpeg -i input.ts output.mp4
$ ffmpeg -i input.webm output.mp4
$ ffmpeg -i input.ogg output.mp3
$ ffmpeg -i input.wav output.mp3
$ ffmpeg -i input.flac output.mp3
Apart from converting a single input file to a single output file format, you can easily convert the existing input file to multiple file formats by specifying each of them with a space as a separator.
For example, the below command will convert the input file from AVI format to MP4 and MP3 formats.
$ ffmpeg -i video.avi video.mp4 audio.mp3Until now, all the above-mentioned commands have re-encoded the audio and video codecs from the input file, indirectly increasing the duration of the conversation.
However, you can use “-c:a copy” for audio codecs and “-c:v copy” for video codecs from the input file to avoid re-encoding codecs from scratch, making the conversion process much faster.
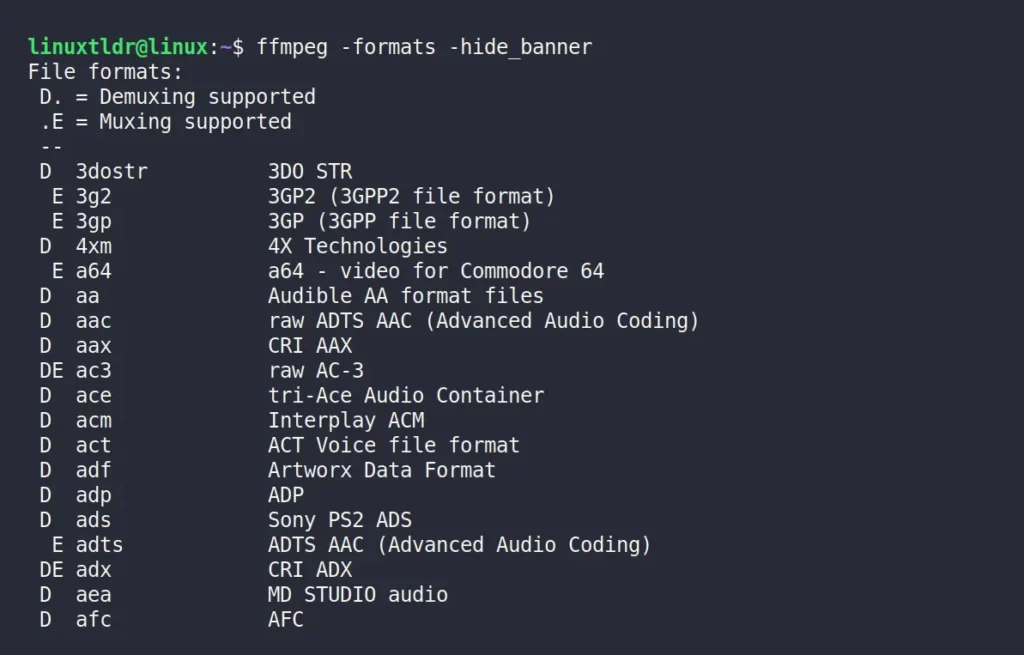
$ ffmpeg -i input.avi -c:a copy -c:v copy output.mp4To check the list of all supported formats, execute the following command:
-hide_banner” to prevent the display of the sticky banner from FFmpeg.$ ffmpeg -formats -hide_bannerOutput:
Extract Images from the Video
Extracting images (also referred to as frames) can be quite useful in scenarios where you require a snapshot of a specific timeframe from a video, for example, extracting frames from a slideshow.
For example, the following command will extract each frame from a video (“input.mp4“) and save them as individual PNG images (“output1.png“, “output2.png“, etc.).
$ ffmpeg -i input.mp4 output%d.pngAlternatively, execute the following command to extract frames from a video, capturing 1 frame every 5 seconds, and save them as individual PNG images.
$ ffmpeg -i input.mp4 -vf fps=1/5 output%d.pngFinally, rather than using “%d” in “output%d.png” to create files like (“output1.png“, “output2.png“, …), you can use “%2d” (for a two-digit format) to produce files such as (“output01.png“, “output02.png“, …), or “%3d” (for a three-digit format).
Convert Images into a Video
If you have numerous images (or frames) from a particular video that you want to use for creating a new video file or slideshow, you can use ffmpeg for assistance.
For example, the following is the simplest way to convert images in the format (“output1.png“, “output2.png“, etc.) to an mp4 file using the “image2” format for frame.
$ ffmpeg -f image2 -i output%d.png video.mp4If the images you want to use for generating the video file are mixed with other media files and naming is unordered, you can use a global expression to specifically select files with the extension (for example, “.png“) for generating the video file.
$ ffmpeg -f image2 -pattern_type glob -i "*.png" video.mp4Extract Audio from the Video
To extract audio from a video (“input.mp4“) without re-encoding and save it as an mp3 file (“output.mp3“), execute the command.
$ ffmpeg -i input.mp4 -vn audio.mp3Note that the above command will utilize the original video file for bitrate when extracting the audio file, but you can manually specify it using the “-ab” (audio bitrate) flag.
Bitrate is the amount of data transferred to an audio file. The higher the bitrate, the better the audio quality, ensuring good audio fidelity.
The common bitrates are 96k, 128k, 192k, 256k, and 320k, any of which you can use to extract the audio file from your video.
$ ffmpeg -i input.mp4 -vn -ab 320k audio.mp3Lastly, you can specify various information using different flags, such as the “-acodec” flag for specifying the codec, “-ar” for audio frequency (22050, 44100, 48000), the “-ac” flag for audio channels, and the “-f” flag for format (auto-detected).
$ ffmpeg -i input.mp4 -vn -ar 44100 -ac 2 -ab 320k -f mp3 audio.mp3Mute Audio in Video
To transform your video into a silent film reminiscent of the 80s, use the “-an” option with ffmpeg to instruct it to exclude audio streams from the output file by running.
$ ffmpeg -i input.mp4 -c copy -an output.mp4The above command utilizes the video file “input.mp4” with the “-i” option, copying its codec for the video without re-encoding (thus saving time). It also excludes audio streams from the output file (“output.mp4“) using the “-an” option.
Add Audio to the Video
To add an audio stream to a video file with missing sound, use the “-i” option to specify the video (with the missing audio file) and the audio file. Use “-c:v” to duplicate video codecs without re-encoding and “-c:a” to duplicate audio codecs without re-encoding by executing the command.
$ ffmpeg -i input.mp4 -i audio.mp3 -c:v copy -c:a copy output.mp4Additionally, you can use the “-strict experimental” option to enable the use of experimental encoders, such as AAC.
Add a Watermark to the Video
To add a watermark (“watermark.png“) to a video (“input.mp4“) with an offset of 10 pixels from the right and bottom edges, then execute.
$ ffmpeg -i input.mp4 -i watermark.png -filter_complex "overlay=W-w-10:H-h-10" output.mp4The command above will utilize the default image size in the video as a watermark, which can be quite large depending on the image. Instead, you can use the following command to scale down the image to a specific size while embedding it in the video for a watermark.
$ ffmpeg -i input.mp4 -i watermark.png -filter_complex "[1:v]scale=100:75[watermark];[0:v][watermark]overlay=W-w-10:H-h-10" output_with_scaled_watermark.mp4Extract Subtitle from the Video
To extract subtitles from the video (“input.mp4“), you must first identify the stream index of the subtitles (especially for the video with multiple subtitles) and then use the “map” option to extract them.
$ ffmpeg -i input.mp4 -map 0:s:0 subtitle.srtThe above command is mapping the subtitle stream to “0:s:0“, which means the first subtitle stream of the input file. You can adjust this value as needed, depending on the input file.
For example, you can check the details of the input file, including the stream indices, by using the following command:
$ ffmpeg -i input.mp4Then look for the subtitle stream in the output. It might be listed as something like “Stream #0:2(eng): Subtitle: subrip“. In this case, you would use “-map 0:s:2” to extract the subtitle.
Add Subtitles to the Video
The following command will merge the “subtitle.srt” file with the input file “input.mp4“, resulting in the output file “output.mp4” with embedded subtitles.
$ ffmpeg -i input.mp4 -i subtitle.srt -c copy -c:s mov_text output.mp4The “-c copy” flag is used here to duplicate the video and audio streams from the input file without re-encoding, saving time. Additionally, “-c:s” is used to specify the codec, in this case, “mov_text”, commonly used for text-based subtitles in MP4 files.
Extract Cover Art from the Audio
The following command will extract the audio cover from the provided “input.mp3” and save it with the output file name “cover.jpg“.
$ ffmpeg -i input.mp3 -an -vcodec copy cover.jpgThe “-an” option is used to disable audio extraction (since we are solely interested in cover art), and “-vcodec copy” will extract the cover art stream without re-encoding, thus saving time.
Add Cover Art to the Audio
The following command will add a cover image (“cover.jpg“) into an input audio file (“input.mp3“), and the resulting output file (“output.mp3“) will feature an embedded cover image (or poster).
$ ffmpeg -i input.mp3 -i cover.jpg -map 0:0 -map 1:0 -metadata:s:v title="Album cover" -c:a copy -id3v2_version 3 output.mp3The additional flags in the above command are used for the following purposes:
-map 0:0: Maps the audio stream from the first input file.-map 1:0: Maps the image stream from the second input file (cover art).-metadata:s:v title="Album cover": Sets the title of the cover art metadata.-c:a copy: Copies the audio stream without re-encoding.-id3v2_version 3: Ensures the ID3 tags are written in the latest version for broader compatibility.
Compress Media Files
The audio and video files are compressed differently for file size reduction; for example, an audio file can be compressed to a smaller size by downgrading its bitrate.
ffmpeg -i output.mp3 -hide_banner” and check for “fltp” in the stream section.$ ffmpeg -i input.mp3 -ab 128k output.mp3
$ ffmpeg -i input.mp3 -b:a 192k output.mp3Now, in a video file, the comparison of file sizes can be done in multiple ways by tweaking the values of codec, bitrate, CRF (constant rate factor), resolution, deinterlacing, and many more.
The easiest method to reduce video file size is by lowering the video bitrate, and you can use the popular H.264 codec for video compression.
$ ffmpeg -i input.mp4 -vcodec h264 -b:v 1000k output.mp4Alternatively, you can adjust the CRF value using the “-crf” flag. A classic example would be to decrease the CRF value for a higher bitrate, thereby indirectly achieving higher-quality videos. Additionally, you can use the latest libx265 as the video codec for help.
$ ffmpeg -i input.mp4 -vcodec libx265 -crf 28 output.mp4The CRF range could be between 24 and 30, but it is free to be adjusted with other values.
Video Scaling
The input video file can be easily scaled up or down to a custom resolution by specifying the width and height. For example, in the following command, the “input.mp4” file will be scaled down to 640×480 resolution pixels (output.mp4).
$ ffmpeg -i input.mp4 -vf scale=640:480 output.mp4Adjusting the video resolution will impact the file size, making this method a good option for reducing (or compressing) the video file size.
Extracting a Specific Part of a Video File
If you have a lengthy video file and are interested in a specific part of it, you can easily extract (or remove) that part from the entire video to a separate file by running the following command:
$ ffmpeg -i input.mp4 -ss start_time -to end_time -c copy output.mp4The additional flags in the above command are used for the following purposes:
-ss start_time: Specify the starting point of the clip you want to extract. Replacestart_timewith the actual timecode (e.g., 00:01:10.000 for 1 minute and 10 seconds).-to end_time: Specify the ending point of the clip. Replaceend_timewith the desired timecode.-c copy: Copies the video and audio streams without re-encoding, preserving their original quality but potentially increasing file size.
Convert Video to GIF
If you have trimmed a clip from the full-length video using our previous method, then you can easily convert that clip to a GIF by executing the following command:
$ ffmpeg -i input.mp4 -vf scale=320:240 -f image2pipe -vcodec png pipe:1 | ffmpeg -i - -vcodec gif output.gifThe additional flags in the above command are used for the following purposes:
-vf scale=width:height: The desired video for GIF will be resized to the specified “width:height” values assigned by you.-f image2pipe: Outputs the video frames as a sequence of PNG images.-vcodec png: Encodes each frame as a PNG image.pipe:1: Pipes the PNG image sequence to the next ffmpeg command.-i -: Tells the second ffmpeg command to read the image sequence from the standard input.-vcodec gif: Encodes the PNG image sequence into an animated GIF.
Record Screen
Using this tool to record your screen could reduce your reliance on other GUI tools, like OBS Studio, used for screencasting. Thus, you can use the following command for screen recording, whereas “-f x11grab” to indicate the XSERVER, “-i :0.0” to select the entire screen (display index 0, screen index 0), and “-vcodec h264” to encode the captured video with the H.264 codec for good compression and compatibility.
$ ffmpeg -f x11grab -i :0.0 -vcodec h264 output.mp4To capture only a specific portion of your screen, use the “-geometry” option with “100x100” to set the width and height of the capturing area in pixels, and “+200+300” to position the top-left corner of the capture area 200 pixels from the left edge and 300 pixels from the top edge of the screen.
$ ffmpeg -f x11grab -i :0.0 -geometry 100x100+200+300 output.mp4Press “q” or “CTRL+C” to stop recording.
Record Webcam
Recording input from your webcam can be easily done by specifying the webcam device address (typically in the order of “/dev/video0“, “/dev/video1“, etc.) in the following command.
$ ffmpeg -i /dev/video0 output.mp4Again, press “q” or “CTRL+C” to stop recording.
Record Audio
In Linux, audio is handled using two methods: ALSA and PulseAudio. To record from either of them, ensure that the desired input recording device you want to use for recording is set to default, and then proceed to run the recording.
$ ffmpeg -f alsa -ac 2 output.wavThe additional flags in the above command are used for the following purposes:
-f alsa: Specifies the audio input device as ALSA (a Linux sound system).-ac 2: Records audio in stereo (adjust to1for mono).
To record audio from all audio playing through your speakers, including system sounds and applications, run.
$ ffmpeg -f pulse -i default -c:a pcm_s16le output.wavThe additional flags in the above command are used for the following purposes:
-f pulse: Specifies the audio input device as PulseAudio (Linux multimedia server).-i default: Selects the default audio input (desktop audio).-c:a pcm_s16le: Encodes the captured audio in a lossless format (pcm_s16le). Adjust based on your needs.
Again, press “q” or “CTRL+C” to stop recording.
Final Word
FFmpeg is a powerful command-line tool for handling multimedia processing, but commands in it can be tricky or difficult to remember, especially for beginners or infrequent users.
So, feel free to revisit this article for future reference, and if you have any suggestions or questions related to the topic, please share them in the comment section.
Till then, peace!


