
Picture multiple computers or systems communicating by sending messages, which could be updates, notifications, or data. Instead of each computer directly communicating with the others, they use Kafka as an intermediary to simplify the process.
What is Apache Kafka?
Apache Kafka is an open-source distributed message-steaming platform that uses a publish and subscribe mechanism to stream records in a distributed and scalable manner.
It was originally created by LinkedIn and later donated to an Apache software foundation. Today, it is maintained by Confluent within the Apache Software Foundation.
It is often used in modern data architectures for building data pipelines, ingesting, storing, and processing large volumes of data in real-time, and ensuring fault tolerance through multiple replicas, similar to HDFS.
Apache Kafka traditionally used Apache ZooKeeper for distributed coordination and management. However, in later versions, Kafka introduced its own internal metadata management system, reducing its dependency on ZooKeeper.
In this article, you will learn about the use case of Apache Kafka, its installation on Red Hat-based distributions like Fedora or CentOS, and a few practical examples of its usage.
Tutorial Details
| Description | Apache Kafka |
| Difficulty Level | Moderate |
| Root or Sudo Privileges | No |
| OS Compatibility | Red Hat, Fedora, CentOS, Alma Linux |
| Prerequisites | Java |
| Internet Required | Yes |
Use Case of Apache Kafka
Here are a few situations in which Apache Kafka could be your solution:
- Real-time data streaming and processing
- Log aggregation and data pipeline construction
- Event sourcing in microservices architectures
- Monitoring and tracking user activity and application metrics
- IoT (Internet of Things) data collection and processing
- Clickstream data processing for analytics
How to Install Apache Kafka on RHEL-Based Systems
Before installing Apache Kafka on a Linux system, you should know that the package names may vary depending on your Linux distribution. In this example, I’ll provide instructions for installing Kafka on RHEL-based distributions like Fedora, CentOS, Alma Linux, etc.
Step 1: Download and Install Java
To ensure smooth operation of Apache Kafka on your Linux system, it is essential to have Java JDK installed. You can easily accomplish this by installing the latest Java version through the DNF package manager.
$ sudo dnf install java-latest-openjdk -yAfter the installation, you can verify the Java version by running:
$ java -versionOutput:

Step 2: Download and Extract Apache Kafka
Visit the Apache Kafka download page (https://kafka.apache.org/downloads) and choose the latest version to download, as shown:
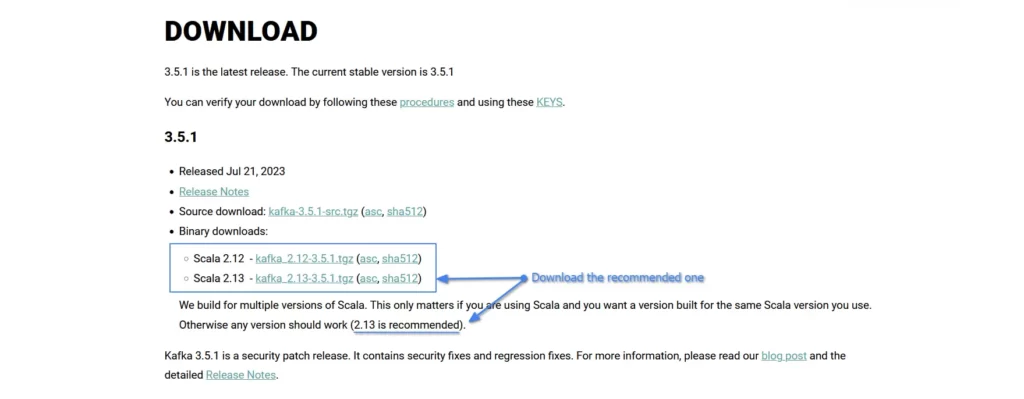
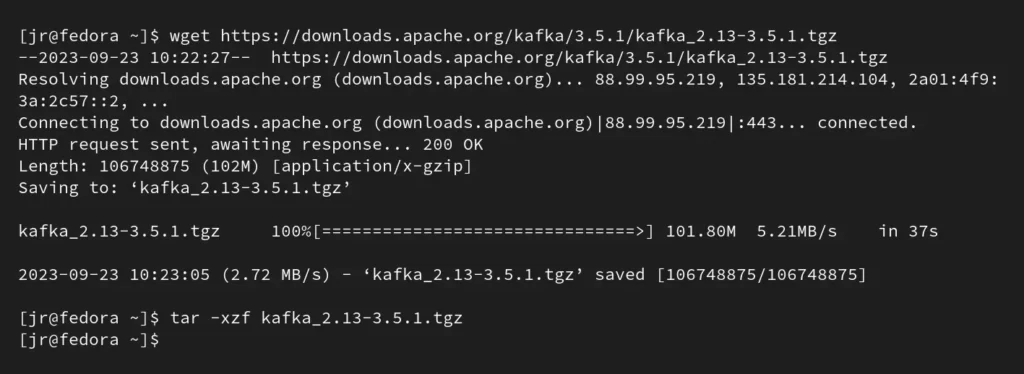
Alternately, you can use the following wget command to download the current Scala 2.13 version directly and extract it:
$ wget https://downloads.apache.org/kafka/3.5.1/kafka_2.13-3.5.1.tgz
$ tar -xzf kafka_2.13-3.5.1.tgz
Output:
Step 3: Add Kafka Bin Directory to your System Path
If you skip this part, then you have to manually navigate to the Kafka bin directory each time you want to run services, which can be both frustrating and time-consuming.
To simplify the process, consider adding the Kafka bin directory to your system path by running.
$ mv kafka_2.13-3.5.1/ kafka/                                                                                         #Renaming the directory to kafka
$ echo "export PATH=$PATH:$HOME/kafka/bin" >> ~/.bash_profile                   #Adding the binary path to your system path using shell profile
$ source ~/.bash_profile                                                                                                 #Reloading the shell profile information
Output:

Now, the entire contents of the Kafka bin directory are easily accessible from any location.
Step 4: Start ZooKeeper
The older Kafka versions used Apache ZooKeeper for distributed coordination, whereas the newer versions have introduced their own internal metadata management system, eliminating the need for ZooKeeper.
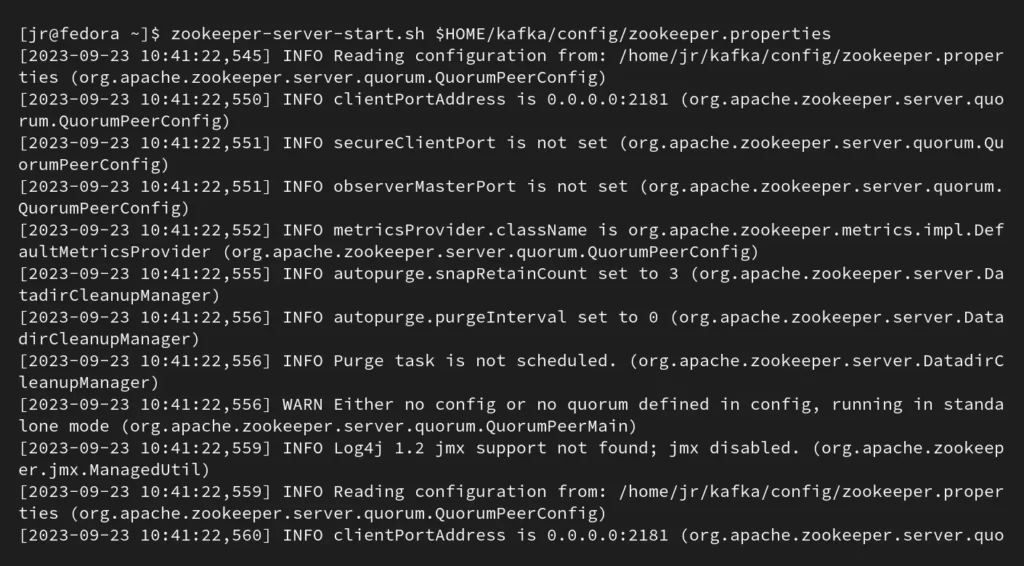
If you’re using a version of Kafka that still relies on ZooKeeper, you can start it with the following command by using its default properties:
$ zookeeper-server-start.sh $HOME/kafka/config/zookeeper.propertiesOutput:
Verify the accessibility of the Zookeeper by attempting a telnet connection to port 2181.
$ telnet localhost 2181Output:

Step 5: Start the Apache Kafka Server
You can launch the Apache Kafka server immediately using its default settings by executing the following command:
$ kafka-server-start.sh $HOME/kafka/config/server.propertiesOutput:

If you encounter the following error during your Kafka server’s execution:
kafka.zookeeper.ZooKeeperClientTimeoutException: Timed out waiting for connection while in state: CONNECTING
	at kafka.zookeeper.ZooKeeperClient.waitUntilConnected(ZooKeeperClient.scala:258)
	at kafka.zookeeper.ZooKeeperClient.<init>(ZooKeeperClient.scala:116)
	at kafka.zk.KafkaZkClient$.apply(KafkaZkClient.scala:2266)
	at kafka.zk.KafkaZkClient$.createZkClient(KafkaZkClient.scala:2358)
	at kafka.server.KafkaServer.initZkClient(KafkaServer.scala:634)
	at kafka.server.KafkaServer.startup(KafkaServer.scala:221)
	at kafka.Kafka$.main(Kafka.scala:113)
	at kafka.Kafka.main(Kafka.scala)
[2023-09-23 11:01:00,932] INFO shutting down (kafka.server.KafkaServer)
Then make sure that ZooKeeper is running before you start Apache Kafka Server, and confirm that it remains operational.
Next, confirm the accessibility of Kafka by performing a telnet connection test to port 9092.
$ telnet localhost 9092Output:

Step 6: Create a Kafka Topic (optional)
You can create a topic to test your Kafka installation. Replace “<topic-name>” with the desired topic name (let’s say “linuxtldr“) from the following command:
$ kafka-topics.sh --create --bootstrap-server localhost:9092 --replication-factor 1 --partitions 1 --topic <topic-name>Output:

To list the topics that have been created in Apache Kafka, run:
$ kafka-topics.sh --list --bootstrap-server localhost:9092Output:

Step 7: Produce and Consume Messages (optional)
You can use Kafka command-line tools to produce and consume messages on the same topic (created previously). For example, to produce a message, run:
linuxtldr” with the actual topic name you used to create in the previous example.$ kafka-console-producer.sh --broker-list localhost:9092 --topic linuxtldrOutput:

In another terminal tab, you can consume a message by running:
$ kafka-console-consumer.sh --bootstrap-server localhost:9092 --topic linuxtldr --from-beginningOutput:

That’s it. You have successfully started Kafka produce and consume, which can be used in various scenarios, like sending real-time data streams from various sources, and its consumers can use it to process and react to these streams in applications ranging from log aggregation to IoT data processing and event-driven microservices.
Final Word
I hope you find this article useful. If you have any questions or queries related to the topic, feel free to ask them in the comment section.
Till then, peace!


