
Java is a prominent high-level programming language like C/C++, that can be used in various domains, such as web development, Android app development, the internet of things (IoT), cloud-based applications, game development, and more.
Java is famously known for its “write once, run anywhere” (WORA) philosophy, meaning that code written in Java can be executed on any platform that has a Java Virtual Machine (JVM) installed.
You can experience this hands-on once you learn how to install Java in your preferred Linux distribution by following this article, replete with prominent examples.
Tutorial Details
| Description | Installation of Java (JDK & JRE) in Linux |
| Difficulty Level | Moderate |
| Root or Sudo Privileges | Yes |
| OS Compatibility | Ubuntu, Manjaro, Fedora, etc. |
| Prerequisites | – |
| Internet Required | Yes |
Differences Between JDK, JRE, and JVM
It would be beneficial to become familiar with the terminology of JDK, JRE, and JVM before moving forward because programmers frequently use and interchange these terms, which causes significant confusion.
- JDK (Java Development Kit): It is a software package that contains all the tools and utilities required for Java application development, including JRE. If you want to write, compile, and build Java applications or applets, you need to install the JDK.
- JRE (Java Runtime Environment): It is a software package that provides a runtime environment for executing Java applications. The package contains the JVM and the Java class libraries necessary for running Java programs. If you only want to run Java applications on your system and do not intend to develop Java programs, you can install the JRE.
- JVM (Java Virtual Machine): It is a virtual machine that allows Java bytecode to be executed on different platforms without modification.
Once you are familiar with these terms and understand their differences, you can choose between JDK (for developers) and JRE (for End-Users), which one you should install.
How to Install Java on Linux
I’ll show you how to install the latest version of Java. You’ll find separate instructions for installing JDK and JRE, giving you the flexibility to choose the one that suits your needs.
Installing Java on a Debian or Ubuntu System
Open your terminal and execute one of the following commands, depending on whether you need to install JDK (which includes JRE) or solely JRE.
$ sudo apt install default-jdk -y                                                                   #for JDK (but JRE included)
$ sudo apt install default-jre -y                                                                    #for JRE
Installing Java on a Red Hat or Fedora System
For Red Hat or Fedora systems, you can use the default DNF package manager to install the latest version of the OpenJDK package, which includes both JDK and JRE.
$ sudo dnf install java-latest-openjdk -y #Include JDK and JREInstalling Java on an Arch or Manjaro System
In Arch Linux and its derivatives (like Manjaro), you can use the default Pacman package manager to install the OpenJDK package (which includes JDK and JRE) or JRE separately.
$ sudo pacman -Sy jdk-openjdk                                                                    #for JDK (but JRE included)
$ sudo pacman -Sy jre-openjdk                                                                     #for JRE
Installing Java on an openSUSE-based System
Execute the following Zypper command to install the OpenJDK package (which includes JDK and JRE) on your openSUSE-based system:
$ sudo zypper install java-11-openjdk -y #Include JDK and JREVerify the Installation
Once the installation is successfully completed, you can use the following command to verify that Java is accessible from your terminal by checking its version:
$ java -versionOutput:

Testing Java with a Sample Program
After installing Java on your Linux system, you can run Java programs using the Java Runtime Environment (JRE) or the Java Development Kit (JDK).
The following is a simple example of how to run Java programs on Linux:
1. Let’s start with a simple “Hello, World!” program. So, first create a file named “HelloWorld.java” using your favorite text editor and paste the following code:
public class HelloWorld {
    public static void main(String[] args) {
        System.out.println("Hello, LinuxTLDR!");
    }
}
2. Save the “HelloWorld.java” file to your desired location.
3. Open the terminal and navigate to the directory containing the “HelloWorld.java” file.
4. Compile the Java source code (ref: “HelloWorld.java“) using the following command:
$ javac HelloWorld.javaAfter the compilation is finished, it will generate a “HelloWorld.class” file, which contains the bytecode.
5. Run the program using the “java” (Java Virtual Machine):
$ java HelloWorldOutput:
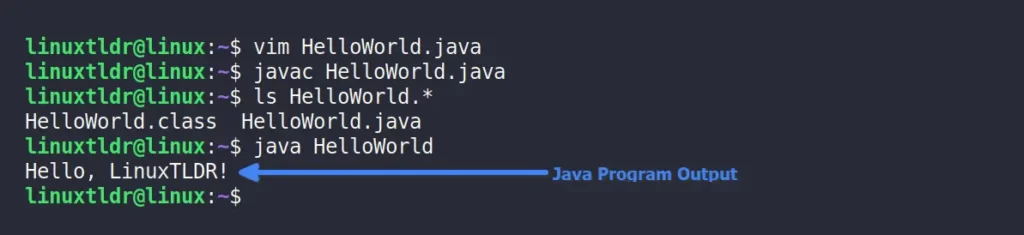
Congratulations on successfully executing your inaugural Java program!
How to Remove Java in Linux
To remove Java (JDK or JRE) from your Linux distribution, you can use the following command:
For Debian and Ubuntu:
# To remove JDK (including JRE)
$ sudo apt remove default-jdk

# To remove JRE
$ sudo apt remove default-jre
For Red Hat or Fedora:
# To remove JDK and JRE installed through DNF
$ sudo dnf remove java-latest-openjdk
For Arch or Manjaro:
# To remove JDK and JRE installed through Pacman
$ sudo pacman -R jdk-openjdk

# To remove JRE installed through Pacman
$ sudo pacman -R jre-openjdk
For openSUSE-based systems:
# To remove JDK and JRE installed through Zypper
$ sudo zypper remove java-11-openjdk
Final Word
And here comes the end of this article. Note that the steps to install multiple versions of Java and switch between them using the “update-alternatives” command on Debian/Ubuntu-based systems are intentionally skipped.
The reason was to make the installation as simple and clear as possible for beginners, specifically for the user who switched from Windows to Linux.
However, if you have any questions or queries related to this article, feel free to ask them in the comment section.
Till then, peace!


