
Assembly language is one of the most popular topics in the coding community as it offers you the ability to work at a low level that is closely tied to a computer’s architecture and hardware.
It provides a human-readable representation of machine code instructions, allowing coders to write code that can directly manipulate a computer’s hardware components, such as the CPU, memory, and I/O devices.
To start your journey in assembly programming, you’ll require a reliable assembler. Several options are available, such as MASM, TASM, and GAS, but today we’ll focus on the most widely used one: NASM assembler.
So, stay with this article to learn about NASM, installing it on your preferred Linux distribution, and running your first assembly program on Linux.
Tutorial Details
| Description | NASM (Netwide Assembler) |
| Difficulty Level | Hard |
| Root or Sudo Privileges | Yes (for installation) |
| OS Compatibility | Ubuntu, Manjaro, Fedora, etc. |
| Prerequisites | – |
| Internet Required | Yes (for installation) |
A Quick Insight into NASM Assembler
NASM, short for “Netwide Assembler“, is a widely used software tool in computer programming. It transforms assembly language code into executable machine code, or binary code, for a computer’s CPU.
It’s freely downloadable from multiple web sources. Interestingly, if you’ve installed “Development Tools” on your Linux system, NASM might already be installed, and you can verify with “whereis nasm” command.
The good thing about this assembler is that it’s well documented, you can get a lot of learning resources on the internet, and it can easily be used on both Linux and Windows.
So, you can follow the next section to learn how to install NASM on your favorite Linux distribution.
How to Install NASM on Linux
The installation is quite simple and straightforward; just launch your terminal and issue one of the following commands based on your Linux distribution to install it from your default package manager.
$ sudo apt install nasm                                                                          #For Debian, Ubuntu, Linux Mint
$ sudo dnf install nasm                                                                          #For RHEL, Fedora, AlmaLinux
$ sudo pacman -S nasm                                                                        #For Arch, Manjaro, EndeavourOS
However, it’s important to know that when using the APT package manager, it will install NASM older version 2.15.05, whereas DNF and Pacman will install the latest NASM version, which is 2.16.01 as of the time this article was written.
If you’re comfortable to compile and install it from source, which I believe won’t be a challenge for you since you’re about to learn the most complex programming language.
You can have the latest NASM assembler on your Debian or Ubuntu-based distributions by just taking a few additional steps. So, start by following the below steps:
1. Go to the official NASM website and choose your preferred source (for example, “Stable“).
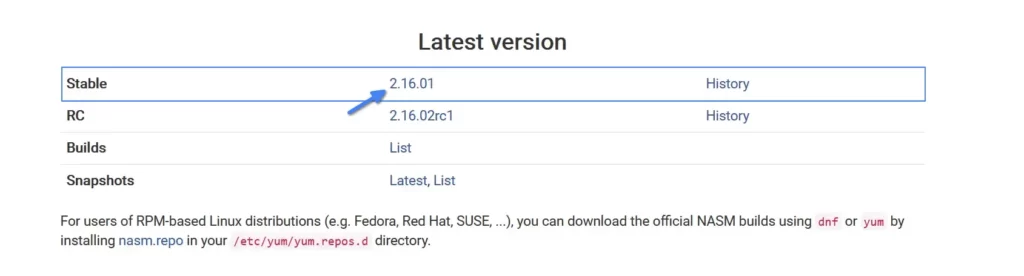
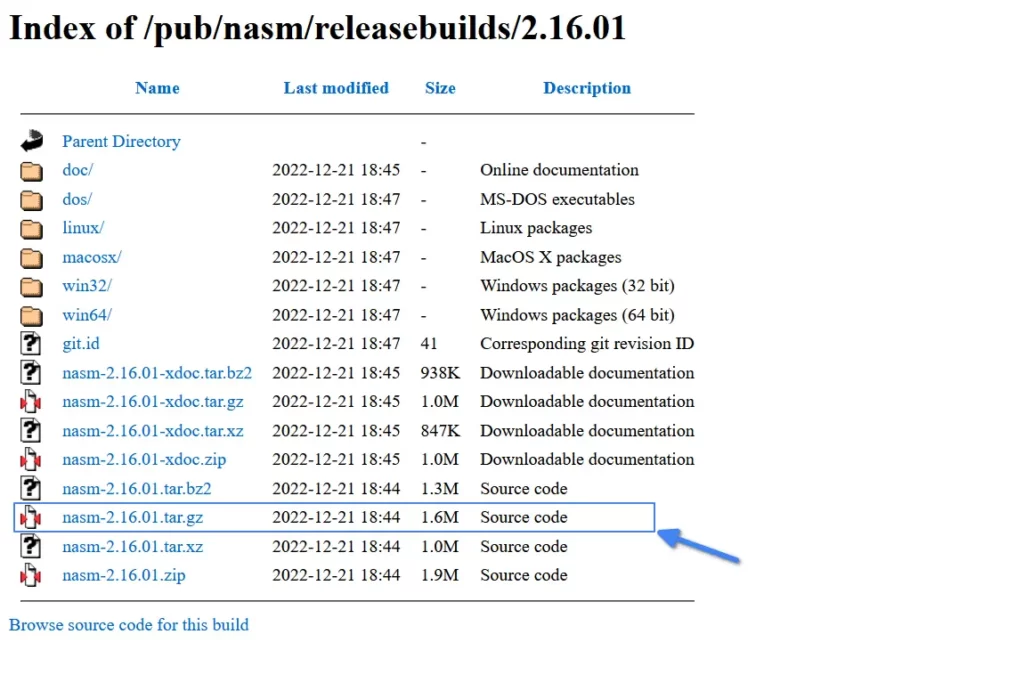
2. You’ll be directed to the index page where you should select the NASM source archive nasm-XXX.tar.gz, with XXX representing the NASM version in the archive.
3. Once you’ve downloaded the NASM archive, open your terminal, go to the download directory, and run the following series of commands to compile and install NASM from source.
$ tar -xf nasm-*.tar.gz                                                                        #Extracting the archive content
$ cd nasm-*/                                                                                        #Moving into the extracted directory
$ ./configure                                                                                         #Setting up the Makefiles
$ make                                                                                                   #Building the nasm binaries
$ sudo make install                                                                              #Installing nasm
After the installation finishes, you can check the accessibility of the NASM assembler by checking its version using the following command:
$ nasm --versionOutput:

Now, let’s learn the process of assembling and executing a basic “Hello World” program in assembly.
Write, Assemble, and Run a Simple Assembly Program
Let’s walk through a simple example of writing, assembling, and running an assembly program using NASM on a Linux system. In this example, we’ll create a program that prints “Hello, Linux TLDR!” to the console. To begin, follow the below steps one-by-one.
1. Create a text file named “hello.asm” using your choice of text editor and paste the following assembly code for our program.
section .data
    hello db 'Hello, Linux TLDR!',0

section .text
    global _start

_start:
    mov eax, 4
    mov ebx, 1
    mov ecx, hello
    mov edx, 17
    int 0x80

    mov eax, 4
    mov ebx, 1
    mov ecx, newline
    mov edx, 1
    int 0x80

    mov eax, 1
    int 0x80

section .data
    newline db 10
Save and close the file.
2. Open a terminal and navigate to the directory where “hello.asm” is located and then assemble the code using NASM.
$ nasm -f elf64 hello.asm -o hello.oThe above command tells NASM to assemble “hello.asm” into an ELF object file named “hello.o” with x64 architecture.
3. Link the object file to create an executable:
$ ld hello.o -o helloThis command uses the GNU linker (ld) to create an executable named “hello” from “hello.o“.
4. Run the assembled program:
$ ./helloYou should be able to see the following output:

That’s it! You’ve successfully assembled and run an assembly program using NASM on Linux.
This is a basic example, but it demonstrates the fundamental steps of writing, assembling, and executing an assembly program.
Final Word
Assembly programming can be quite low-level and requires a good understanding of the CPU architecture and system calls for more complex tasks.
The learning journey has a lot of curves, but you can find guidance and learning resources on the internet. To begin your journey, I would suggest you start with this tutorial.
If you are having difficulty, facing any issues, or even needing basic help, feel free to tell us via the comment section.
Till then, peace!


