
In this article, you will learn about a “lineselect” tool that allows you to interactively select single or multiple lines from stdin and output them to stdout, as shown.
What is LineSelect?
LineSelect is a free and open-source CLI tool that allows those working on the command line to interactively select single or multiple lines from stdin and output them to stdout.
I’d find it more useful when writing a shell script. Suppose you’re creating a shell script to administer a running Docker container. With this tool, you can allow users to interactively choose single or multiple running containers. After selection, you can use the stdout data to perform actions like checking container details, inspecting ports, stopping, deleting, etc.
This is one use case, but you can use it in various ways for different purposes in your shell script, and as a Node package, anyone with Node installed can effortlessly install it on their system.
So, in this article, I’ll show you how you can install LineSelect on Linux with command-line usage.
Tutorial Details
| Description | LineSelect |
| Difficulty Level | Low |
| Root or Sudo Privileges | No |
| OS Compatibility | Ubuntu, Manjaro, Fedora, etc. |
| Prerequisites | – |
| Internet Required | Yes (for installation) |
How to Install LineSelect on Linux
LineSelect is available as a Node package, allowing easy installation for users. However, most Linux distros currently ship with an older version of Node that is incompatible with LineSelect. Therefore, if you have Node version <20, you can refer to our article on installing the latest version of Node.
Once you have it installed, run the following NPM command in your terminal to install LineSelect.
$ npm install -g lineselectOnce done, run the following command to verify it’s functioning without any errors:
$ lineselectOutput:
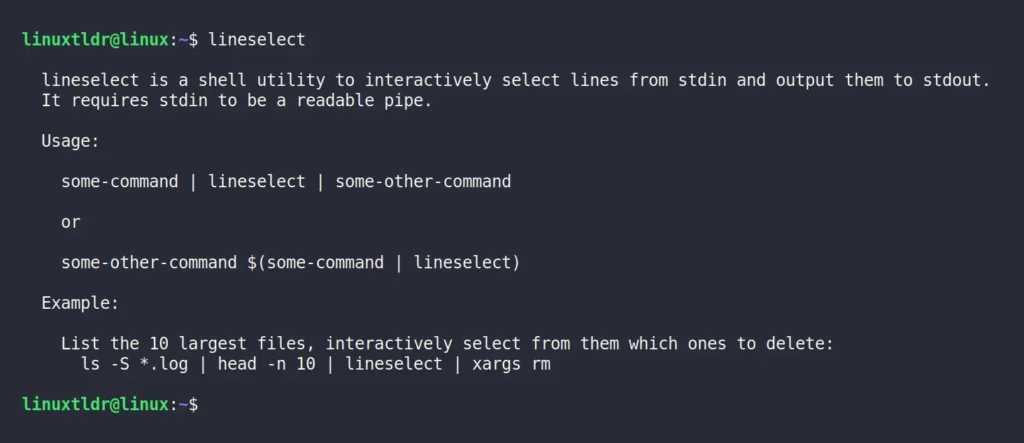
If you get the same output as shown above, it means you have properly installed LineSelect using the correct version of Node. Now, let’s see some usage examples…
Usage of LineSelect
To understand the use case of LineSelect within a command-line or shell script, you must first understand its basic workings by looking at the following syntax:
$ some-command | lineselect | some-othercommandHere,
- “
some-command” can be any command, such as “ls“, “docker ps“, “ps“, “ss“, etc. - “
lineselect” takes the output of the chosen command and provides an interactive interface for users to select single or multiple lines. - “
some-othercommand” will be a command where the user’s selected line will be redirected. Often, its “xargs” command is used, but it’s not limited to it.
When selecting single or multiple lines using LineSelect, remember to press the “Space” key first to select and then press “Enter” button to send the selected lines to the next command.
To showcase its use case, I’ll provide various command-line examples. Once you grasp its functionality, you can confidently use it in your own command or shell script. So, let’s start with…
1. Selecting one or more text files in the current directory using LineSelect, then removing them.
$ ls *.txt | lineselect | xargs rmOutput:
Here,
- “
ls *.txt” will list all the text files in the current directory. - “
lineselect” takes the stdin of the listed file and allows user to select between them. - “
xargs rm” will take the user-selected file and delete it.
2. Selecting the running Docker containers with LineSelect, then halting the selected one.
$ docker stop $(docker ps -q | lineselect)Output:
Here,
- “
docker stop” will wait for the user action, then stop the selected Docker container. - “
$(docker ps -q | lineselect)” lists the IDs of the running Docker containers and allows users to select one or more.
3. Listing the currently running processes, selecting a single or multiple of them using LineSelect, and then killing the selected process.
$ kill -9 $(ps -a | lineselect | cut -d " " -f 4)Output:
Here,
- “
kill -9” will wait for the user action, then kill the selected process using the “SIGKILL” signal. - “
$(ps -a | lineselect | cut -d " " -f 4)” once the users have selected from the list of running processes, the cut command will receive the output and filter the first column from the selected line.
I’ll end the article here, but you can see how easy and useful it is to use while writing a shell script. Now, if you have any questions or concerns related to the topic, do let me know in the comment section.
Till then, peace!


