
The mount command in Linux is used to mount a file system or removable storage devices like USB flash drives to a specific point in the directory tree, known as the “mount point”.
This allows files and directories on the file system or storage device to be accessed and managed like any other files on the system. Once you’re done, you can use the “umount” command to detach the mounted filesystem.
In this article, you will learn how to mount and unmount various file systems using the “mount” and “umount” commands in Linux (with practical examples).
Tutorial Details
| Description | Provides Access to an Entire Filesystem in One Directory. |
| Difficulty Level | Moderate |
| Root or Sudo Privileges | Yes |
| OS Compatibility | Ubuntu, Manjaro, Fedora, etc. |
| Prerequisites | mount, umount |
| Internet Required | No |
Listing Mounted Filesystems in Linux
The mount command is used to mount (or attach) any file system in Linux that accepts multiple arguments, most commonly are options, device, and mountpoint.
$ mount [OPTION] [DEVICE] [MOUNTPOINT]Whereas,
- OPTION: Here you can specify the commonly used “
-t type” option that defines the file system type, like EXT3, EXT4, BTRFS, XFS, HPFS, NTFS, VFAT, etc. - DEVICE: Specify the device file that represents the storage device or partition.
- MOUNTPOINT: Specify the directory where the file system will be mounted.
When you execute this command without any options or arguments, it will output all the mounted (or attached) filesystems to your Linux system.
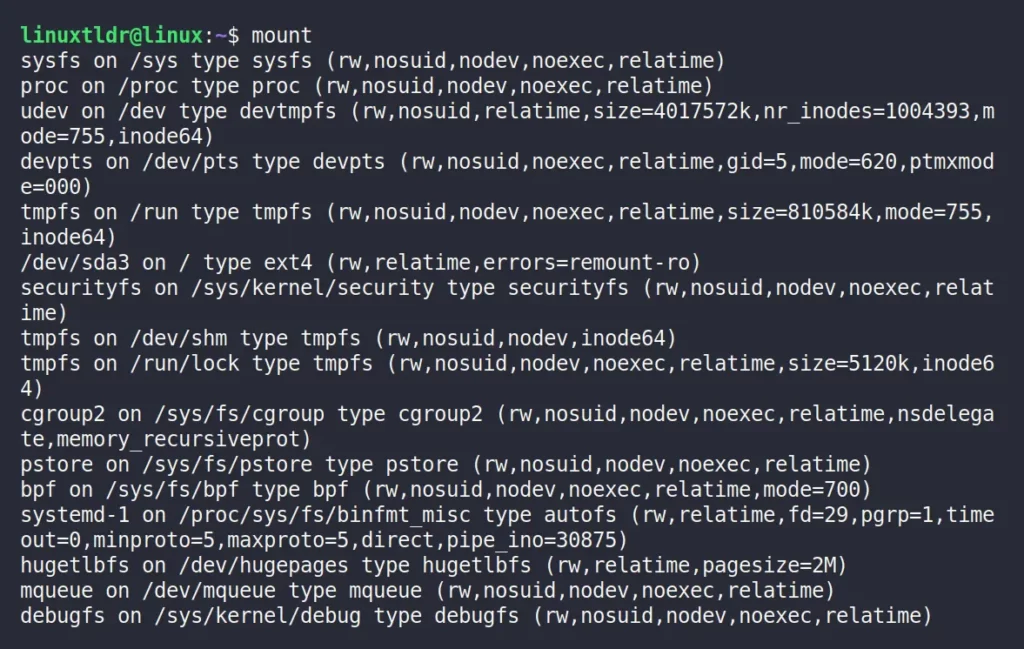
The above output contains the filesystems, including the virtual ones like cgroup, sysfs, and others. There are primarily four fields on each line of the output, followed by
- Device name.
- The directory to which the device is mounted
- Filesystem type.
- Mount options.
This long list can be filtered to display only specific file systems using the “-t” flag. For example, the following command will only list the ext4 partitions.
$ mount -t ext4Output:

Exit Status
The mount command returns one of the following exit statuses after the command execution:
0: Success1: Incorrect command execution or insufficient permissions.2. System error.4. Internal mount bug.8. Operation interrupted by the user.16. Issues with writing or locking the “/etc/mtab” file.32. Mount failure.64. At least one mount operation succeeded, but not all.
Let’s see how you can mount a filesystem on your Linux system using the mount command.
Mounting Filesystems in Linux
The simplest way to use this command is to specify the filesystems and the mount path where the referenced file system will be mounted.
Here are a few examples of how to use the “mount” command to mount different file systems:
1. Mount an EXT4 file system on “/dev/sda1” to the mount point “/mnt“:
$ sudo mount /dev/sda1 /mnt2. Mount an NTFS file system on “/dev/sdb1” to the mount point “/mnt“:
$ sudo mount -t ntfs /dev/sdb1 /mnt3. Mount an FAT32 file system on “/dev/sdc1” to the mount point “/mnt“:
$ sudo mount -t vfat /dev/sdc1 /mntUsually most of the filesystem, like EXT4 or XFS, is automatically detected while mounting, but for others you need to specify them using the option, like we previously did for NTFS and VFAT.
The following is the syntax for using the “-t” flag.
$ mount -t TYPE [DEVICE] [MOUNTPOINT]To specify additional file system-specific mount options, use the “-o” flag.
$ mount -o OPTIONS [DEVICE] [MOUNTPOINT]Multiple options can be specified using a comma as a separator; do not provide any space after the comma.
Execute the “man mount” command to get the complete list of all the options.
Mounting Filesystem Using /etc/fstab
When you just specify one parameter (either “[DEVICE]” or “[MOUNTPOINT]“) to the mount command, it will read the content of the “/etc/fstab” file to check if something identical to the given file system is listed or not.
If the “/etc/fstab” file contains the information of the given file systems, the mount command will use the value of the missing parameter, including the specified options.
Execute the following command to check the defined entries in your “/etc/fstab” file.
$ cat /etc/fstabOutput:
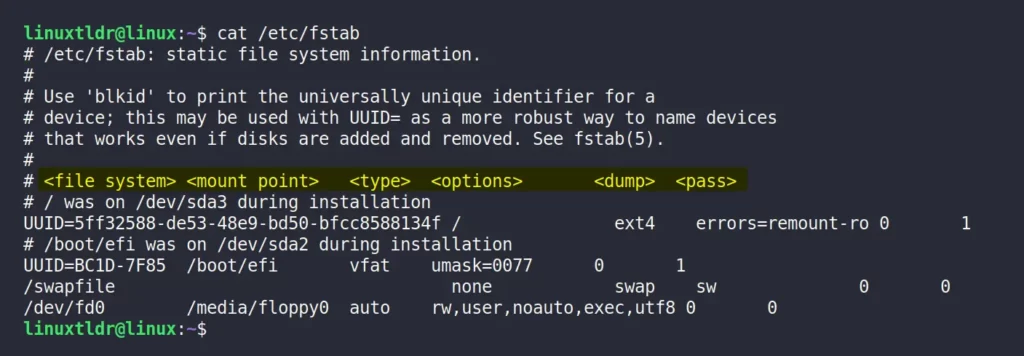
Use any one of the following commands to attach file systems specified in the “/etc/fstab” file.
$ mount [OPTION] [DEVICE]

#OR

$ mount [OPTION] [MOUNTPOINT]
Mounting a USB Flash Drive
Modern Linux distributions like Ubuntu or Red Hat automount the inserted USB flash drive in the Linux filesystem.
Unfortunately, in a few Linux distributions or when the automount fails for unknown reasons, you can follow the below steps to mount the USB flash drive manually:
1. Insert your USB flash drive into your system.
2. Use the lsblk command to list all the attached storage devices and their device files.
$ lsblkThe above command will list all the available storage devices and their device files. You can identify your inserted USB flash drive by its capacity from the provided list.
3. Create the mount point directory using the mkdir command:
$ sudo mkdir /mnt/usb4. Assuming that “/dev/sdb1” is your inserted USB flash drive, use the mount command to mount (or attach) the USB flash drive to the mount point directory.
$ sudo mount /dev/sdb1 /mnt/usbThe above command will mount the USB flash drive that is represented by “/dev/sdb1” to the mount point directory “/mnt/usb“.
Mounting CD-ROM
The CD-ROM is automatically mounted by the Linux distribution. However, if the mounting fails, you can execute the following command to mount the CD-ROM to the mount point directory:
$ sudo mount /dev/sr0 /mnt/cdrom -t iso9660 -o roWhereas,
- The CD-ROM is represented by the “/dev/sr0” device file.
- The referenced CD-ROM will be mounted in the mount point directory “/mnt/cdrom“.
- The “
-t iso9660” is the standard file system for CD-ROMs. - And, the last “
-o ro” option is used to mount it as read-only.
Mounting ISO Files
You can easily mount an ISO file by mapping its data to a loop device, which makes the file accessible as a block device. Here’s an example of how to use the mount command to mount an ISO file:
1. Create a mount point directory for the ISO file:
$ sudo mkdir /mnt/iso2. Mount the ISO file to the mount point by executing the following command:
$ sudo mount -o loop image.iso /mnt/isoWhereas,
- The “
-o loop” option is used to specify that the file is an ISO image and should be mounted as a loop device. - The “
image.iso” is the ISO image you are wanting to mount. - The “/mnt/iso” is the mount point directory.
Mounting NFS
A NFS (Network File System) is a protocol in Linux that allows users to access files and directories on a remote server as if they were local.
To mount an NFS share, you must have the NFS client package installed on your system.
$ sudo apt install nfs-common                                                                      #On Debian or Ubuntu
$ sudo dnf install nfs-utils                                                                              #On Red Hat or Fedora
Once the client package is successfully installed, you can follow the below steps to mount a remote NFS directory on your Linux system:
1. Make sure that the NFS server is running and that the share that you want to mount is exported. You can verify the exported share on the NFS server by using the following command:
$ showmount -e [REMOTE_IP]2. Create a mount point directory for the remote share:
$ sudo mkdir /media/nfs3. Use the following command to mount the NFS share to the mount point directory:
$ sudo mount -t nfs [REMOTE_IP]:/path/to/share /media/nfsGenerally, you will want to mount the NFS share automatically at boot. To do so, you can open the “/etc/fstab” file using your choice of text editor:
$ sudo nano /etc/fstab

#OR

$ sudo vim /etc/fstab
Add the following line at the end of the file and do not forget to replace the following parameters with actual ones:
# <file system>    <dir>       <type>   <options>   <dump>	<pass>
[REMOTE_IP]:/path/to/share /media/nfs  nfs      defaults    0       0
Lastly, mount the NFS share by running the following command:
$ sudo mount /media/nfsMove a Mount Point to Another Mount Point
There are two ways to move an existing mount point to another mount point. Let’s look at the first way, which involves unmounting the file system from its existing mount point and then remounting it to a new mount point.
The following is an example of how we will mount a file system mounted at “/mnt/old” to a new mount point at “/mnt/new“:
1. Unmount the file system from its existing mount point:
$ sudo umount /mnt/old2. Create a new directory for the new mount point:
$ sudo mkdir /mnt/new3. Remount the file system at the new mount point:
$ sudo mount -o bind /mnt/old /mnt/newThe “-o bind” option allows you to bind the old mount point to the new one; in this way, you are not relocating the data but creating a new link to the same data. This way, the data is accessible from both mounting points.
Of course, you must access the file system from one mount point at a time, and while accessing from another mount point, you must unmount from the existing point to avoid data loss.
In the second way, you can use the “--move” option to move your mount point to a new point while it is still mounted.
$ sudo mount --move /mnt/old /mnt/newThe above command will mount the file system from “/mnt/old” to “/mnt/new“, and this option is not supported for all the file systems, so do check your file system documentation before using it.
Unmounting Filesystem in Linux
To unmount (or detach) an attached file system from Linux, use the umount command followed by either the device name or mount point.
$ umount [DEVICE]

#OR

$ umount [MOUNTPOINT]
For example, the following command will detach the ISO image file mounted at “/mnt/iso“.
$ sudo umount /mnt/isoSometimes, executing the above command may fail to unmount the device due to an ongoing process accessing the file system.
In this situation, you can use the fuser command to find out which processes are accessing the file system:
$ fuser -m [DEVICE]

#OR

$ fuser -m [MOUNTPOINT]
Once you determine the process, you can stop or kill it, then try to unmount the file system.
Lazy Unmount
The lazy unmount is helpful, especially when your file system is being accessed by another process and you want to unmount as soon as the processes stop accessing your file system.
$ umount -l [DEVICE]

#OR

$ umount -l [MOUNTPOINT]
Forceful Unmount
This method will forcefully unmount the file system, even if another process is using it, which might also damage the files.
$ umount -f [DEVICE]

#OR

$ umount -f [MOUNTPOINT]
Note that it is not recommended to use this method unless it is absolutely necessary.
Wrap Up
In this article, you will find all the important things that, as a Linux user, you should know about mounting and unmounting file systems on Linux systems.
If you have any questions or queries related to this article, then feel free to ask them in the comment section.
Till then, peace!


