
VLC is undoubtedly the best media player out there, but the ignorance of many users in learning it properly holds them back from utilizing the advanced features that VLC offers, which can ultimately improve the user experience to the next level.
I used to be like them, ignoring the need to give it time to learn properly. But since I did, to be honest, it has become hard to imagine a day without this feature while using VLC.
In this article, I’ll list all of the features I’ve learned and found most useful and productive while using VLC, and note that these aren’t the ordinary features commonly known by others.
Tutorial Details
| Description | Tips and Tricks for VLC Media Player |
| Difficulty Level | Low |
| Root or Sudo Privileges | No |
| OS Compatibility | Windows, macOS, and Linux |
| Prerequisites | VLC Media Player |
| Internet Required | Yes (but Depend) |
Tips and Tricks for VLC Media Player
I assume you already have VLC media player installed on your system, and this article will not cover commonly known features such as displaying subtitles, adjusting volume, and others.
Instead, I’ll attempt to share some hidden gems of VLC that are rarely known or used by others and can ultimately improve the user experience to the next level. So, let’s begin with…
Play Video Frame by Frame
This method allows you to play any video frame by frame, proving particularly useful in situations where a specific scene within the timeframe is shortened and fast-forwarded to divert users’ attention, as commonly observed in movie trailers.
So, to catch a glimpse of those shortened and fast-forwarded scenes, use the default keyboard shortcut key “e” and press it continuously to move to the next frame rapidly.
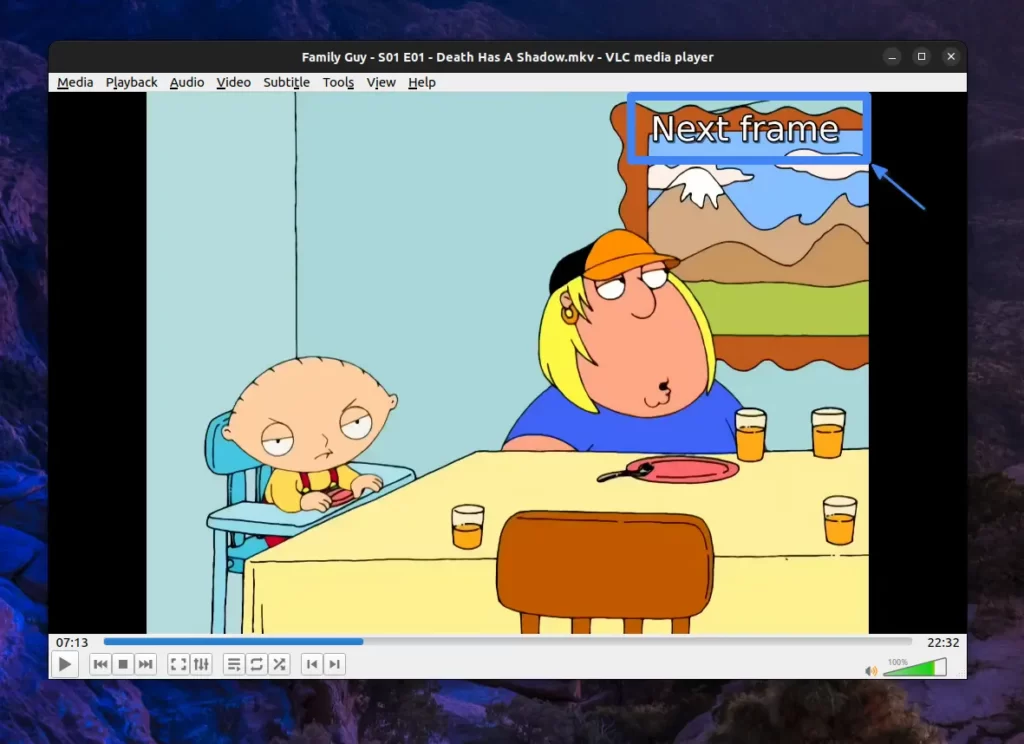
To exit from the frame-by-frame situation, you can press the “space” key to resume your video to a normal playback speed.
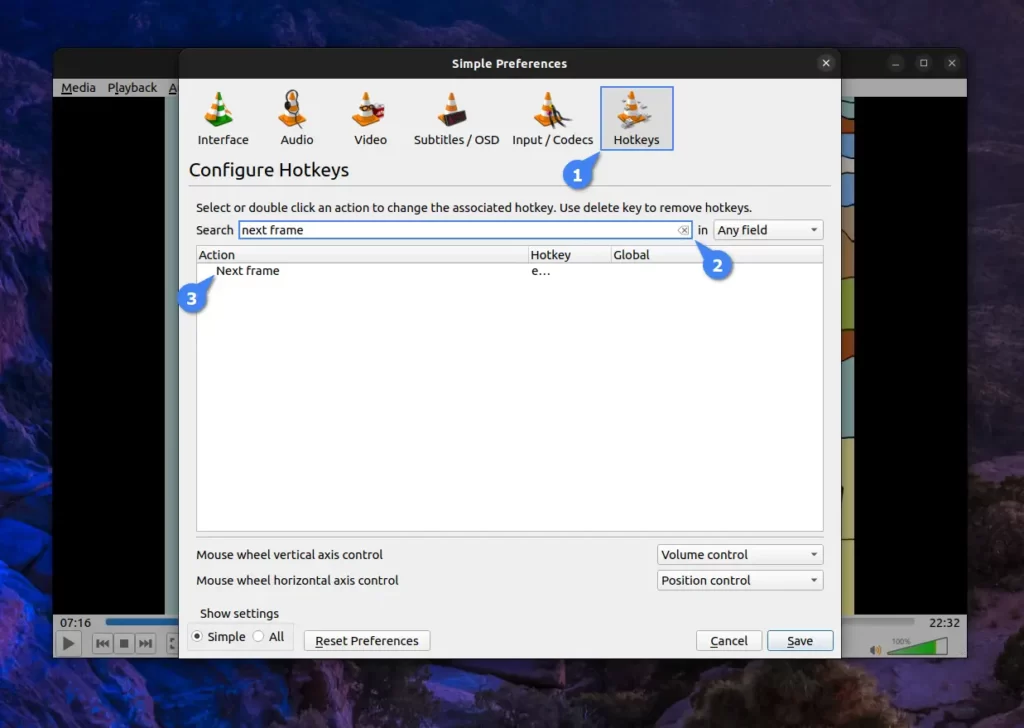
As mentioned earlier, the default shortcut key to perform this action is “e“. However, if you wish to change it to a specific key, navigate to “Tools” -> “Preferences (Ctrl+P)” -> “Hotkeys” and search for “Next frame“.
Adjust Playback Speed to 0.10x (not 0.50x) Rate
This method involves speeding up the playback speed of video at 0.10x, which is rarely known by anyone. Usually, people are aware of fast forwarding video files in VLC via the +/- key, which increases the playback speed to 0.50x per input.
However, if you have ever increased the playback speed on YouTube, which allows speeds of 0.25x per input, you may find it more comfortable than 0.50x, as it increases the video speed significantly.
Initially, I was quite disappointed with VLC for lacking the option to slightly increase the playback speed to my comfort. However, upon inspecting each option, I discovered a default “[” (slower -0.10x) and “]” (faster +0.10x) shortcut key exists that allows a slight increase in playback speed. I adjusted it to 0.30x, which is comfortable for me, by pressing the “]” key three times.
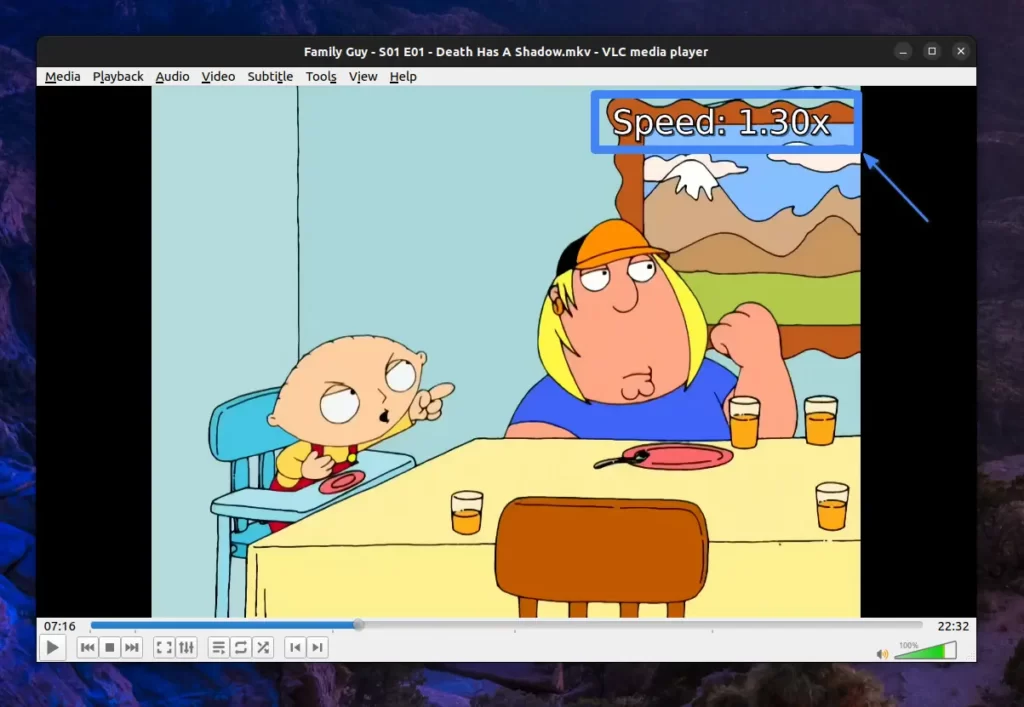
You might wonder when this method comes to the rescue. For me, it comes in handy if I’m watching a boring interview or podcast or want to speed up a particular boring scene from a movie without skipping.
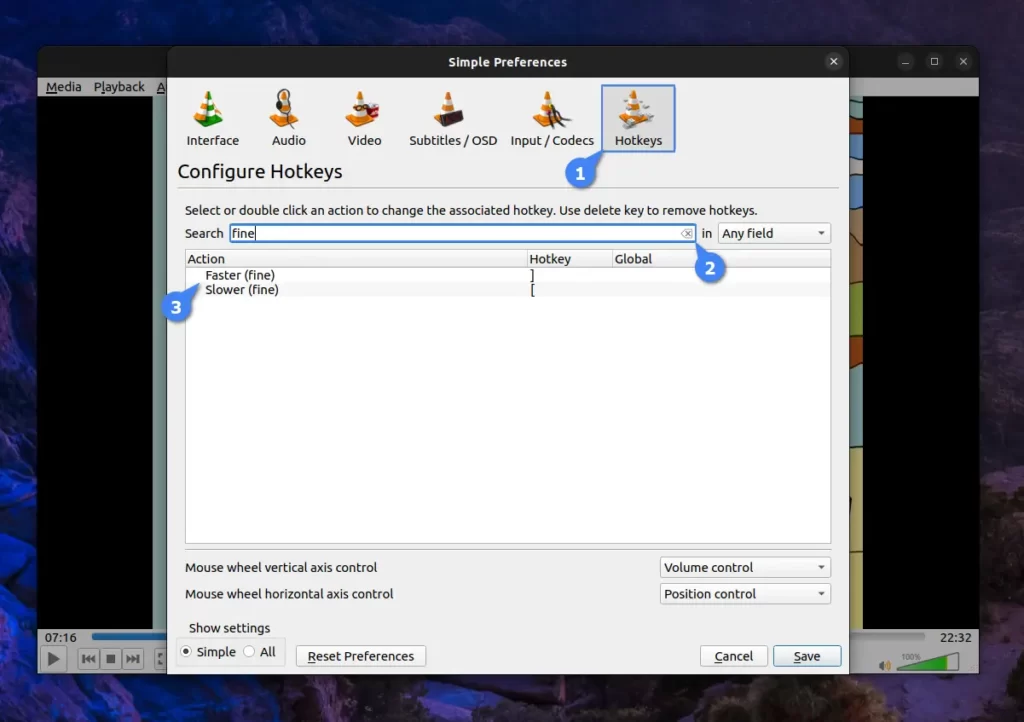
As stated earlier, the default shortcut to perform this action is “[” and “]” keys. However, if you wish to change it to a different key, navigate to “Tools” -> “Preferences (Ctrl+P)” -> “Hotkeys” and search for “fine“.
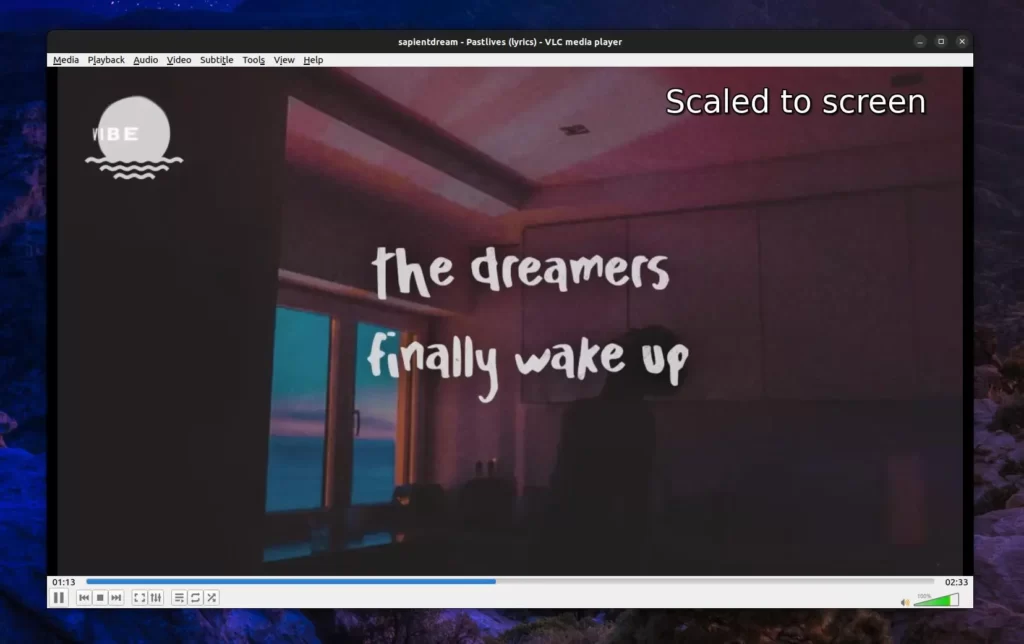
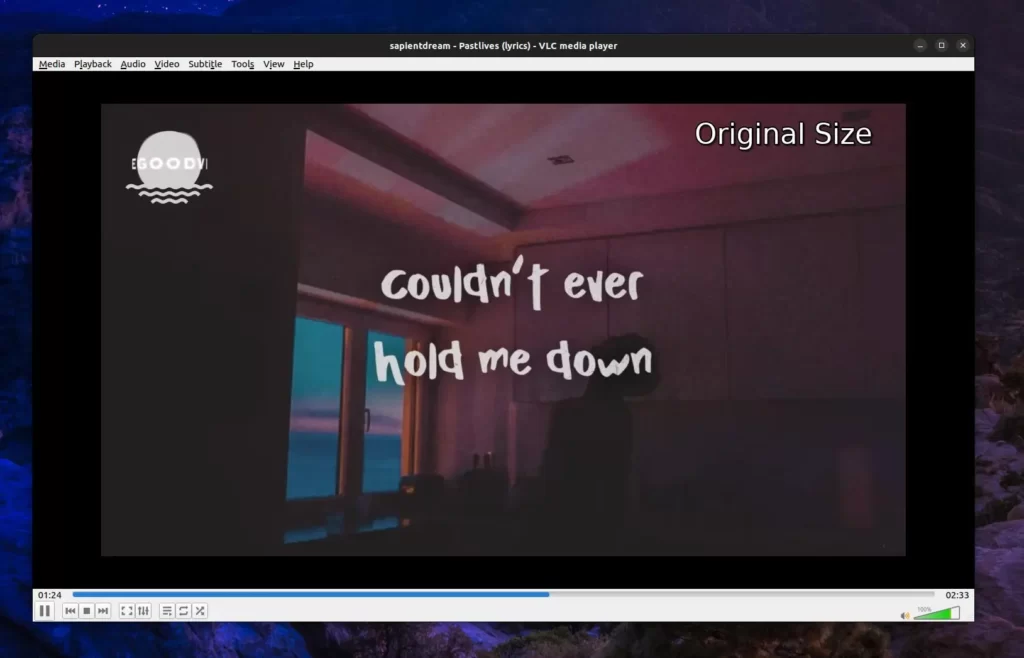
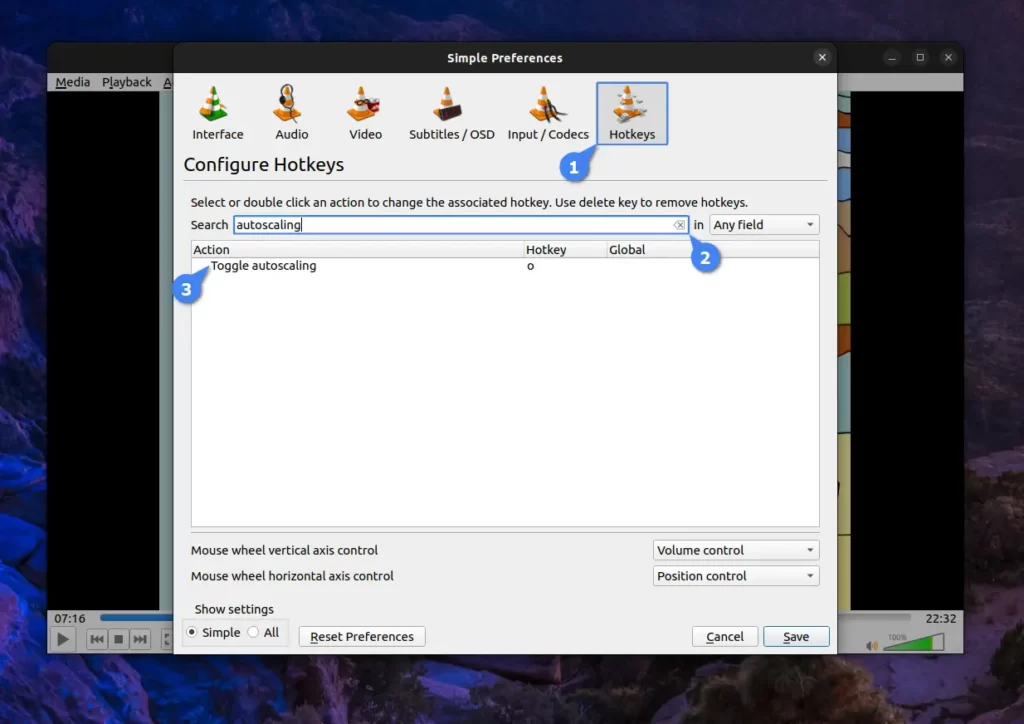
Toggle Between Original and Scaled-to-Screen Sizes
When you watch a particular video on VLC, despite its default resolution, it typically autoscales to your screen to provide a better experience.
However, if the quality of the video is poor, this default autoscaling feature can be quite annoying, and you might prefer to watch your video in its original size.
In that case, you can press the default shortcut key “o” to toggle between the scaled-to-screen and original sizes to watch that particular video according to your preferences.
Here is a low-resolution video at scaled-to-screen size.
Here is that same video at its original size.
I don’t recommend tweaking this default shortcut key, but if you can’t resist, navigate to “Tools” -> “Preferences (Ctrl+P)” -> “Hotkeys” and search for “autoscaling“.
Add Local Subtitle or Download it from the Internet
This method is significantly important for me, as I enjoy watching songs or movies from different countries in their local languages, such as Japanese (especially for anime), Italian, Chinese, etc.
Watching in their native language, I can’t understand what they are saying, and most of the video is either unofficially dubbed or dubbed with poor translation, and subtitles are not provided with the video.
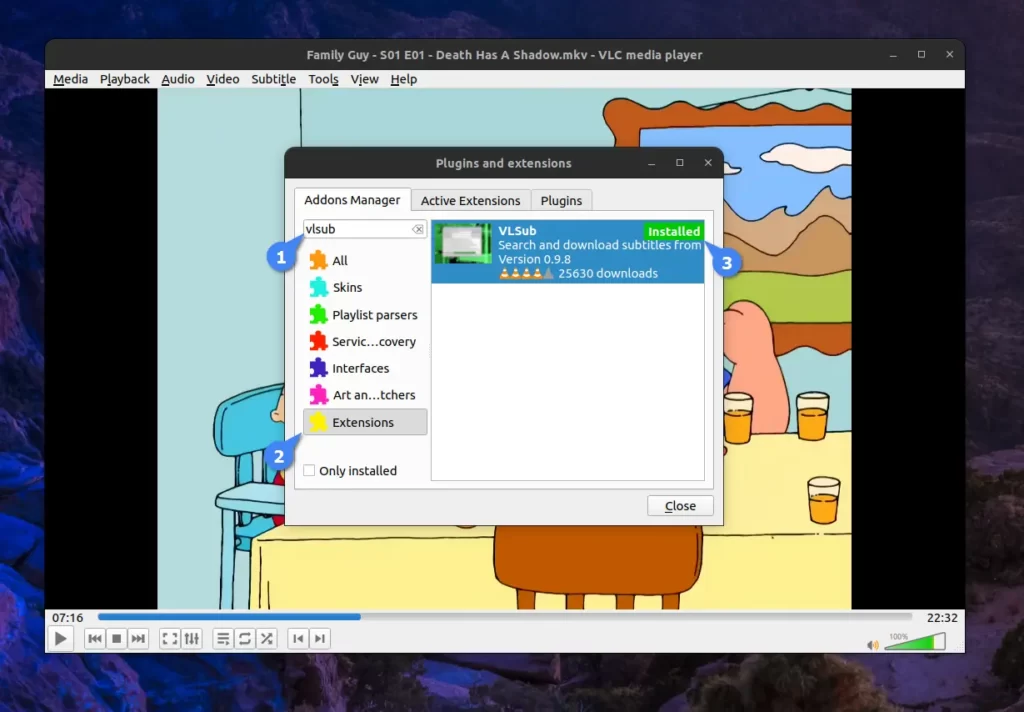
In this instance, I depend on the widely-used VLC plugin called VLSub, which can be easily installed by going to “Tools” -> “Plugins and Extensions“, prompting a window to locate and install the VLSub.
To find and download the subtitles for your specific video in your native language (typically, English would be the only available option), go to “View” -> “VLSub“. It automatically uses the metadata to gather information, but you can customize it for more accurate results.
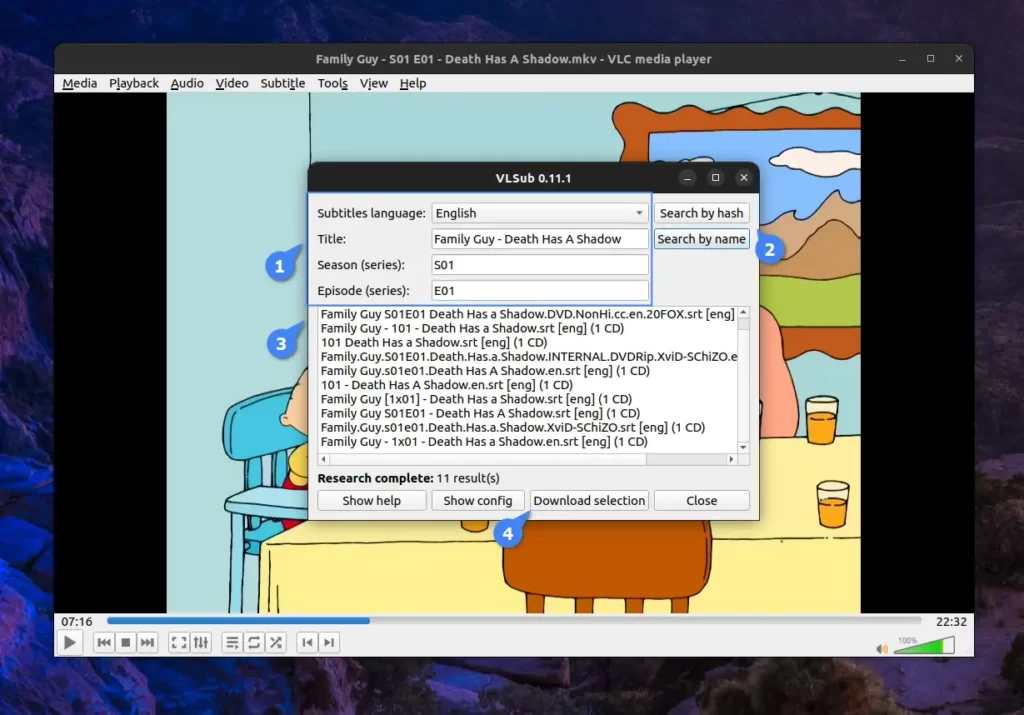
Note that the above method will function for popular series or movies; however, for songs, lyrics (or subtitles) are rarely available. In such situations, I directly search for the SRT files for that specific song and add them manually through “Subtitle” -> “Add Subtitle File…” option.
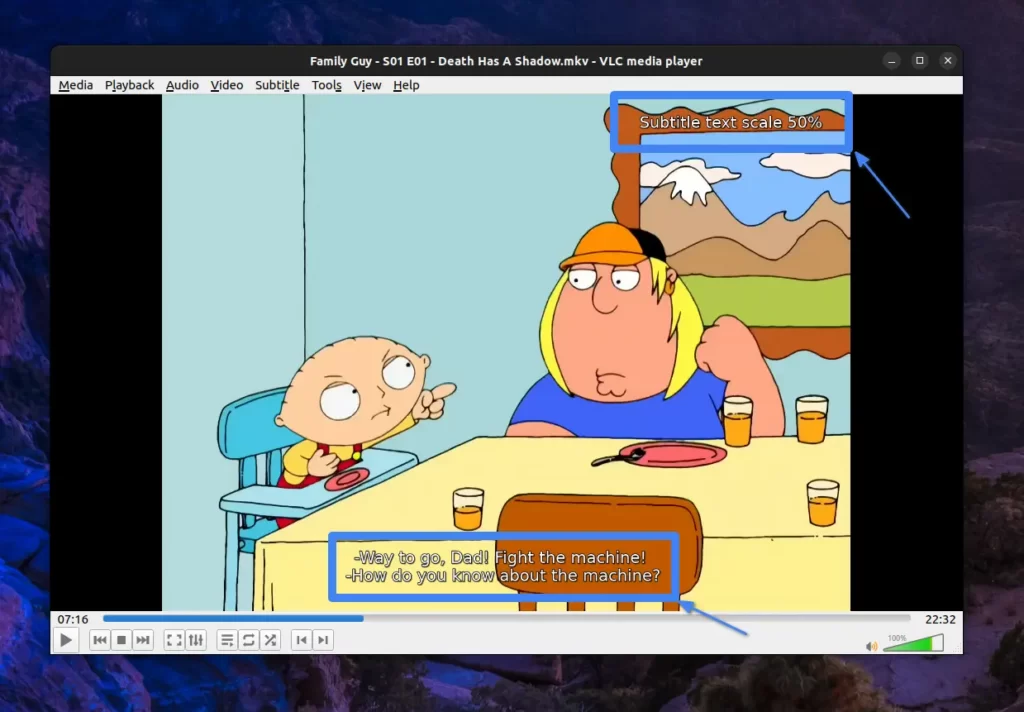
Resize the Subtitle Text Size to 5 Pixels (not the smallest)
Personally, it’s quite annoying for me to watch a foreign language video (be it a series, movie, or song) with a large subtitle text size that continuously distracts me.
A commonly known option to resize subtitle size is to navigate to “Tools” -> “Preferences (Ctrl+P)” -> “Subtitle / OSD” and under “Subtitle effects“, there is the option to change “Font size“.
Unfortunately, this method does not fulfill my needs; instead, I use the default shortcut “Ctrl+Mouse Wheel Up” to decrease and “Ctrl+Mouse Wheel Down” to increase the subtitle text scale in VLC.
To discover the steps for modifying the default shortcut keys and important aspects of this method, refer to a separate article that discusses reducing VLC subtitle font size through multiple methods.
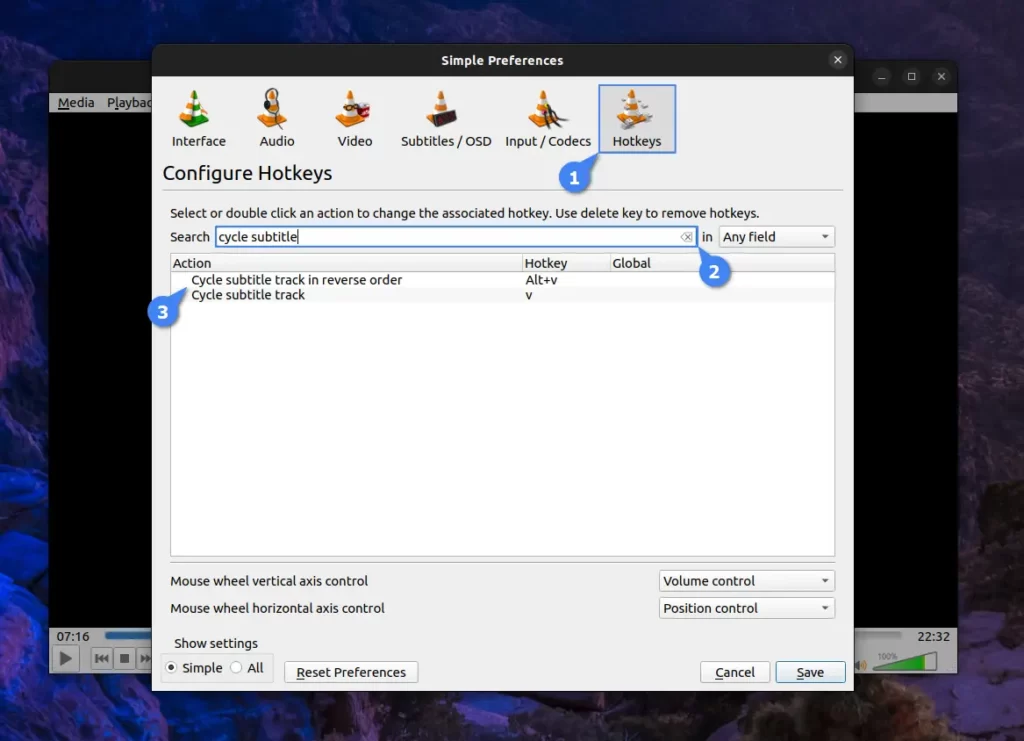
Cycle and Reverse Cycle Between Multiple Subtitles
This method is helpful when dealing with a video containing 10+ embedded subtitles. Usually, English is positioned at the top, but occasionally, it may be in the middle.
Thus, impatiently pressing the “v” shortcut key, commonly used to cycle subtitle tracks in a straight order, can be frustrating if the desired subtitle is pushed behind. So, to adjust, either repeat the entire cycle or manually adjust it from the context menu.
Apparently, I stopped getting annoyed by this silly thing after learning about the default shortcut key “Alt+V” used to cycle the subtitle track in reverse order.
Here, I won’t provide a screenshot for proof, as a static image can’t explain it. You can try it on your own the next time you watch a video with a bunch of subtitles.
If you want to modify the default shortcut key, navigate to “Tools” -> “Preferences (Ctrl+P)” -> “Hotkeys” and search for “cycle subtitle“.
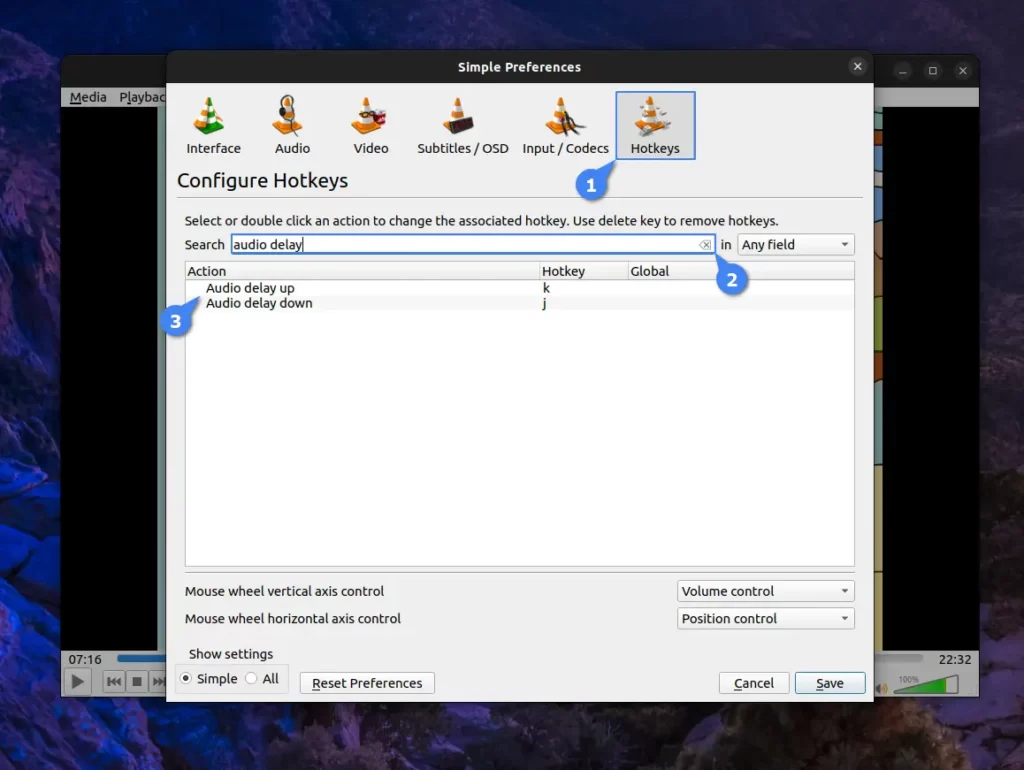
Adjust Audio Delay to a Video with Improper Alignment
This method has come in handy for me on one or two occasions, as most videos today are perfectly synced with audio. However, if that’s not the case for you, you can use the default shortcut keys: “j” to reduce audio delay by -50ms or “k” to increase audio delay by 50ms.
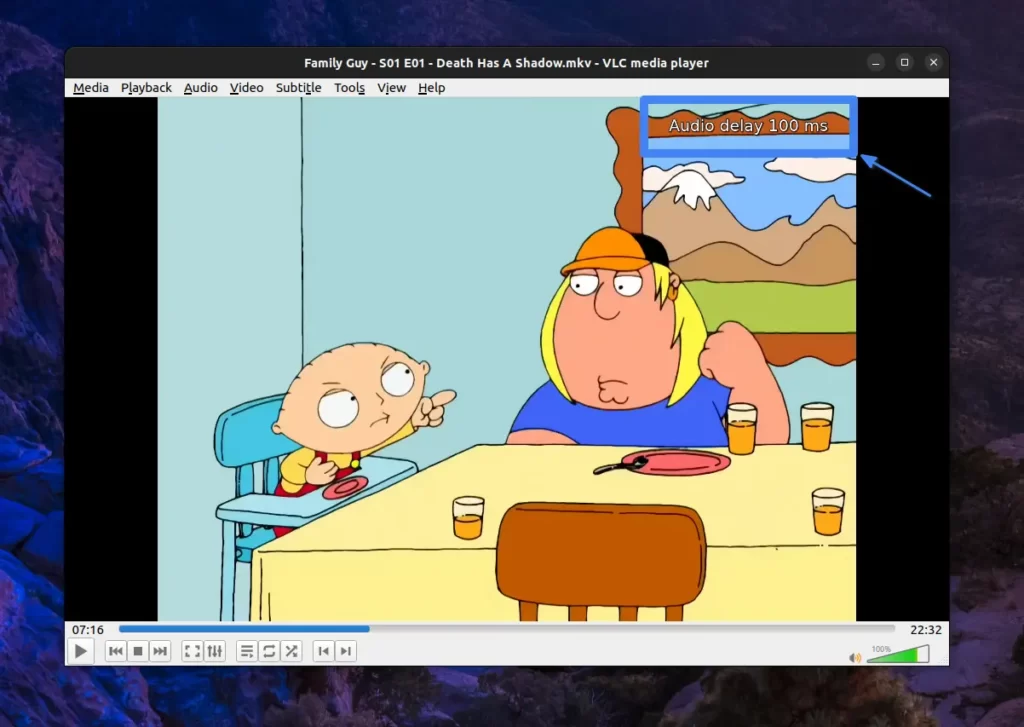
To change the default shortcut key, head to “Tools” -> “Preferences (Ctrl+P)” -> “Hotkeys” and search for “audio delay“.
Capture Snapshot of a Particular Scene
The importance of this method varies among individuals, as capturing a specific scene from a video can be accomplished using either the default feature on your system or the built-in feature in VLC.
So, to capture a snapshot of a specific scene using the default VLC feature, just press the default shortcut key “Shift+S“.
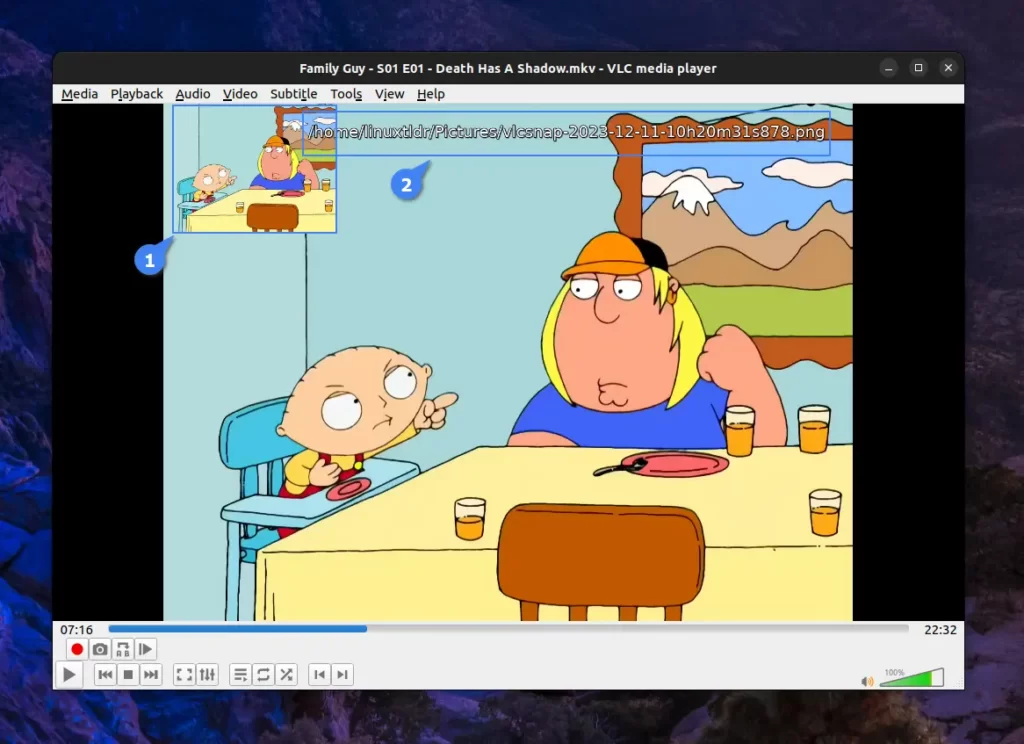
Alternatively, you can head to “View” and enable “Advanced Controls” option. This will add a new panel above the progress bar, from which you can click on the “camera icon” to capture that particular scene snapshot.

Once the snapshot is captured, it will be saved to the default “Pictures” directory of your system (the absolute path varies based on the operating system).
Create a Shorts/Clip from the Full Video
This method is a little trickier than all the previously mentioned methods because here you first have to set a loop between point A and point B, which can be achieved using the default shortcut key “Shift+L“.
Here is the step explained in detail.
- Open your video file via VLC.
- Press the “Shift+L” key once to set the “A” point.
- Press the “Shift+L” key once more to set the “B” point, and it will begin looping.
- Lastly, press the “Shift+L” key once more to end the looping function.
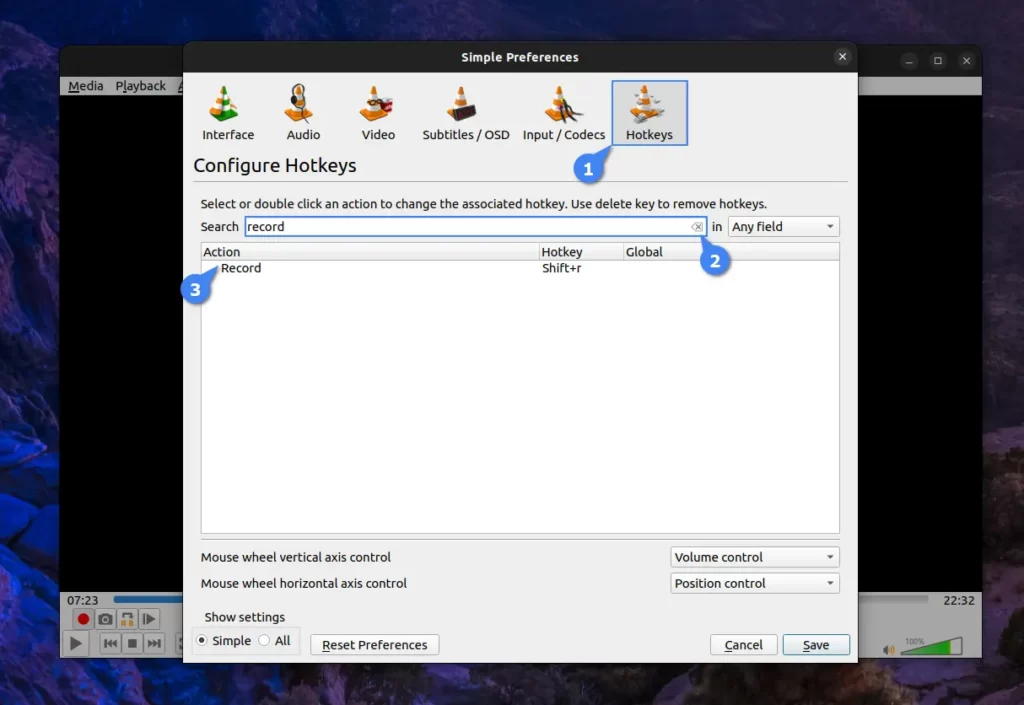
When the loop starts from point “A“, immediately press the default shortcut key “Shift+R” to begin recording, and when it reaches point “B“, press the same shortcut key to stop recording.
Note that this process can also be manually performed through the advanced controls, which can be enabled from “View” -> “Advanced Controls“.
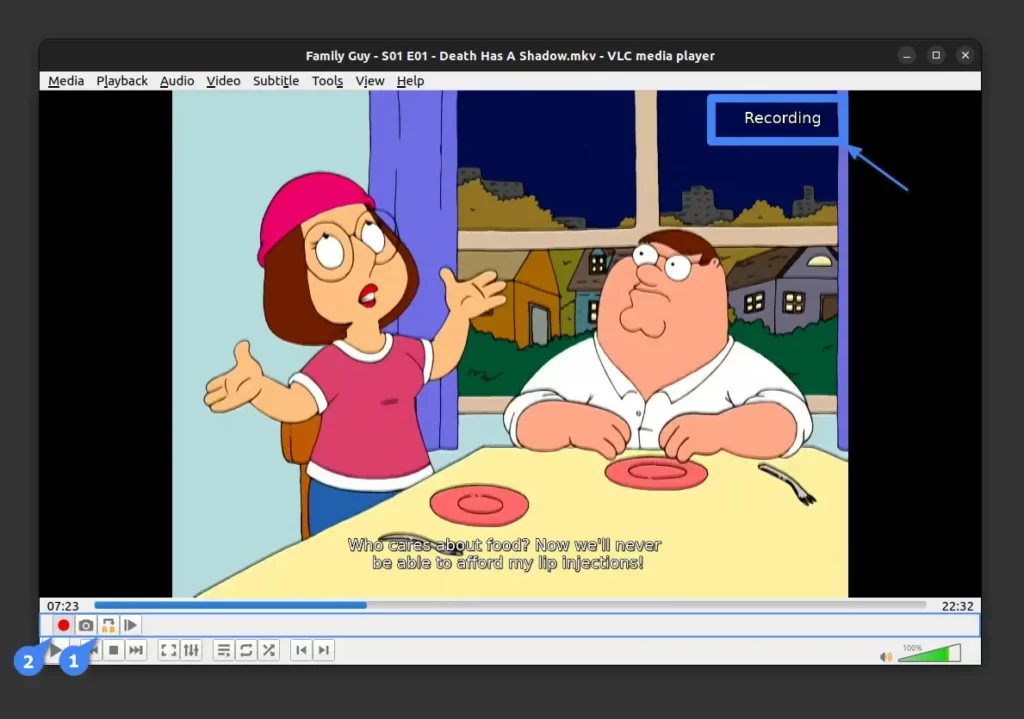
Once you stop the recording, the video will be saved to the default “Videos” directory on your system.
If you wish to modify the default shortcut key, there is no option to change the shortcut key for set points A and B. However, you can alter the recording shortcut key by going to “Tools” -> “Preferences (Ctrl+P)” -> “Hotkeys” and searching for “record“.
Add Bookmark to Multiple Timestamps for Easy Revisiting
This method proves helpful for me when watching a web series or tutorial with multiple videos. I can’t complete them continuously, and quitting in the middle makes it a bit confusing when revisiting and continuing from where I left off.
Here, VLC offers a built-in bar at the top of the screen with a “Continue” button that allows you to resume from where you left off. However, I personally prefer to set a bookmark, as this allows you to bookmark multiple timestamps that you may wish to revisit in the future.
Now, creating a bookmark in VLC can be done via the built-in option, so first launch your media file; for a series, create and add them to a playlist, then save the playlist using “Media” -> “Save Playlist to File (Ctrl+Y)” option.
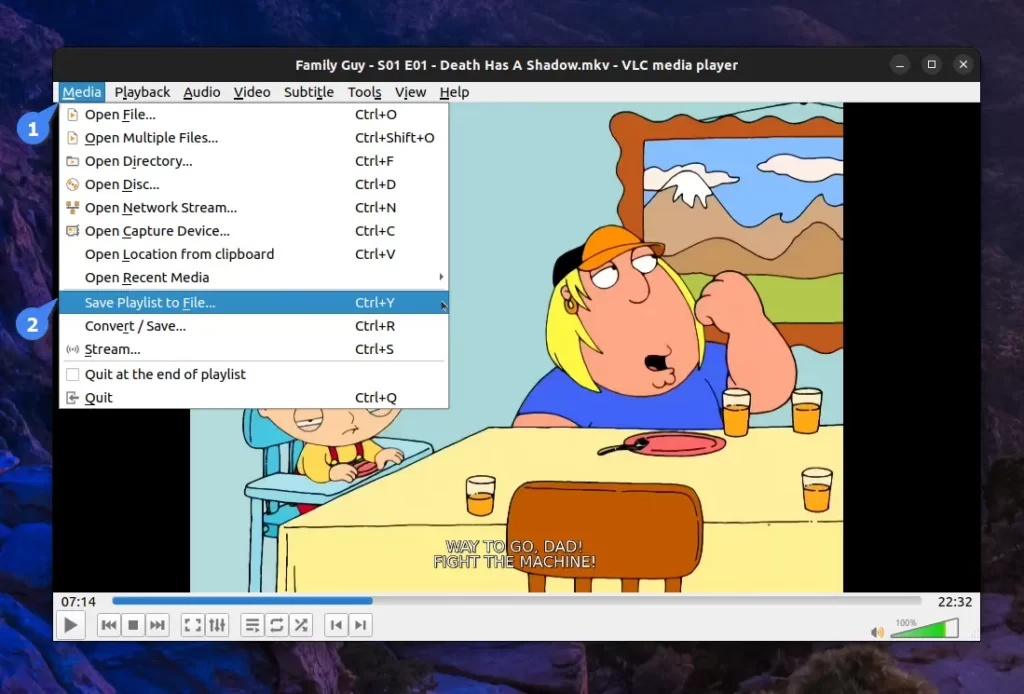
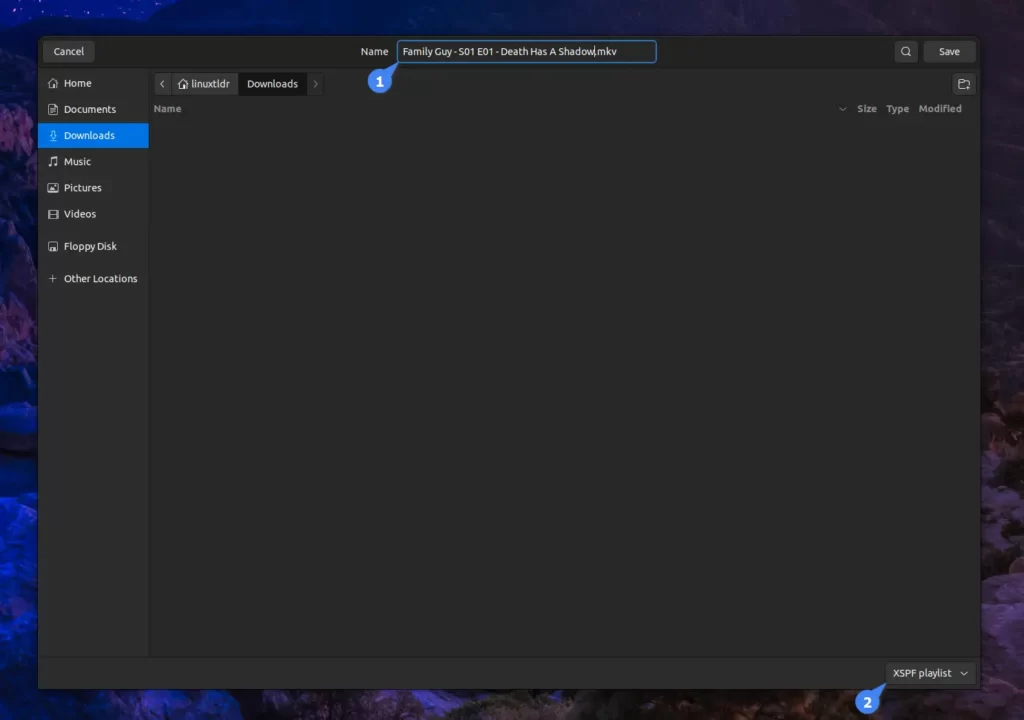
This action will prompt the file manager to ask you to specify the location for saving the file with the “.xspf” extension.
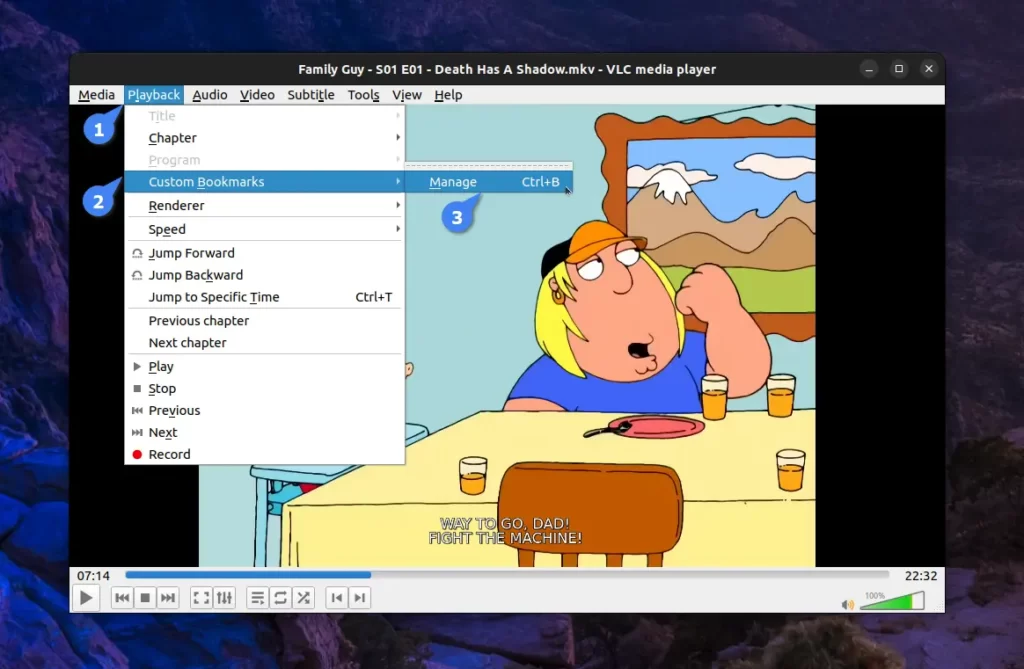
After saving the playlist, you can watch your video as usual. When you wish to quit, just navigate to the “Playback” -> “Custom Bookmarks” -> “Manage (Ctrl+B)” option.
It will launch the “Edit Bookmarks” window from where you can simply click the “Create” button, and it will create a bookmark for the current video at the current timestamp.
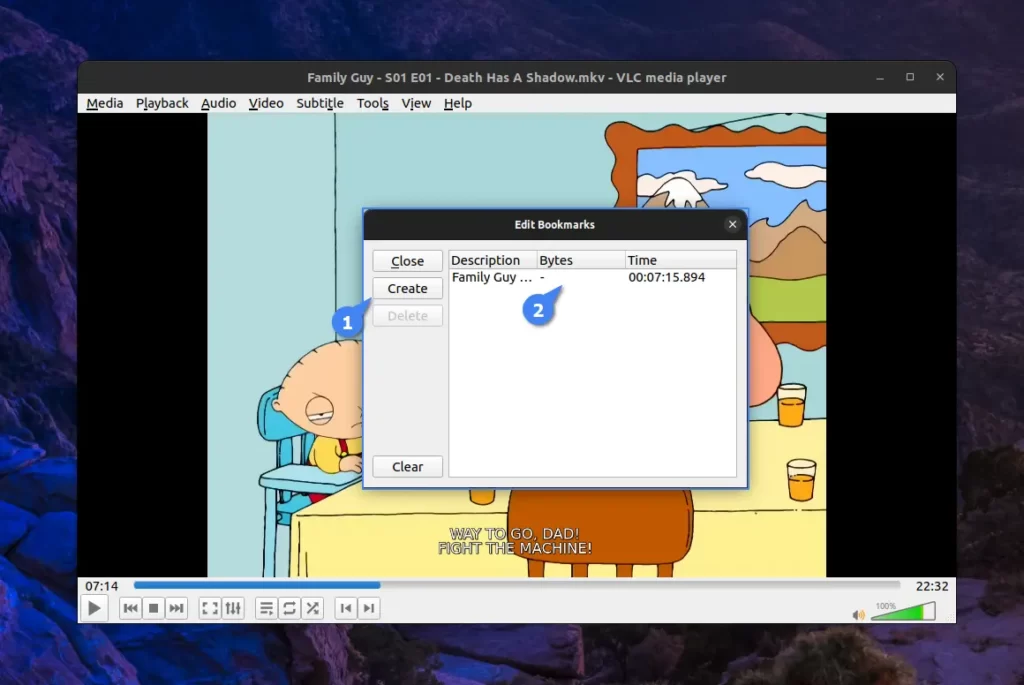
When you are done, close the “Edit Bookmarks” window, then go to “Media” -> “Save Playlist to File (Ctrl+Y)” and save the modified changes to the previously created playlist “.xspf” file.
In the future, to play this video from the bookmark, just open the saved playlist file by navigating to “Media” -> “Open File (Ctrl+O)“, select the playlist, then use the “Ctrl+B” shortcut key to open the “Edit Bookmark” window, and double-click on the chosen bookmark to resume the video from that specific timestamp.
This method is a bit tedious and requires multiple steps. When you create a new bookmark, you have to save each change to the playlist, which is quite bothersome. However, it can be skipped in two steps via a different method, as you can learn from this article.
Remove Media History from the Recent Media Section
This method serves as more of a privacy feature. Let me explain how: whenever you play a media file in VLC, it gets saved to the history. Anyone with access to your system can easily navigate to “Media” -> “Open Recent Media” to check out the media files played in the past.
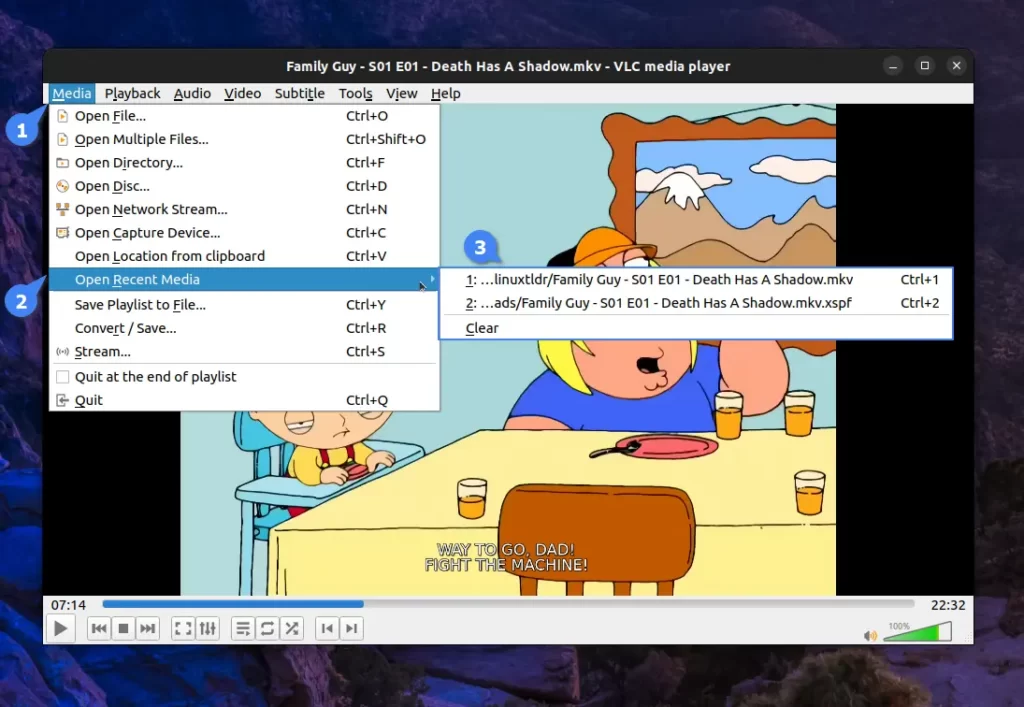
If it’s your personal system, there is no cause for concern; however, when using a shared PC among multiple individuals, this storage of media file history can become somewhat bothersome.
So, to disable the storing of media file history in VLC, simply head to “Tools” -> “Preferences (Ctrl+P)” -> “Interface” and make sure the “Show settings” is set to “Simple”. Then, under “Privacy / Network Interaction”, uncheck the “Save recently played items” checkbox and then click on “Save” button.
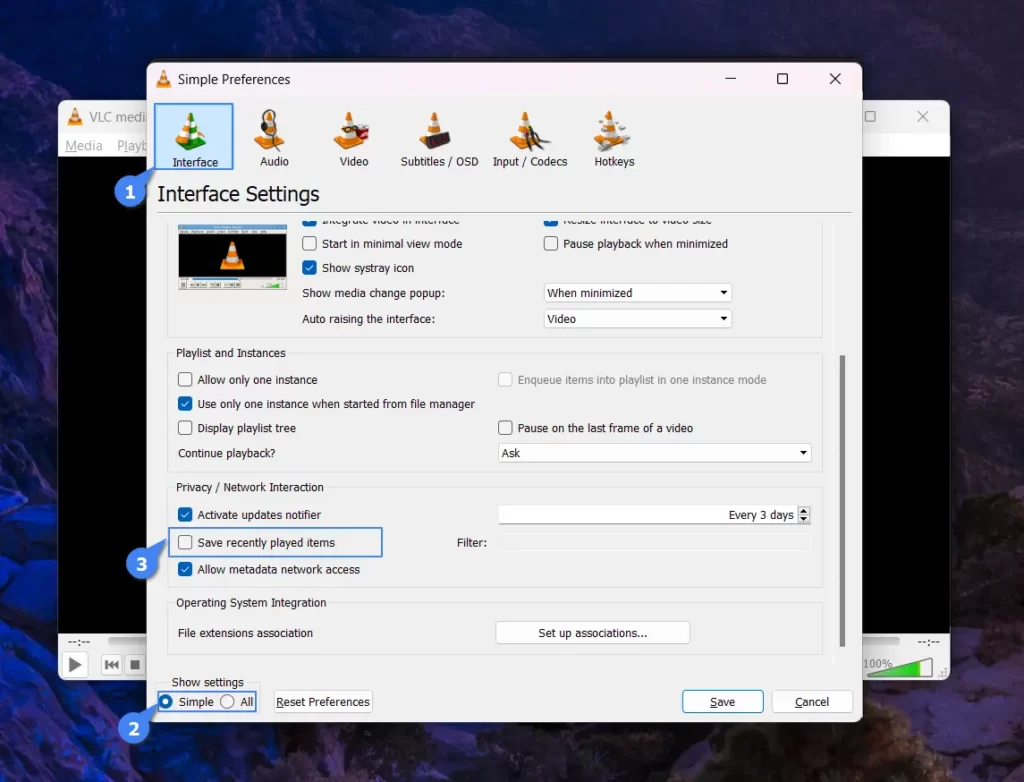
Note that if you disable saving the recently played item in history, VLC will stop notifying you with the “Do you want to restart the playback where left off?” option.
Play Online Media Files in the VLC Media Player
This method is rarely used in situations where your browser is unable to properly render the video (typically happen when using an outdated browser).
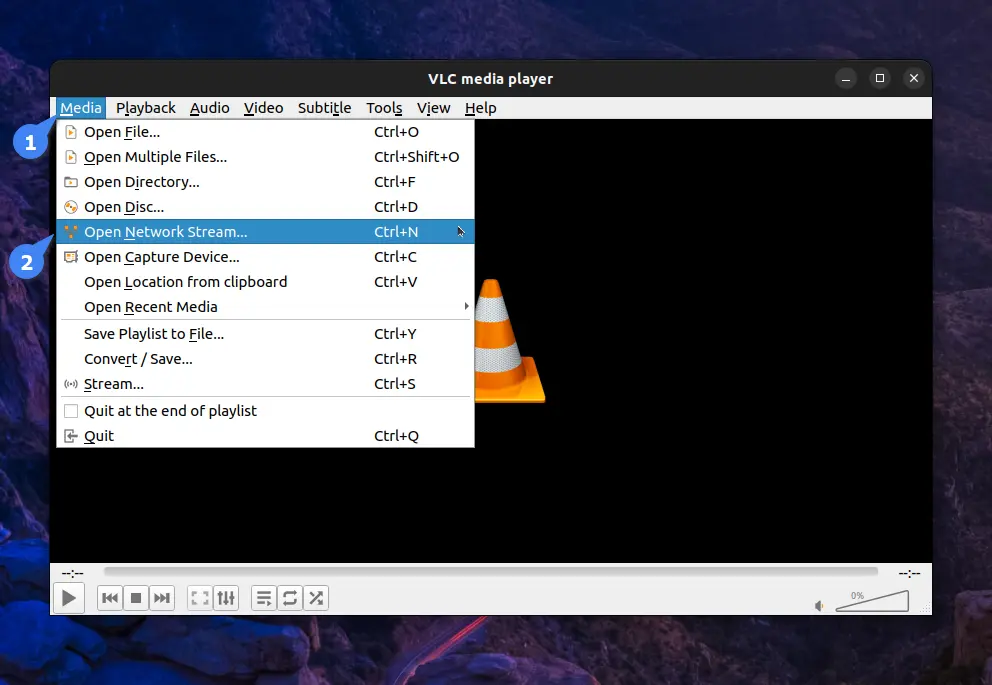
In such cases, you can copy a video URL ending with extensions like “.mp4“, “.mkv“, or another supported video format, and then navigate to “Media” -> “Open Network Streams…” in VLC.
It will prompt the “Open Media” window with an active “Network” tab, so here simply provide the video URL in the input field and click on the “Play” button.
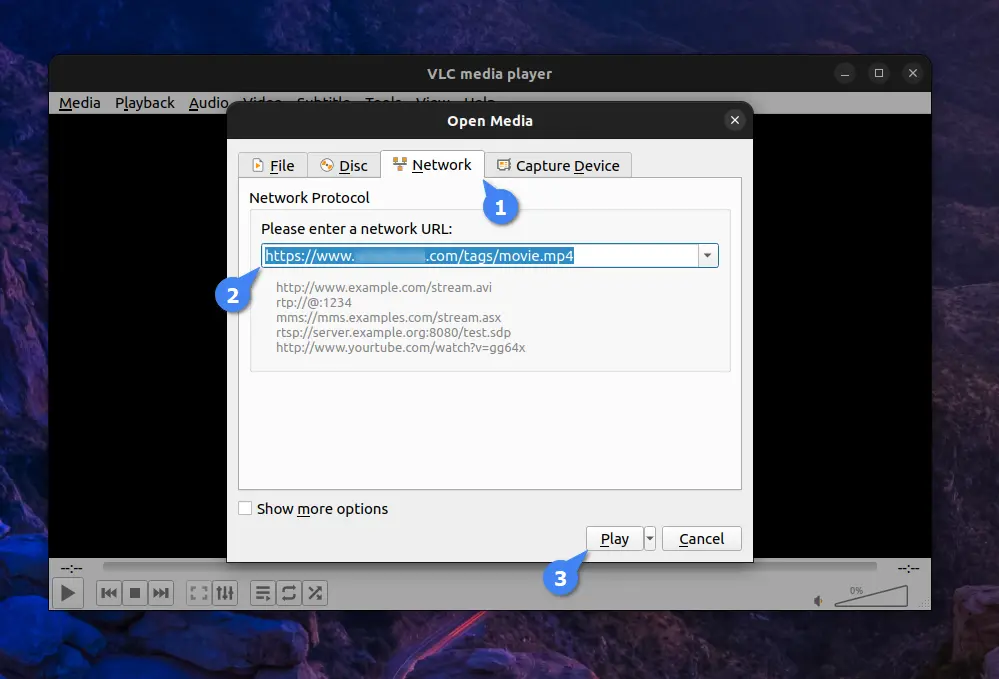
Once you have completed these steps, VLC will begin streaming the video from the provided URL. Note that YouTube videos cannot be streamed in this manner.
Listen to Your Favorite Podcast Directly in VLC
This method is much better than relying on any other tool for listening to your favorite podcast, as VLC can do this out of the box; you just have to find the RSS feed for your favorite podcast.
For example, I’m a great listener of the Lex Fridman podcast, whose RSS is available on his official website, making it easy for me to simply copy from there.
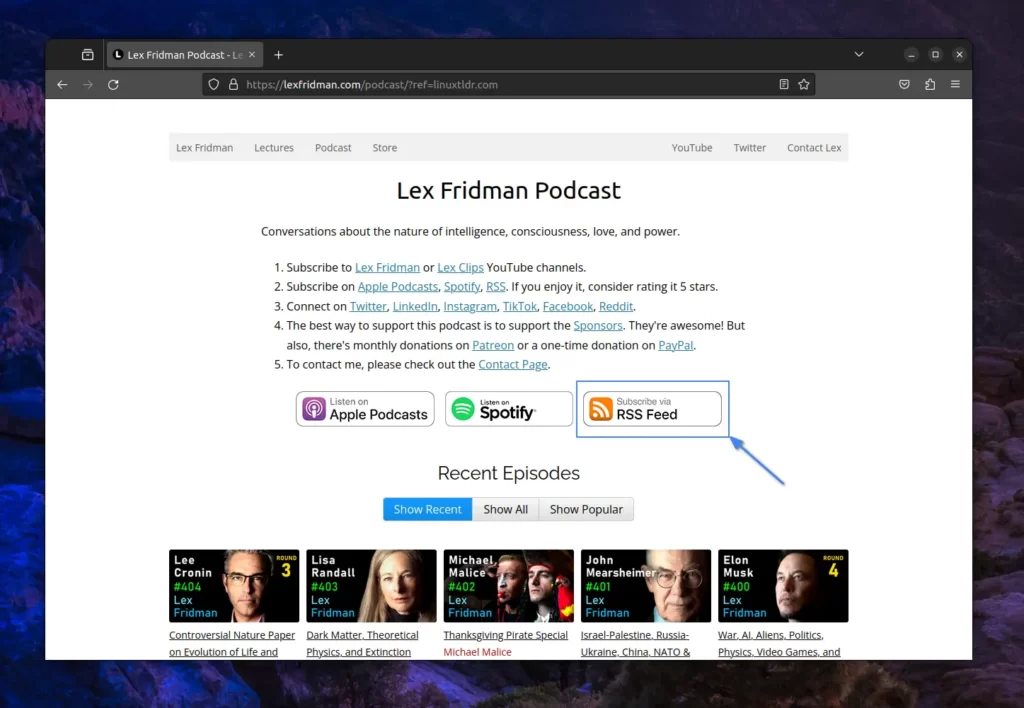
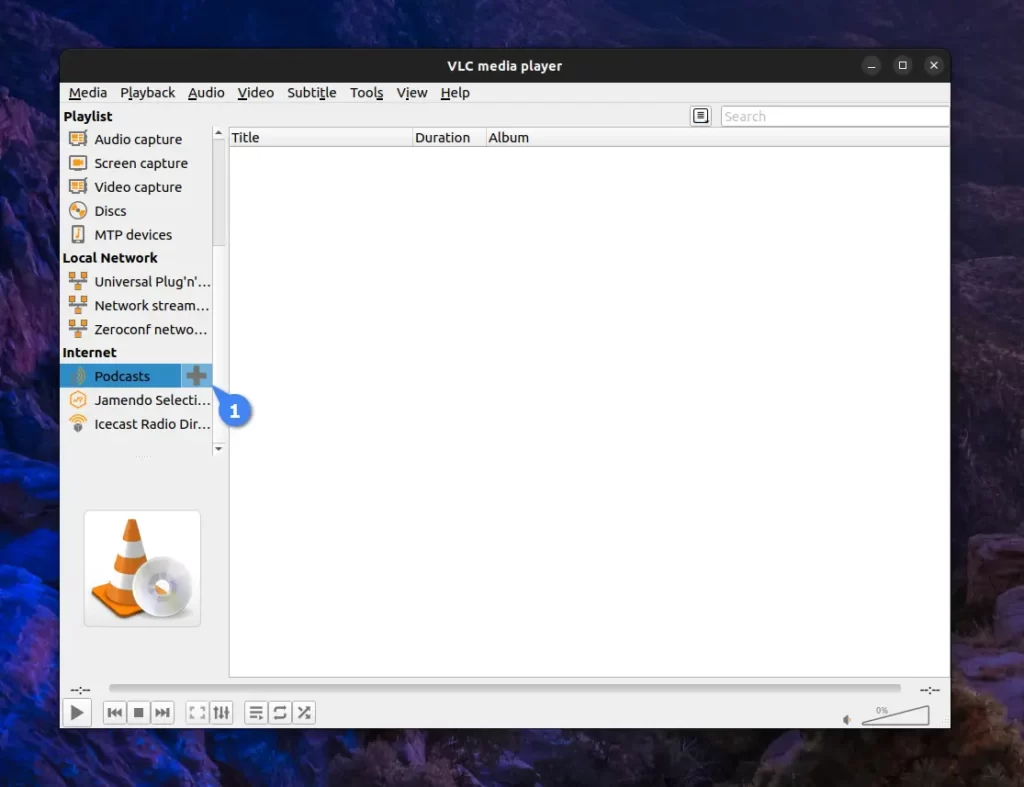
After copying the RSS feed, open VLC, go to “View” -> “Playlist (Ctrl+L)“, scroll to the bottom of the side panel until the “Internet” section is visible, and underneath, locate the “Podcasts” option. Simply hover over it and click on the “+” symbol in front of it.
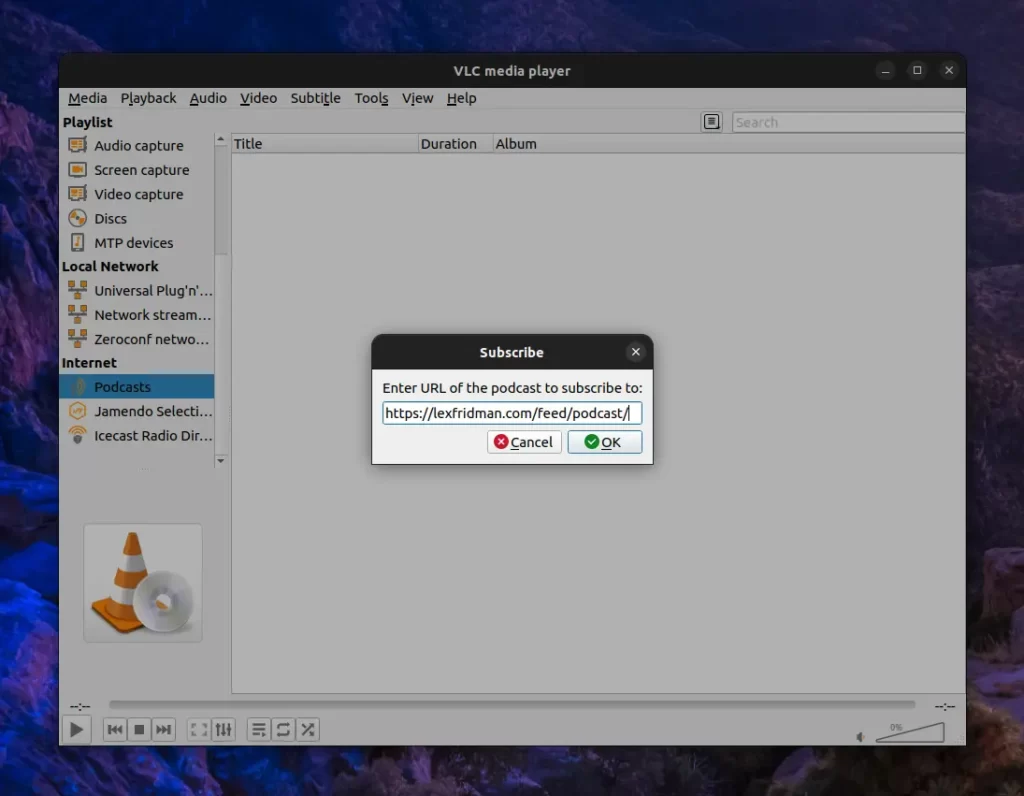
It will prompt the “Subscribe” window; simply paste the previously copied RSS feed and click on the “Ok” button.
A new section with the podcast title will appear under “Podcasts“; simply click on it, and all the available podcasts from the provided RSS feed will be listed in VLC.
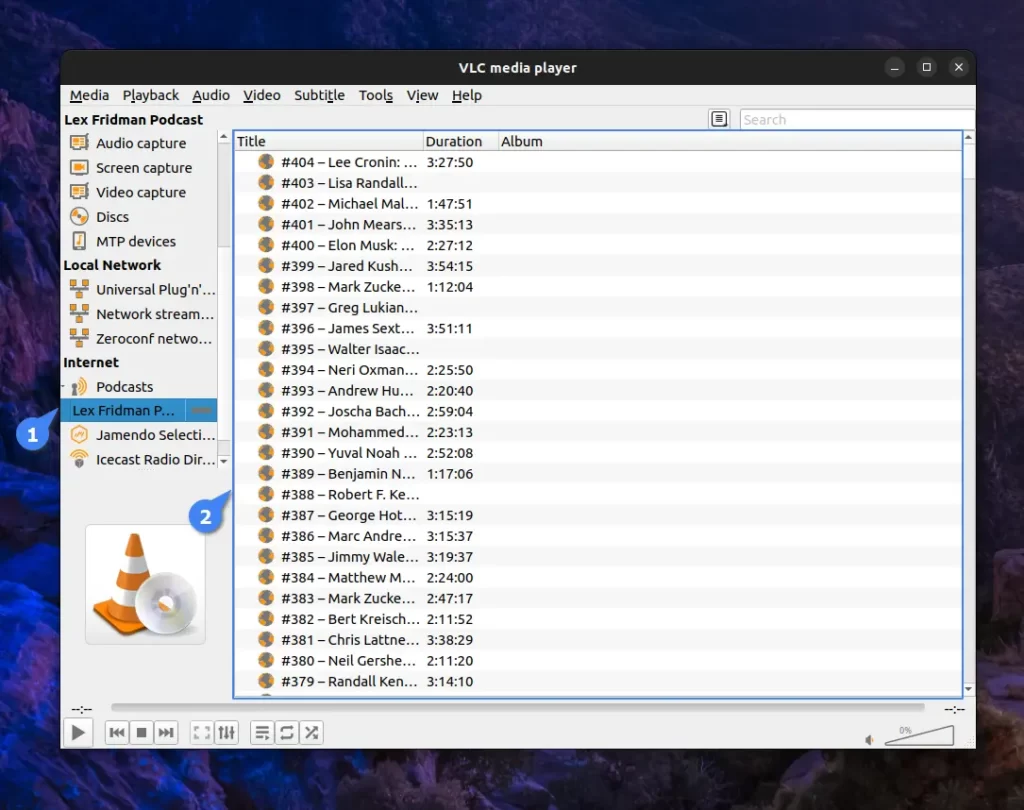
Now, you need not worry about the steps you have performed so far, as they will persist over the next VLC launch. If you wish to remove your added podcast feed, simply hover over it and click on the “–” symbol.
Final Word
Here, I’ll conclude this article, having provided as much information as possible. If you are aware of any important yet uncommon tips and tricks about VLC, please share them in the comment section.
Till then, peace!


