
LXD (pronounced lex-dee) is a lightweight container manager that allows you to run Linux containers (LXC), a type of container similar to VMware that maintains its state even after a system reboot and uses the host system kernel.
The LXC container creation process is similar to Docker containers, but they have their differences. First, as we discussed earlier, LXC containers can retain their state after a system reboot, unlike Docker containers, which wipe out all data.
Another difference between Docker and LXD is the way they handle processes, which varies between them. When using multiple processors, LXD is faster than Docker for managing applications, whereas Docker is faster than LXD when using a single processor.
Surprisingly, most Docker images can be seamlessly managed by LXD. However, a few might not run because LXD operates all containers in non-superuser mode, like Podman, which restricts users from performing certain actions.
This article will show you how to install LXD on your desired Linux system, as well as how to create and manage your first LXC container.
Tutorial Details
| Description | LXD |
| Difficulty Level | Moderate |
| Root or Sudo Privileges | Yes (for installation) |
| OS Compatibility | Ubuntu, Fedora, etc. |
| Prerequisites | – |
| Internet Required | Yes |
How to Install LXD on Linux
The installation of LXD is divided into multiple parts: first, you need to install the Snap on your Linux system, then install the LXD Snap package, and finally, add the current user to the “lxd” group to use the “lxc” command without needing root or sudo privileges. So, let’s start with…
Step 1: Install Snap on Linux
The LXD is a product of Canonical (other products include Ubuntu) and is shipped as a Snap package. Therefore, if you are using Ubuntu, you already have Snap installed; however, you need to manually install Snap for other Linux systems such as Debian, Pop!_OS, Fedora, or AlmaLinux.
So, to install Snap on your desired Linux system, open your terminal and execute one of the following commands, depending on your Linux distribution:
# On Debian, Ubuntu, Min, Pop!_OS, etc.
$ sudo apt install snapd
# On Redhat, Fedora, AlmaLinux, CentOS, etc.
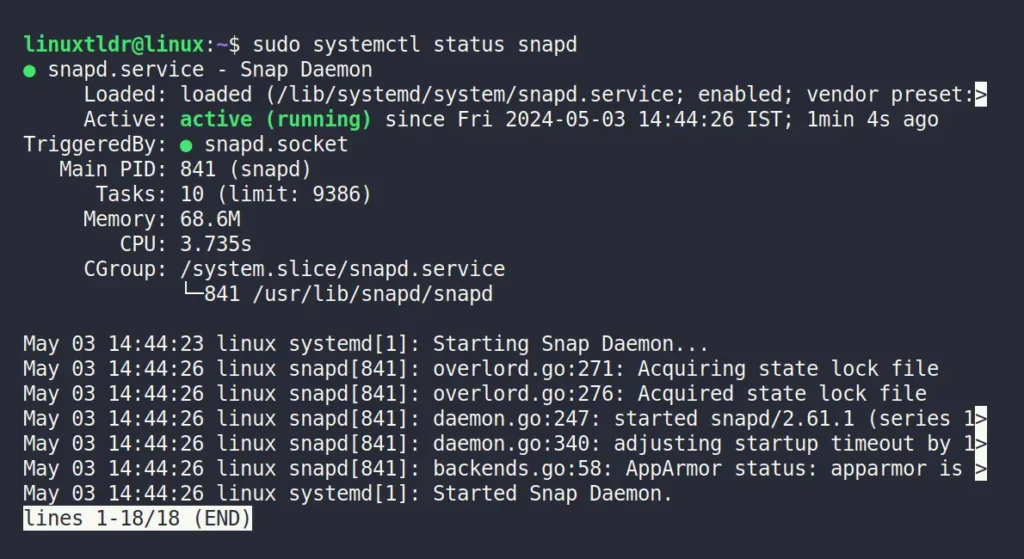
$ sudo dnf install snapdOnce done, check that Snapd is running in the background by using the systemctl command:
$ sudo systemctl status snapdOutput:
If Snapd is not active in your system, use the following command to enable the Snapd (autostart daemon on system boot) and restart it.
$ sudo systemctl enable snapd
$ sudo systemctl restart snapd
Output:

Step 2: Install the LXD Snap Package
The LXD comes as a Snap package, so to install it on your Linux system, use the following command:
$ sudo snap install lxdOutput:

After installation is complete, you can use the snap command with grep to locate the LXD Snap package in the list of installed Snap packages.
$ snap list | grep lxdOutput:

Step 3: Add the User to the LXD Group
To manage the containers without needing root or sudo privileges, you need to add your current user to the “lxd” group. The “lxd” group is automatically created at the time of installing the LXD Snap package. Therefore, you don’t have to create one; just use the usermod command to add the user to the “lxd” group.
linuxtldr” with your own username; if you’re unsure, use the “echo $USER” command to display the current username.$ sudo usermod -aG lxd linuxtldrOutput:

Once completed, you must update the changes to the “lxd” group. For this purpose, you can either restart your system or simply use the newgrp command to reflect the change immediately.
$ newgrp lxdOutput:

To verify that the current user is added to the “lxd” group, run the groups command:
$ groupsOutput:

Step 4: Initializing LXD
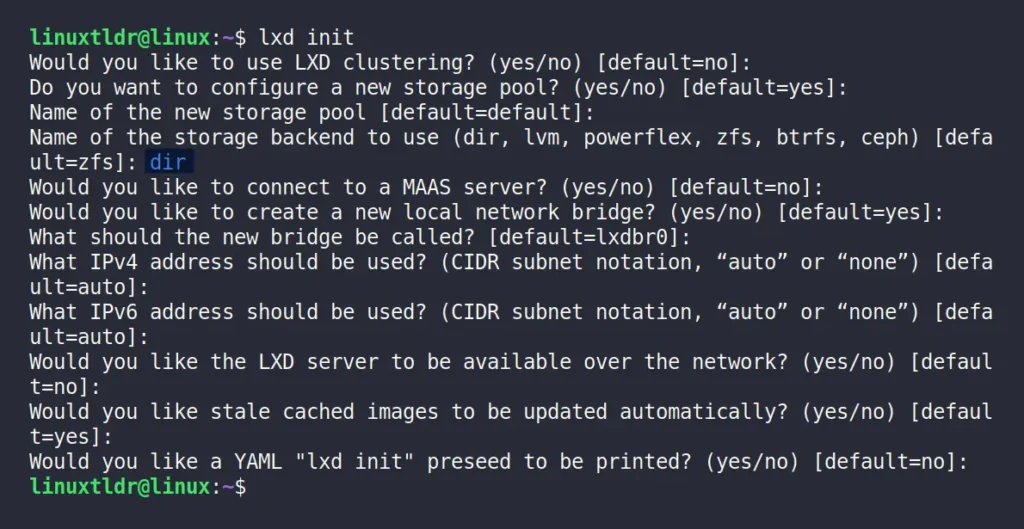
Now that LXD is installed, you need to initialize it. This is a one-time process that will configure your LXD networking and storage options, such as directory, ZFS, Btrfs, and more:
$ lxd initWhen initializing, it will prompt various questions about configuring the LXD, such as storage and networking options. If you’re a beginner, feel free to opt for default settings (except for the storage backend, where you should choose “dir“) by pressing “enter” for each question.
That’s it. Now you have successfully installed and configured LXD on your Linux system. You can begin creating and managing containers using the “lxc” command.
How to Use LXD on Linux
After installing and configuring LXD on your Linux system, you can start creating and managing containers. However, to do this, you must use the “lxc” command that comes with the LXD package. So, let’s start with our first example…
List All the Remote Server
When setting up a container from an image, the image is pulled from a server, and the list of servers from which the image will be pulled can be listed using the following command:
$ lxc remote listOutput:
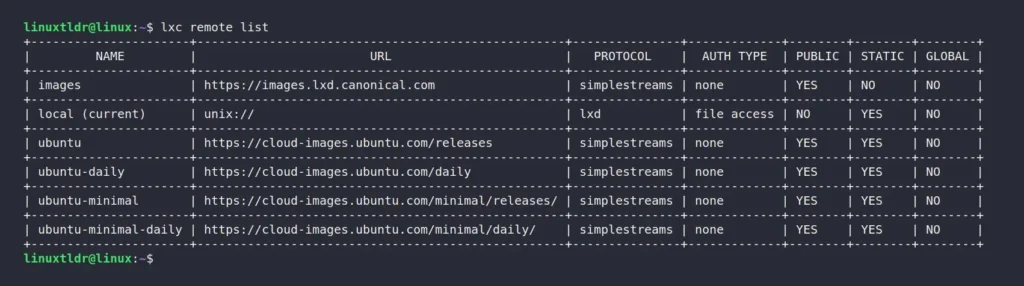
If you’re familiar with Docker, then you can compare it to Docker Hub, so when searching for an image or pulling it using the “lxc” command, it will look for the requested image on this remote server.
Search for LXD Images
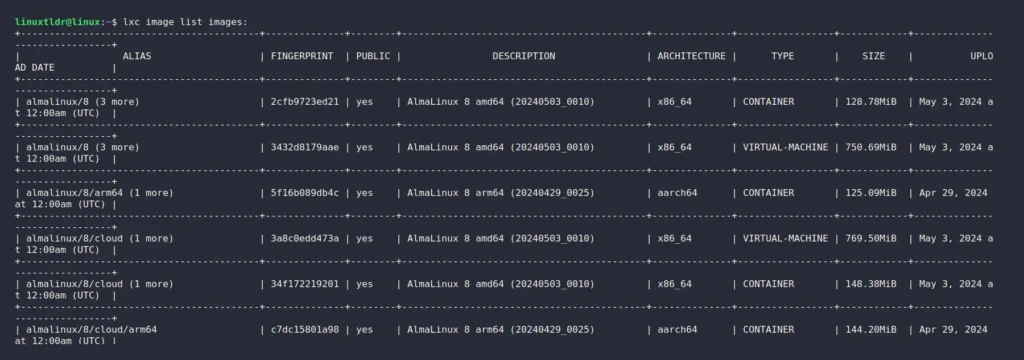
To pull your desired LXD image, you need to first ensure it’s available on the remote server. For that purpose, you can use the following command to list all the images on the mentioned remote server:
# The following command will list all the images from the "images" server.
$ lxc image list images:

# The following command will list all the images from the "ubuntu" server.
$ lxc image list ubuntu:

# The following command will list all the images from the "ubuntu-daily" server.
$ lxc image list ubuntu-daily:
Output:
The above output quickly becomes too long, so to quickly locate your desired image, if you have any specific image in mind, you can specify it by its name with or without version and architecture.
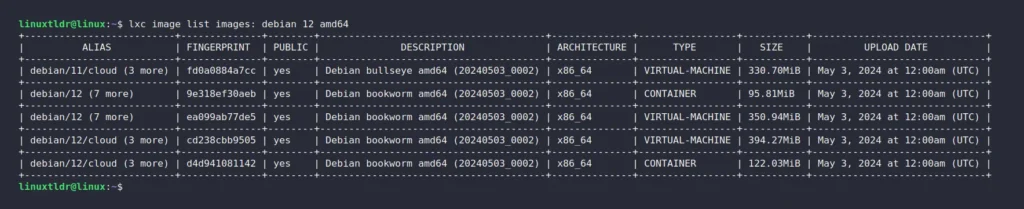
# Search for "Debian" image from the "image:" server.
$ lxc image list images: debian

# Search for "Debian 12" image.
$ lxc image list images: debian 12

# Search for "Debian 12" image with 64-bit architecture.
$ lxc image list images: debian 12 amd64

# Search for "Ubuntu 24.04" image.
$ lxc image list images: ubuntu 24.04

# Search for "Ubuntu Noble" image.
$ lxc image list images: ubuntu noble

# Search for "Fedora 40" image.
$ lxc image list images: fedora 40
Output:
Create a Container from the LXD Image
Creating a container is straightforward; all you need to do is fill in the basic information about your image, such as the distro, version, arch, and container name, in the following command:
$ lxc launch images:<distro>/<version>/<arch> <container-name-here>Remember, the “<distro>” and “<container-name-here>” parameters are important, but other parameters such as “<version>” and “<arch>” can be skipped, and if they are not specified, the latest image based on your system will be picked.
To assist you, I’ve provided a few commands below to create containers using different images in different ways:
# Create container named "Debian" with "Debian 12"  image from the "image:" server.
$ lxc launch images:debian/12 debian

# Create container named "Debian" with "Debian 12 amd64"  image from the "image:" server.
$ lxc launch images:debian/12/amd64 debian

# Create container named "Fedora" with "Fedora 40"  image from the "image:" server.
$ lxc launch images:fedora/40 fedora
The following is a picture of a “Debian” container with a “Debian 12” image.

List All the Containers
For checking the list of all containers, including their information such as container name, state, IPv4, IPv6, type, and snapshots, use the following command:
$ lxc listOutput:

You can see above the “Debian” container we created in the previous method listed here.
Execute Commands Inside the Container
Once the container is ready and in a running state, you can directly execute a command inside it by specifying the container name to the “lxc exec” command and passing your desired command after the “--” separator.
For example, I’m running an Ubuntu system on the host machine and have configured a Debian container to demonstrate that we were able to successfully execute the command inside our container. I am checking the “/etc/os-release” file on both using the following commands:
# The following command will run on host machine.
$ cat /etc/os-release

# The following command will run on Debian container.
$ lxc exec debian -- cat /etc/os-release
Output:
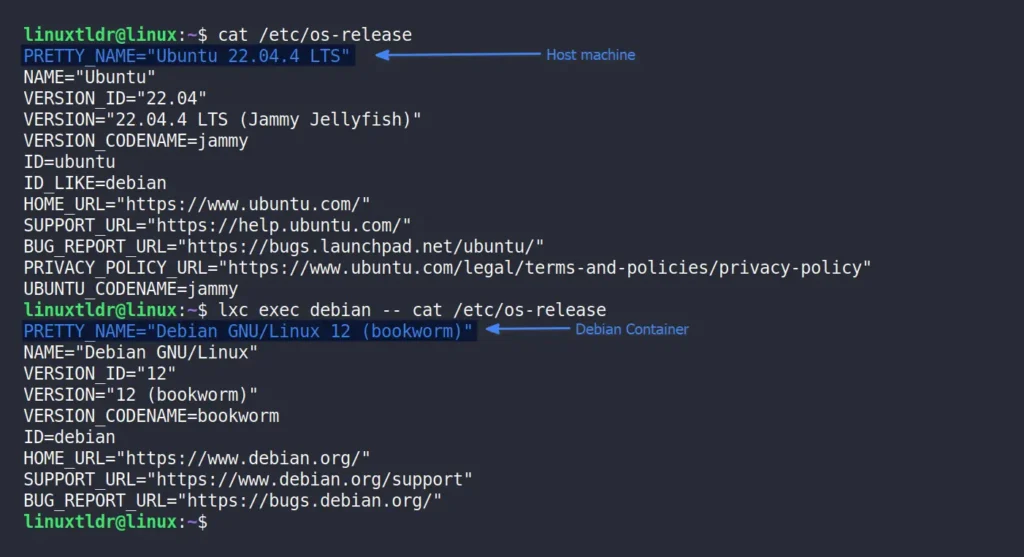
You can see that we were able to successfully execute the command inside our Debian container.
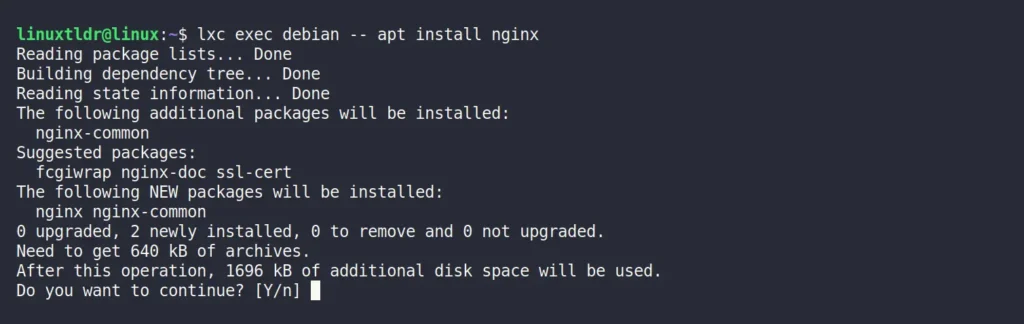
If you want to install any packages inside your Debian container, you can do so by simply replacing the command after the double dash “--” with the package installation command. For example, the following command will install the Nginx package in my Debian container.
$ lxc exec debian -- apt install nginxOutput:
Once the installation is complete, you can access your Nginx server from your desired browser or by using the curl command with the IPv4 address of your Debian container, which can be found using the “lxc list” command.
Stop the Container
To stop a running container, you can specify the container name you want to stop in the following command:
# Stop the container.
$ lxc stop debian

# Check the state of container.
# lxc ls
Output:

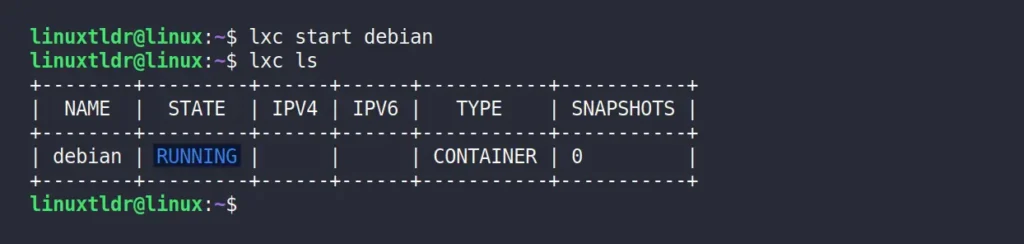
Start the Container
To start the stopped container, you can specify the container name you wish to start in the following command:
# Start the container.
$ lxc start debian

# Check the state of container.
# lxc ls
Output:
Restart the Container
If your container is not working correctly, you can try restarting it, although there is no way to monitor the status of the container while it is restarted. You can specify the container name you wish to restart in the following command:
$ lxc restart debianOutput:

Push a File to the Container
Pushing files from the host machine to the container is very easy; you can do so with the following command:
$ lxc file push </path/to/file> <continer-nane>/path/to/dest/dir/For demonstration, I have a “file.txt” in my home directory on my host machine. To push it to the home directory on my container, the command would look like below:
$ lxc file push file.txt debian/home/The following is a picture of checking the existence of a file on the host machine, pushing it into the container, and then checking its existence on the container:

Pull a File from the Container
To pull the file from the container to the host machine, you can use the following command:
$ lxc file pull <continer-nane>/<path/to/file> </path/to/local/dest>For example, to pull the “file.txt” from the home directory in my container to the “~/Documents” directory on the host machine, the command would look like this:
$ lxc file pull debian/home/file.txt ~/Documents/Output:

Managing Snapshots of Containers
The LXD container provides support for snapshots, which makes life way easier. If you are not familiar with the term “Snapshot“, then if you have used VMware, a snapshot in LXD is almost the same as in VMware.
In layman’s terms, a snapshot is a complete copy of your container, so if you are going to perform any task that might damage your container, you can take a snapshot. If something goes wrong in the future, you can restore your container from the previously created snapshot.
In LXD, you can easily create a snapshot for your container and assign a unique name to it. For example, the following command will create a snapshot of the Debian container with the name “mysnap1“.
$ lxc snapshot debian mysnap1Output:

See, creating a snapshot in LXD is so much easier. This way, you can create any number of snapshots for your containers, and to check the count of snapshots, you can use the following command:
$ lxc listOutput:

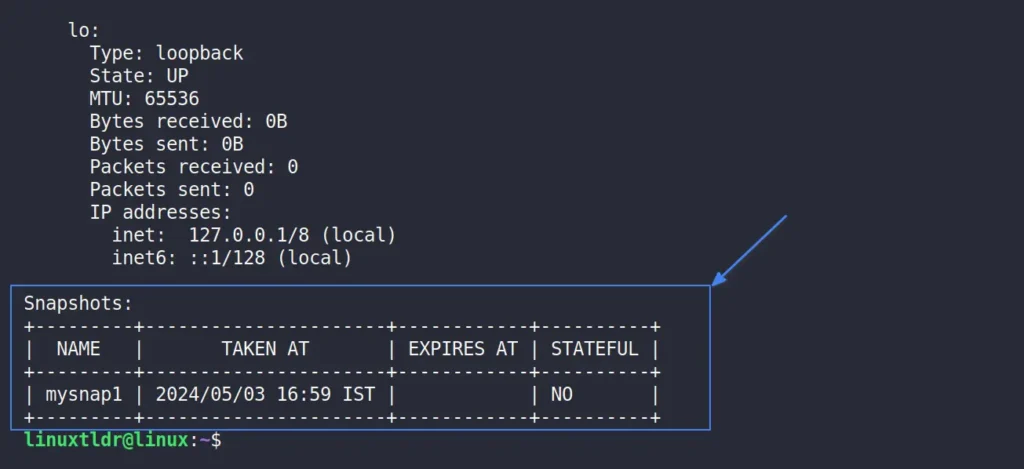
The above output shows you the number of snapshots, but if you forget the name of your snapshot, you can’t restore or delete it. So, to get a detailed list of snapshots created with their names, taken time, expiry date, and state, use the following command:
$ lxc info debianOutput:
This way, you can easily create and list snapshots, and in the future, when you want to restore the container state to the created snapshot, simply specify the container name and snapshot name, as shown in the following command:
$ lxc restore debian mysnap1Output:

Finally, to delete the snapshot, you can specify the container name and snapshot name that are to be deleted.
$ lxc delete debian/mysnap1Output:

Delete the Container
To delete your containers, first stop them, and then delete them as shown in the following command.
$ lxc stop debian
$ lxc delete debian
Output:

To verify that the container is successfully deleted, you can check the list of all containers.
$ lxc listOutput:

Bonus Tip: Advanced Configuration of LXD Containers
In LXD, you have different ways to configure various aspects of your containers. To demonstrate a few, the following command will set the container to use only 1GB of memory.
$ lxc config set <container-name> limits.memory 1GBIf you have multiple containers, such as one for PHP and another for MySQL, you must start MySQL before PHP. Therefore, you can use the following command to set an order for each of these containers, ensuring they start sequentially instead of randomly:
# This container will start first.
$ lxc config set <mysql-container> boot.autostart 1

# This container will start second.
$ lxc config set <php-container> boot.autostart 2
Instead of specifying the order of the container, you can also set a delay time on container launch by using the following command:
# The following container will start after 30 seconds.
$ lxc config set <container-name> boot.autostart.delay 30
This way, you can set many custom configurations for your container, and to check an existing configuration applied to your container, you can use the following command:
$ lxc config show <container-name>To get a complete list of all types of configurations that can be set for your containers, refer to the LXD instance configuration documentation.
Final Word
Here comes the end of this article; we discussed everything from basic to advanced ways of managing the LXD container. Well, I hope you find this article helpful; if you have any questions or queries related to the topic, then do let me know in the comment section.
Till then, peace!


Join The Conversation
Users are always welcome to leave comments about the articles, whether they are questions, comments, constructive criticism, old information, or notices of typos. Please keep in mind that all comments are moderated according to our comment policy.