
The usermod command is a user management tool to modify user account information like username, user ID, default shell, home directory, and many more.
Tutorial Details
| Description | Usermod (Modify User Information) |
| Difficulty Level | Moderate |
| Root or Sudo Privileges | Yes |
| OS Compatibility | Ubuntu, Manjaro, Fedora, etc. |
| Prerequisites | usermod, grep, which, su, groups |
| Internet Required | No |
Syntax of the Usermod Command
The usermod command requires two arguments: one is the option, and the other is the username.
$ sudo usermod [OPTION] [USERNAME]The above command has the ability to modify the following files (or databases):
- /etc/passwd file stores the user account related information.
- /etc/group file stores the system group information with GID.
- /etc/shadow file stores user security-related information.
- /etc/gshadow file stores group security-related information.
- /etc/login.defs file is for shadow password suite configuration.
- /etc/subgid file stores the per user subordinate group IDs.
- /etc/subuid file stores the per user subordinate user IDs.
However, you can manually visit the above mentioned files and edit them using your choice of text editor, like Nano or Vim, but usermod gives you the power to manage each of these files using one command.
Changing a Username
Use the “-l” or “--login” flag with your new username (ex: “newuser“) and current username (ex: “olduser“) to change.
$ sudo usermod -l newuser olduserOutput:

The above command will replace the “olduser” username with “newuser” that you can verify by searching the username in the “/etc/passwd” file using the grep command.
$ grep newuser /etc/passwdOutput:

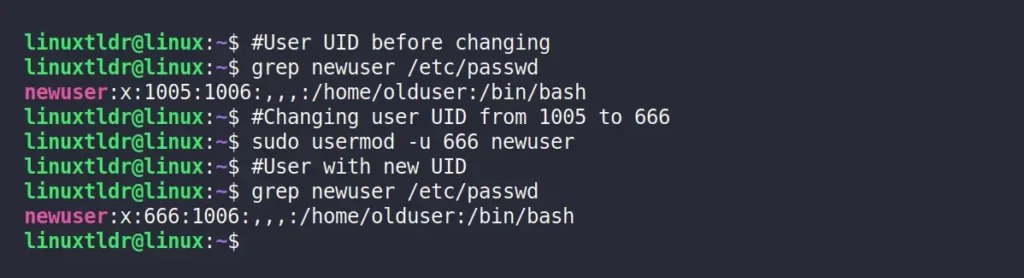
Changing a User ID
To replace the existing user’s UID with a new one, specify the new UID with your username using the “-u” or “--uid” flag.
#User UID before changing
$ grep newuser /etc/passwd

#Changing user UID from 1005 to 666
$ sudo usermod -u 666 newuser

#User with new UID
$ grep newuser /etc/passwd
Output:
Changing a User Login Shell
By default, the Bash shell is used by major Linux distributions; however, if you prefer to have another shell like ZSH or Fish, you can make them your default login shell.
But before changing your current shell to ZSH or Fish, first find their full path using the which command.
$ which zshOutput:

Than use the “-s” or “--shell” flag by specifying the full shell path with your username.
$ sudo usermod -s /usr/bin/zsh newuserCheck the “/etc/passwd” file to verify the default shell is changed with new one.
$ grep newuser /etc/passwdOutput:

Add a User to the Supplementary Group
You can easily append your existing user to another group (ex: sudo) using the following command.
$ sudo usermod -aG sudo newuserUse the groups command to verify the user is added to the specified group.
$ groups newuserOutput:

To append multiple users in a group, specify each of them with a comma (“,“) as a separator.
Change a User’s Home Directory
The home directory might be crucial to change because you will lose all your “.config” and “.bashrc” data.
If you know what you’re doing, then specify the location for your new home directory along with your username in the following command.
$ sudo usermod -md /home/newhomedirectory newuserTo verify the changes check the “/etc/passwd” file.
$ grep newuser /etc/passwdOutput:

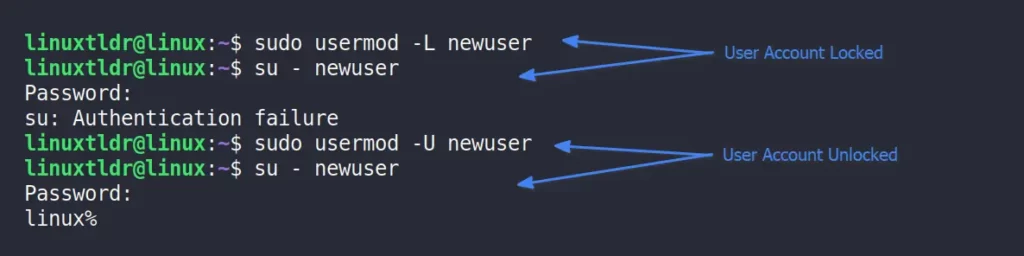
Lock and Unlock a User
To block the user’s access to their account, you can lock it by using the “-L” or “--lock” flag with their username.
$ sudo usermod -L newuserIf the user tries to access their account, they will get the following error.
$ su - newuserTo unlock the user account, use the “-U” or “--unlock” flag with their username.
$ sudo usermod -U newuserOutput:
Set a Password for a User (Unsecure)
You can use the passwd command to change a user’s password, but usermod also gives you the option to change your password using the “-p” or “--password” flag with a new password and username.
$ sudo usermod -p newpassword newuserThe above command will change the password for the specified user but this method is not recommended because it will save the password in plain text in “/etc/shadow” file.
$ sudo grep newuser /etc/shadowOutput:

Change the User’s Primary Group
The “-g” or “--gid” flag can be used to forcely change the user’s primary group to a specified group.
$ sudo usermod -g newgroup newuserVerify the change by using the following command.
$ groups newuserOutput:

Adding Comments to the User Account
The comments are extra pieces of information that are added to the specified user account to help other administrators by giving them account descriptions like the purpose of that account.
Use the “-c” or “--comment” flag and specify your comment with a username.
$ sudo usermod -c "This is Linux TLDR" newuserUse the following command to verify the comment is added to the specified user account.
$ grep newuser /etc/passwdOutput:

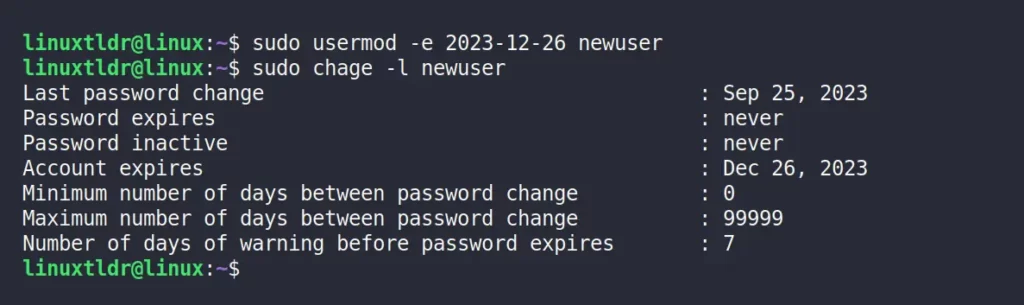
Set User Account Expiry Date
You can use the “-e” or “--expiredate” flags with an expiry date in “YYYY-MM-DD” format to disable the specified user account on that date.
$ sudo usermod -e 2023-12-26 newuserExecute the chage command with the username to verify the user account expiry date.
$ sudo chage -l newuserOutput:
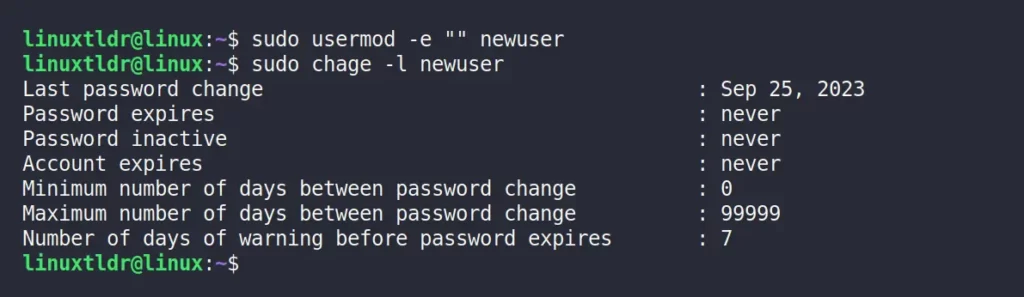
To disable the account expiration, specify the flags with an empty date.
$ sudo usermod -e "" newuserOutput:
Here the end comes.
The article went into great detail; however, if you have any questions, feel free to ask them in the comment section.


