While walking in your Linux journey, you might hit yourself with the term “chroot” (or “chroot jail”), and that’s what you’re about to learn today: what they are and their usage.
Tutorial Details
| Description | Chroot Jail |
| Difficulty Level | Moderate |
| Root or Sudo Privileges | Yes |
| OS Compatibility | Ubuntu, Manjaro, Fedora, etc. |
| Prerequisites | chroot |
| Internet Required | No |
What is Chroot Jail in Linux?
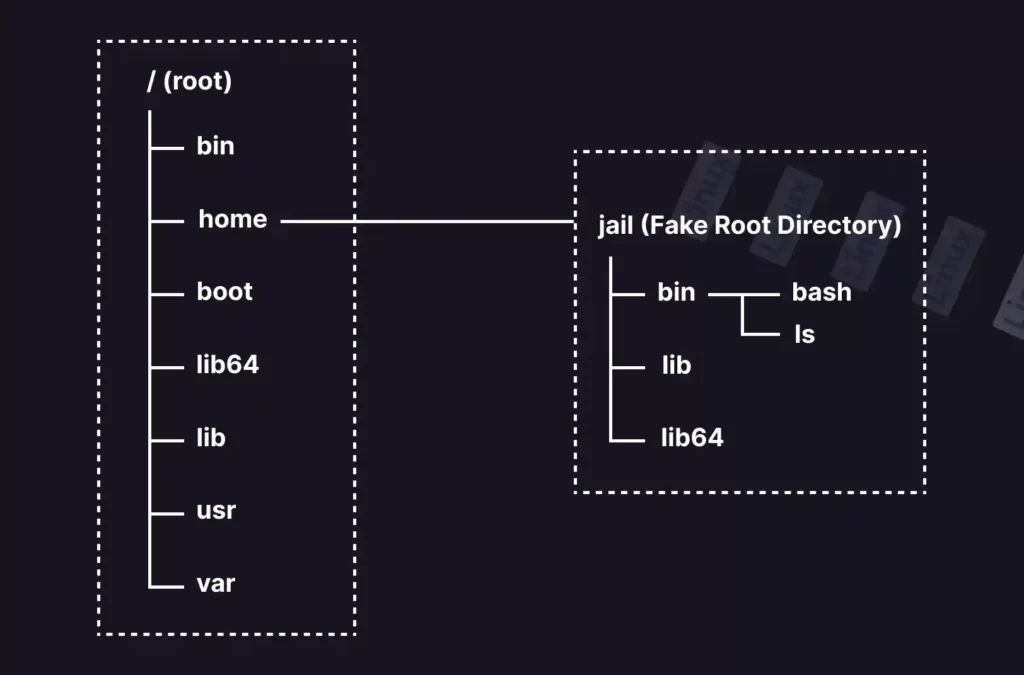
The chroot (a.k.a. “change root“) is a command used to push a user into a fake root directory (in jail) intentionally created by you with access to certain commands and permissions.
It works like this: first, you will create a fake replica of the root directory and move certain binary files (like bash and ls) from the “/bin/” directory to your newly created root directory.

Lastly, you will use the chroot command to put/add the user into that isolated fake root directory (or environment) that contains limited command binaries (apart from binaries, anything else can also be added).
Since users are not allowed to read or write anything outside the fake root directory this way, this process is known as a “chroot jail” or “jailing user”.
Why Should You Use Chroot Jail?
The chroot jail is a process of creating a sandbox environment for a user or script with restricted permissions assigned by the jail creator that can come into use for various reasons, followed by
- Restricting the user with specific permissions.
- Creating a test environment for programs or scripts.
- Execute old programs or scripts with incompatible binaries without crashing the application or system.
- To recover the system or system password.
- To reinstall the bootloader, like Grub or Lilo.
- Virtual machine substitution.
Syntax of the Chroot Command
The chroot command takes three arguments: one is the option; another is the path of the fake root directory; and the last one is the command.
$ chroot [OPTION] [PATH/TO/NEW/ROOT/DIRECTORY] [COMMAND]The following are the known options:
| Options | Description |
|---|---|
--groups=G_LIST | It describes the supplementary groups as g1, g2,…, gN. |
--userspace=USER:GROUP | Specify the user or group (with their name or ID) to use. |
--skip-chdir | Prevent changing the working directory to “/“. |
--help | Display the help section. |
--version | Give version information. |
Creating a Chroot Jail for the User
The first step for creating a chroot jail is to create a fake replica of the original root directory somewhere in your Linux filesystem.
1. Execute the following command to create a new directory with the name “jail” in your home directory that will be used as a fake root directory.
$ mkdir $HOME/jailOutput:

2. Now create sub-directories (like “bin“, “lib“, and “lib64“) that will store the program binaries and libraries in your “jail” (or fake root) directory.
$ mkdir -p $HOME/jail/{bin,lib,lib64}Output:

3. Let’s copy a few binaries like “/bin/bash” and “/bin/ls” into our fake “$HOME/jail/bin” directory.
$ cp -v /bin/{bash,ls} $HOME/jail/bin/Output:

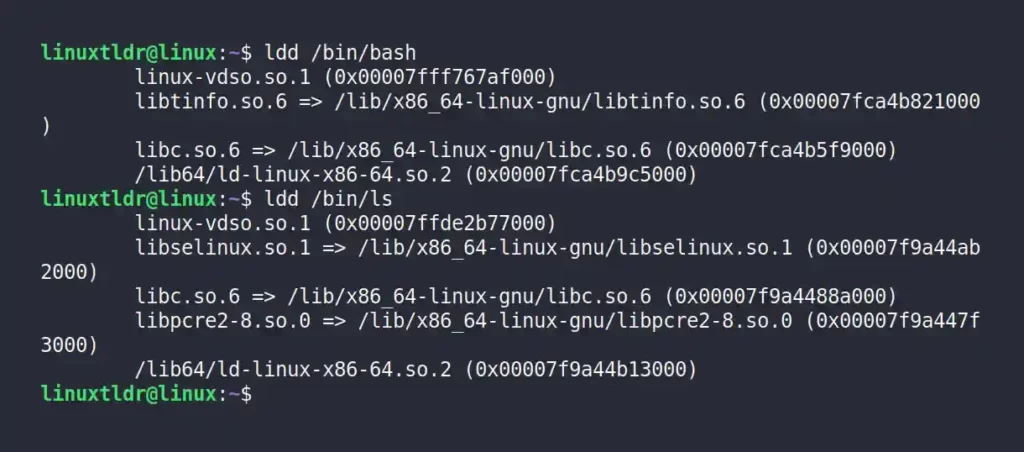
4. Execute the following “ldd” command with a binary path to list the supporting libraries.
$ ldd /bin/bash
$ ldd /bin/ls
Output:

5. Copy the supporting libraries into the “lib” and “lib64” directories, starting with the bash libraries:
$ cp /lib/x86_64-linux-gnu/libtinfo.so.6 $HOME/jail/lib/
$ cp /lib/x86_64-linux-gnu/libc.so.6 $HOME/jail/lib/
$ cp /lib64/ld-linux-x86-64.so.2 $HOME/jail/lib64/
Output:

The following are the supporting libraries for ls binary:
$ cp /lib/x86_64-linux-gnu/libselinux.so.1 $HOME/jail/lib/
$ cp /lib/x86_64-linux-gnu/libc.so.6 $HOME/jail/lib/
$ cp /lib/x86_64-linux-gnu/libpcre2-8.so.0 $HOME/jail/lib/
$ cp /lib64/ld-linux-x86-64.so.2 $HOME/jail/lib64/
Output:

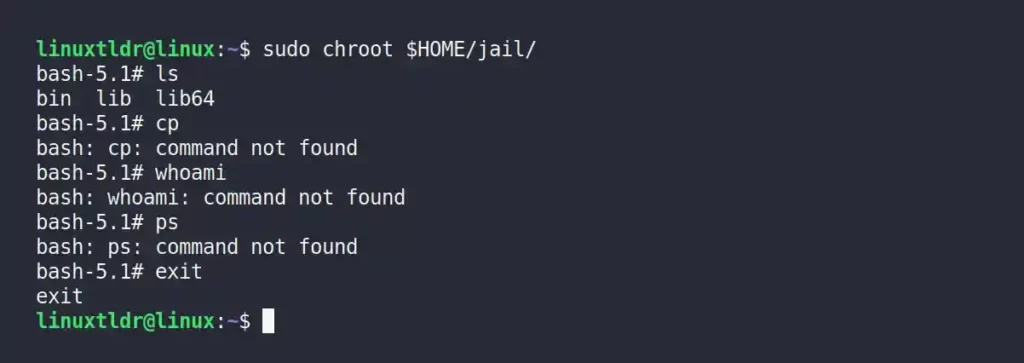
6. Lastly, enter into this mini-jail using the chroot command (it will start a new bash instance).
$ sudo chroot $HOME/jail/Output:

If you execute any command outside of what is specified in the “$HOME/jail/bin” directory, you will get “Command not found” errors.

7. When you’re done, just execute the exit command to quit the chroot jail.
$ exitOutput:

Final Tips
As you can see, if you want to have access to another command other than bash and ls, then you need to copy the binary and supporting libraries for that command into the chroot jail sub-directories.
After a while, this repetitive process will start getting boring, and you will lose interest in chroot. For that reason, I will suggest you use the restricted bash shell to limit user access and AppArmor or SELinux to restrict program or script access.
Chroot is better for system recovery and password resetting, but apart from that, you might rarely use it.
So, that was all a beginner should know about chroot jail.
If you have any questions related to this topic, feel free to ask them in the comment section.


