
Fastfetch is a tool for fetching system information, similar to Neofetch, but with enhanced performance because it’s written in C and offers greater customizability, providing you with more control over the output.
Overall, it’s a good tool available for most operating systems, like Linux, Android, FreeBSD, macOS, and Windows 7. However, since it’s almost identical to Neofetch, the question arises: should you consider making the switch?
But before I answer this question for you, I would love to show you the features, different ways to install it on your Linux system, a few command-line usages, and conclude with my final thoughts.
Tutorial Details
| Description | Fastfetch – System Information Fetching Tool |
| Difficulty Level | Low |
| Root or Sudo Privileges | Yes (for installation) |
| OS Compatibility | Ubuntu, Manjaro, Fedora, OpenSUSE, etc. |
| Prerequisites | – |
| Internet Required | Yes (for installation) |
Features of Fastfetch
The project page lacks a features table, so here is a list of things discovered while using this tool that could be considered features.
- It can perform all tasks of neofetch and is written in plain C.
- Focuses on performance and customizability.
- During testing with the time command, it proved to be 78.53% faster than neofetch.
- The default command output is customizable through JSON-written modules.
- It is compatible with Linux, Android, FreeBSD, MacOS, and Windows 7.
So, it can be considered a good replacement for Neofetch; let’s see how you can install fastfetch on your favorite Linux distribution.
How to Install Fastfetch on Linux
Fastfetch is available in most Linux repositories, such as Debian, Ubuntu, Fedora, Arch, OpenSUSE, etc., and can be easily installed from the package manager by running.
$ sudo apt install fastfetch                                                                           #For Debian, Ubuntu, or Pop!_OS
$ sudo dnf install fastfetch                                                                           #For RHEL, Fedora, or Alma Linux
$ yay -S fastfetch-git                                                                                    #For Arch, Manjaro, or EndeavourOS
$ sudo zypper install fastfetch                                                                    #For OpenSUSE
$ sudo emerge --ask app-misc/fastfetch                                                 #For Gentoo
$ brew install fastfetch                                                                                 #For macOS
$ pkg install fastfetch                                                                                   #For FreeBSD
$ scoop install fastfetch                                                                              #For Windows
Once the installation is finished, you can move on to the next section to learn how to use it.
How to Use Fastfetch on Linux
Once fastfetch installation is completed on your preferred Linux system, simply issue the following command without options to launch it.
$ fastfetchOutput:
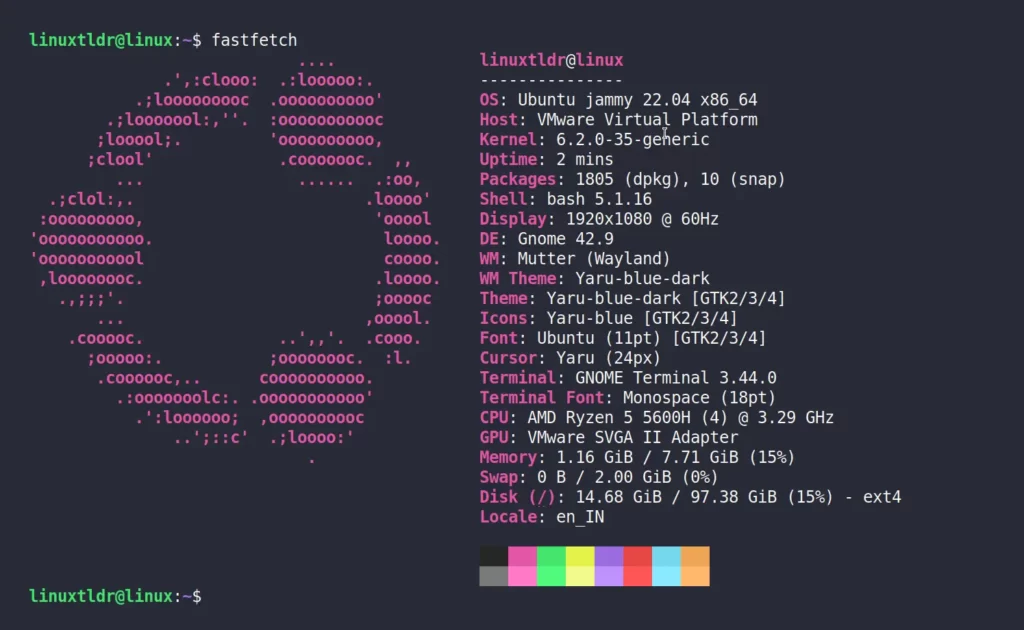
Quite identical to neofetch, right? However, when comparing the output with neofetch, I noticed a few differences, like the display being named Resolution and additional options such as font, cursor, terminal font, swap, disk, and locale being shown in fastfetch.
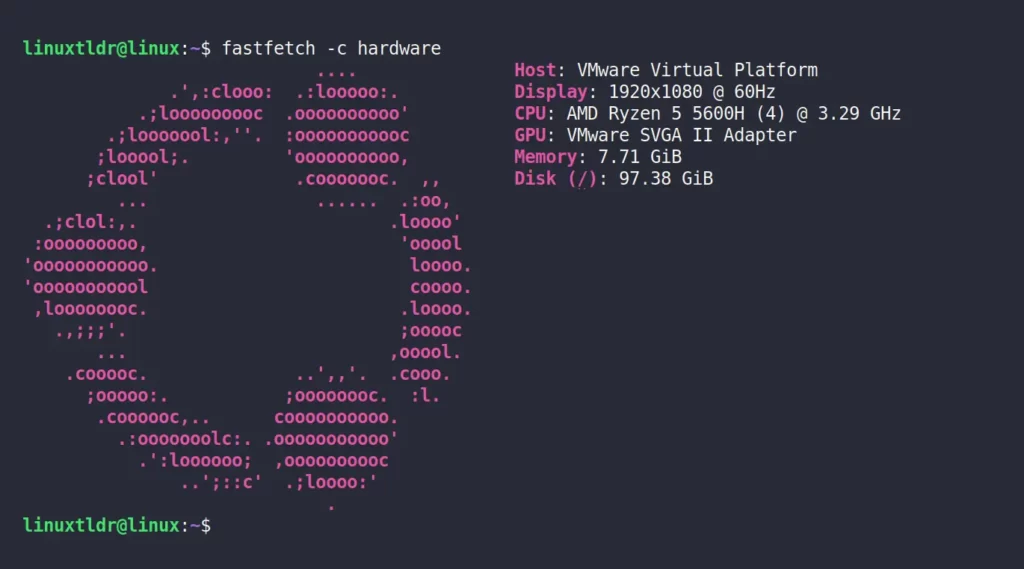
If you have some knowledge of JSON, then you can easily create your own configuration file or use premade config files from presets to get your desired output.
For instance, I would take the hardware module from the preset and pass it as an argument for the “-c” option, as shown.
$ fastfetch -c hardwareOutput:
Here, every time you execute the command, the Ubuntu ASCII logo on the left side will always appear. However, when you execute the following command, you will get a list of logos.
$ fastfetch --print-logosOutput:
If you discover a logo you adore from the aforementioned list, simply provide its name to the “-l” option, and it will be shown in place of the default Ubuntu logo.
$ fastfetch -c hardware -l starOutput:
You can further customize it based on your needs, and for assistance, you can refer to the logo documentation for more information.
The rest of the things are quite self-explanatory, so you have to take a look and understand them on your own. Additionally, you can also use the “fastfetch --help” command for help information.
Final Word
TBH, it’s a good replacement for Neofetch. If you’re happy with Neofetch, there’s no reason to switch. However, if you need a high-performance and highly customizable tool to display system information based on your requirements, then this could be the tool for you.
If you have any questions lingering in your mind or suggestions, or if you know of any similar tools, please feel free to let us know in the comment section.
Till then, peace!


Excellent recommendation. It’s much faster and shows more specific info than Neofetch by default.
Thank you
I tried it on my Mint 21.x and on my Ubuntu 24.04, and it could not install directly. I had to manually add the ppa: URL to my deb repolist.
sudo add-apt-repository ppa:zhangsongcui3371/fastfetch