
The time command is used to determine the amount of time taken by the referenced command or shell script to execute in your system, from start to finish.
It returns the result in three categories: real time, user time, and system time (we will discuss them later), which can be very useful, especially if you are a sysadmin.
As a sysadmin, you must be aware of the time taken by your server to execute the referenced script. A single script doesn’t affect much, but running multiple complex scripts on your server will result in resource waste.
In this article, you will learn how to use the time command to determine the execution time of a command or shell script taken by your system/server in Linux.
Tutorial Details
| Description | Time |
| Difficulty Level | Low |
| Root or Sudo Privileges | No |
| OS Compatibility | Ubuntu, Manjaro, Fedora, etc. |
| Prerequisites | time |
| Internet Required | No |
Syntax of the Time Command
The time command takes two arguments: one is the option, and the other is the command or script name.
$ time [OPTION] [COMMAND or SCRIPT]When you use the time command to find out how long a command or shell script took to run, the output will have three sets of time, followed by:
- Real time: This is the actual time it took your system/server to execute the referenced command or shell script from start (when you hit the “Enter” key) to end (when it completed the command).
- User time: The amount of CPU time spent in user mode.
- System time: The amount of CPU time spent in kernel mode.
Different Time Command Versions for Shells
The popular Linux shells like Bash and Zsh have their own built-in versions of the time command that could be different from the standard GNU time command.
Use the type command to determine whether the time is a binary or a built-in keyword.
$ type timeOutput:
# Bash
time is a shell keyword

# Zsh
time is a reserved word

# GNU time (sh)
time is /usr/bin/time
Any of the above commands will give the same result, but some of the formatting and command options are only available with GNU time.
To use the GNU time command, either you can directly specify the full path to the “/usr/bin/time” binary or create an alias of the GNU time binary.
$ alias time=/usr/bin/timeFew Factors Influencing the Execution Time
The result (basically the duration of time) varies depending on the command or script, and your system resources also influence the outcome, as a new system with the latest hardware may achieve a result in less time than the potato PC.
Also, if your command requires an internet connection, the speed of the internet will also affect the execution time, especially if you are downloading.
Measuring the Execution Time of Commands
To make things easier for beginners, I will use the cp command to copy a single file from one location to another and measure the amount of time it took to copy the file.
$ time cp ~/Downloads/guix.iso ~/Documents/ISO/Output:

As you can see from the above picture, the real (or total) amount of time the cp command took to copy the referenced “guix.iso” ISO file (with a size of 800 MB) was 9.43 seconds.
Let’s check out another example where I will ping “google.com” twice using the ping command and measure the total amount of time it took to ping.
$ time ping -c 2 google.comOutput:
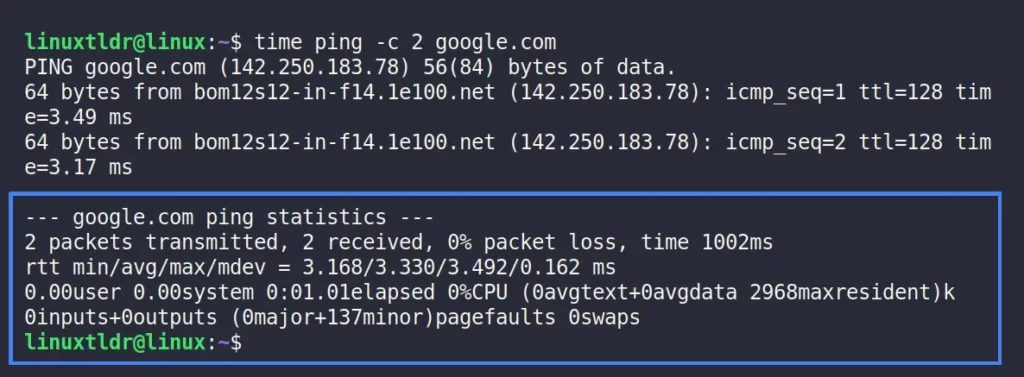
As you can see from the above picture, the total amount of time it took for this command to fully execute was 1.01 seconds.
Get Minimal Command Runtime Statistics
The “-p” flag will return clean output that will make it way easier and more convenient for beginners to figure out the amount of time it took for a command or script to execute.
$ time -p ping -c 2 google.comOutput:
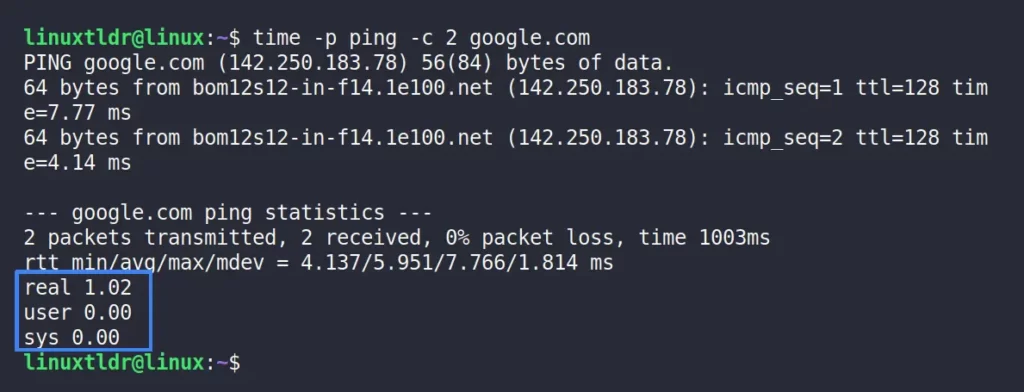
As you can see from the rest of the parameter, only the real (or total), user, and system information were returned.
Get Detailed Command Runtime Statistics
If you use the “-v” flag, you will get a detailed list of all the parameters used to run the referenced command or script.
$ time -v ping -c 2 google.comOutput:
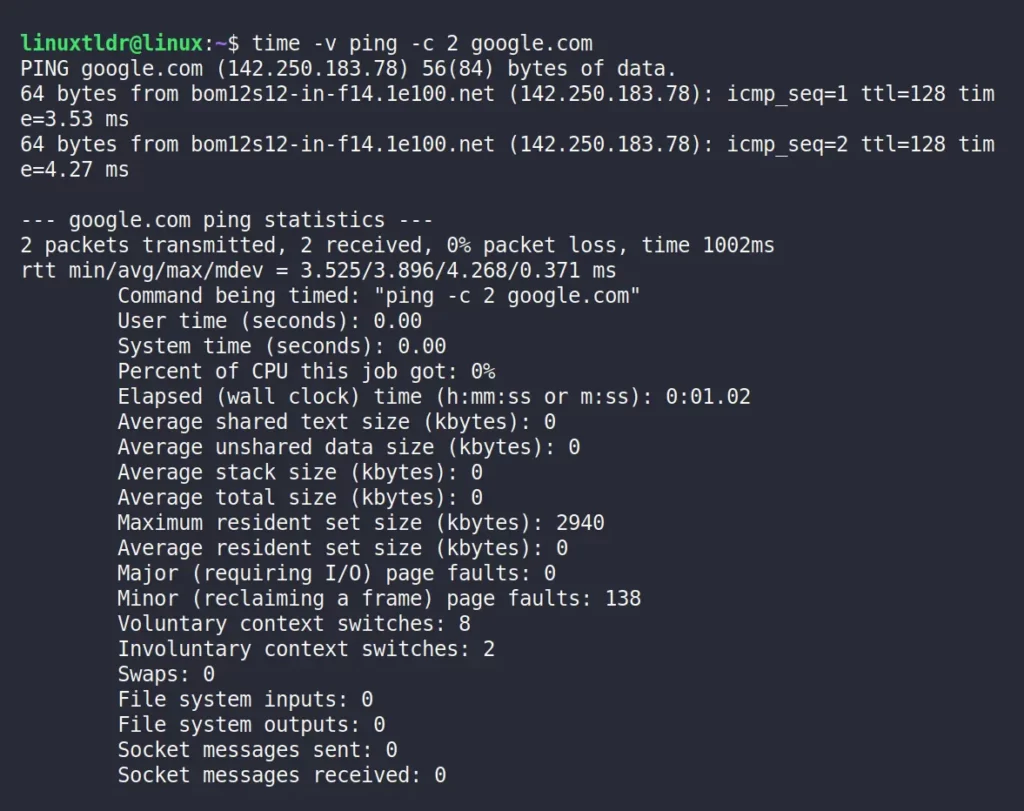
As you can see from the above picture, you have comprehensive information for all the parameters that are involved in the command runtime.
Formatting the Time Command Output
As I’ve told you earlier, (GNU) time also supports the custom formatting that you can assign using the “-f” flag.
The following is a list of a few known formatting options:
| Custom Format | Description |
|---|---|
%C | Return the command itself with the assigned options. |
%E | Return the real (or total) amount of time it took to execute the command. |
%K | Return the average amount of memory (in kilobytes) that was used for data, stack, and text when the command was run. |
%M | Return the total size (in kilobytes) of the command execution during its lifetime. |
%P | Return the amount of CPU time spent on the execution. That is just the user and system times divided by the total running time. |
%R | Return the various page fault details. |
%U | Return the amount of CPU time spent on the execution in user mode. |
%S | Return the amount of CPU time spent on the execution in kernel mode. |
%e | Elapsed real (wall clock) time used by the process, in seconds. |
%x | Return the exit status of the referenced command or script. |
For a detailed list, check the “man time” command.
From the above list, let’s choose a few of the formats to create a custom time command output.
$ time -f "Elapsed time: %E\nExit Code: %x" ping -c 2 google.comOutput:
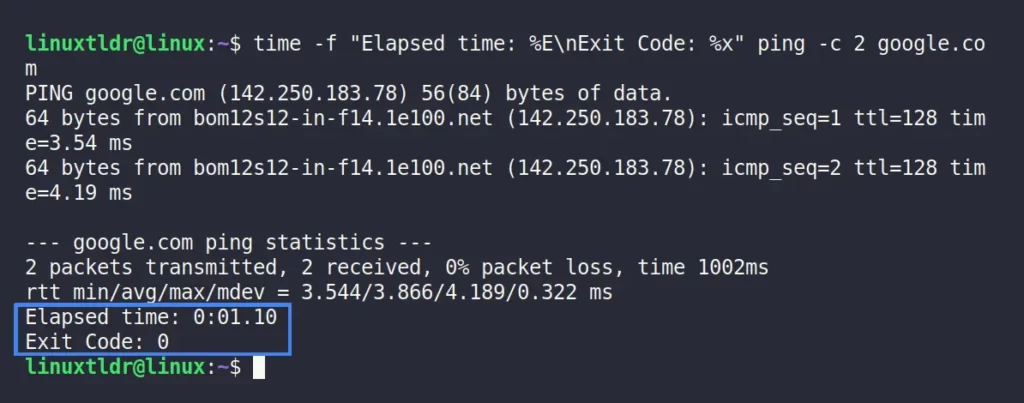
As you can see from the above picture, the time command returns different output with “Elapsed time” and “Exit Code“, which are specified using the “%E” and “%x” formats.
Saving the Output in a New File
It is quite possible the command or script that you intend to run might take a longer time, and of course you will not going to stare at your screen until the execution is completed.
In this case, you can redirect the output to a new file once the referenced command or script has finished its execution.
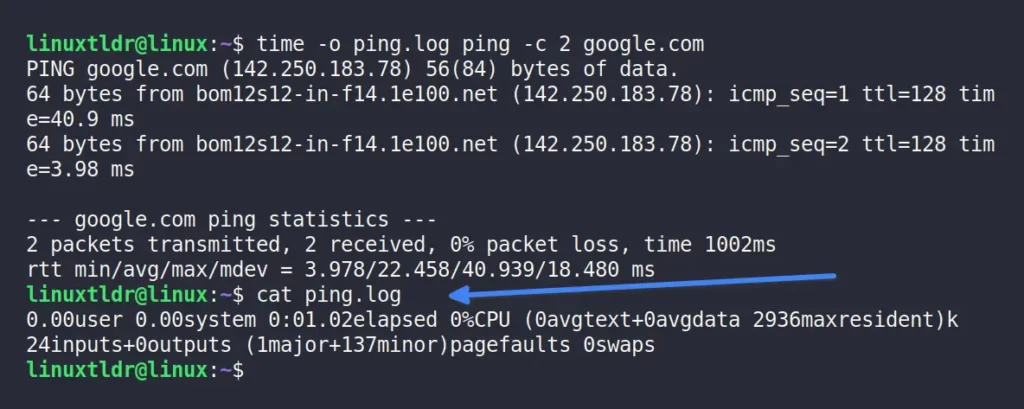
$ time -o ping.log ping -c 2 google.com
$ cat ping.log
The above command will redirect the output to the “ping.log” file once the command is fully executed.
Final Tips!
As you can see, this command-line utility can be very useful for sysadmins or shell script writers.
If you have any more tools related to this for sysadmin, then do let us know in the comment section.
Till then, peace!


