
Can you name a good GUI music player? If not, Moosync could be your next favorite GUI music player in Linux—at least for me, if there wasn’t that one issue.
Moosync: A Near-Perfect GUI Music Player for Linux
Moosync is an open-source music player with excellent customizability and a clean interface built on Electron, capable of playing music from your local device, YouTube, Spotify, or LastFM.
Recently, I wrote an article about an incredible CLI-based music player called Spectrum, but the issue is that it can only play local music and lacks the option to play music from YouTube or Spotify.
While searching for an alternative, I came across Moosync, which fulfills almost all my desired features. However, two aspects I disliked were its lack of a CLI tool and its use of Electron, a technology known for its sluggish performance.
But if I set this aside, there were some issues again; however, overall, it was a good tool if you are only interested in listening to songs from YouTube or Spotify (ad-free).
So, let’s start this article by exploring its features, followed by installation on your favorite Linux distribution, a few usage examples, and concluding with final thoughts.
Tutorial Details
| Description | Moosync – A GUI Music Player |
| Difficulty Level | Low |
| Root or Sudo Privileges | Yes (for installation) |
| OS Compatibility | Ubuntu, Manjaro, Fedora, etc. |
| Prerequisites | – |
| Internet Required | Yes |
Features of Moosync
The following is a list of Moosync features:
- Play your local music files in Moosync with ease.
- Play music from YouTube without a login, but it is required for Spotify.
- After logging in, effortlessly enjoy ad-free music from your YouTube or Spotify playlist.
- Read the lyrics while listening to your songs, but they won’t be synchronized with the music.
- Automatically launch it on system boot and hide it in the system tray.
- Enjoy an easy-to-use interface with the option to switch themes.
- Available for Windows, Linux, and MacOS.
The list of features is quite overwhelming, but let’s discover them by starting with the installation.
How to Install Moosync on Linux
The easiest way, and the one I recommend for installation, is to use Flatpak. Just ensure that your system is installed and configured with Flatpak, then run:
$ flatpak install flathub app.moosync.moosyncAlternatively, if you’re using Ubuntu, it may already be installed and configured with Snap, allowing you to effortlessly install it with the following command:
$ sudo snap install moosyncIf you love using the default package manager, here’s some unfortunate news: the documentation states that you can install Moosync using their hosted APT repo, but it’s offline as of writing this article, and the provided bash command didn’t work for me.
So, your only remaining option for Debian-based distributions is to install it via the “.deb” package from the GitHub release page; once downloaded, simply install it using the following command:
$ sudo dpkg -i Moosync-*-linux-amd64.deb
$ sudo apt --fix-broken install                                                         #Run this if a dependencies issue occurs.
If you’re using RHEL-based distributions such as Fedora, Alma Linux, CentOS, etc., simply enable the Fedora COPR repository and install it with the dnf command.
$ sudo dnf copr enable ovenoboyo/Moosync
$ sudo dnf install moosync
In the end, Arch users can install it using Yay.
$ yay -S moosyncFinally, let’s move on to the usage section to get a kickstart guide.
How to Use Moosync on Linux
After the installation is complete, you can either execute the following command or find it in the application search menu.
$ moosyncOr

When you launch it for the first time, you will be taken through the welcome wizard.
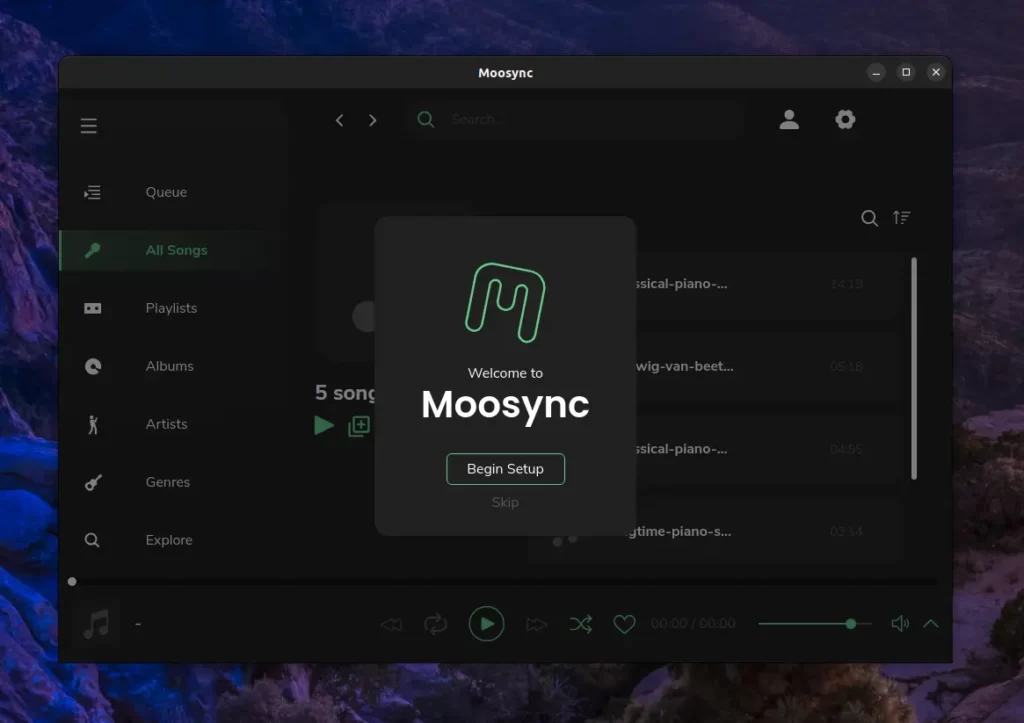
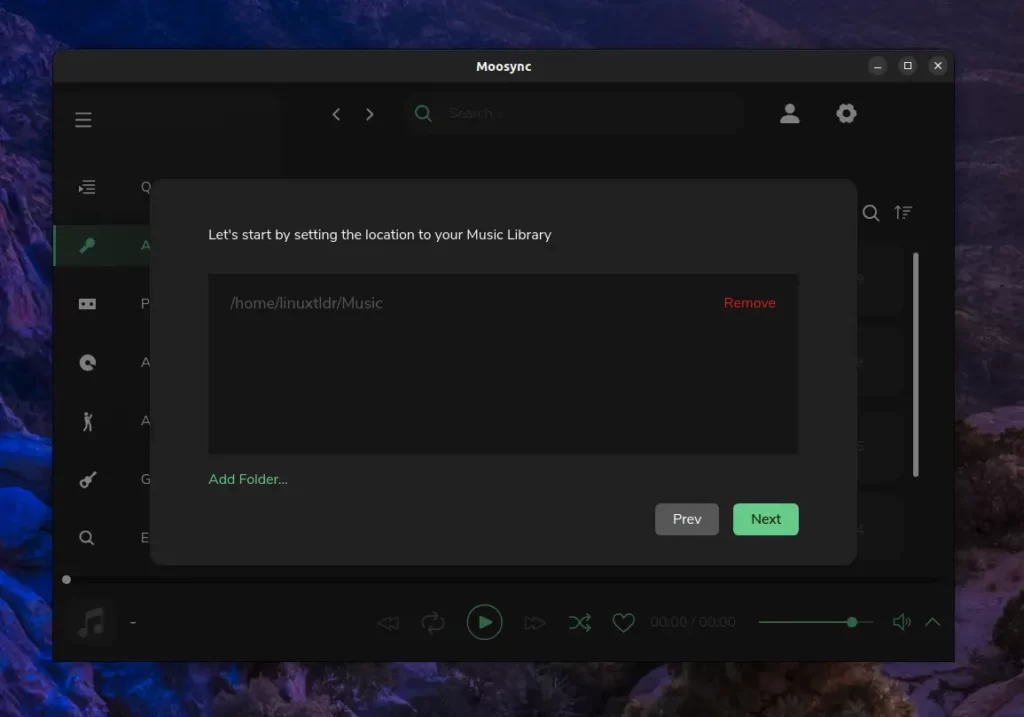
Begin by clicking on the “Begin Setup” button, which will take you to the next window where you can add a music library. For instance, the default music directory will already be included, and since I’m using it to store my local songs, I’ll simply proceed by clicking the “Next” button.
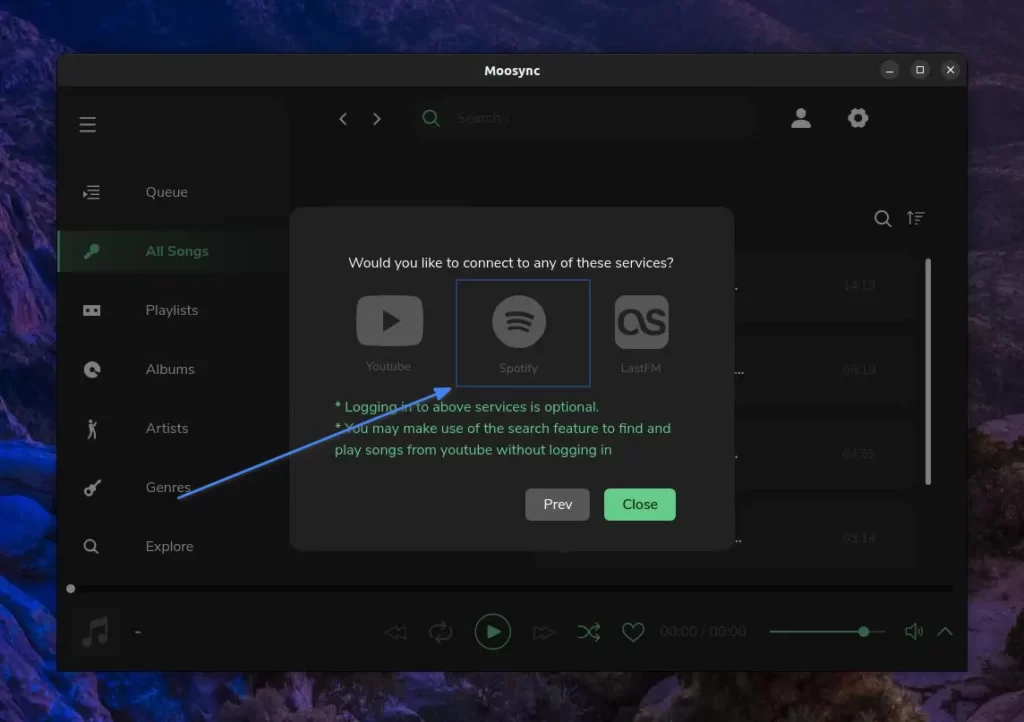
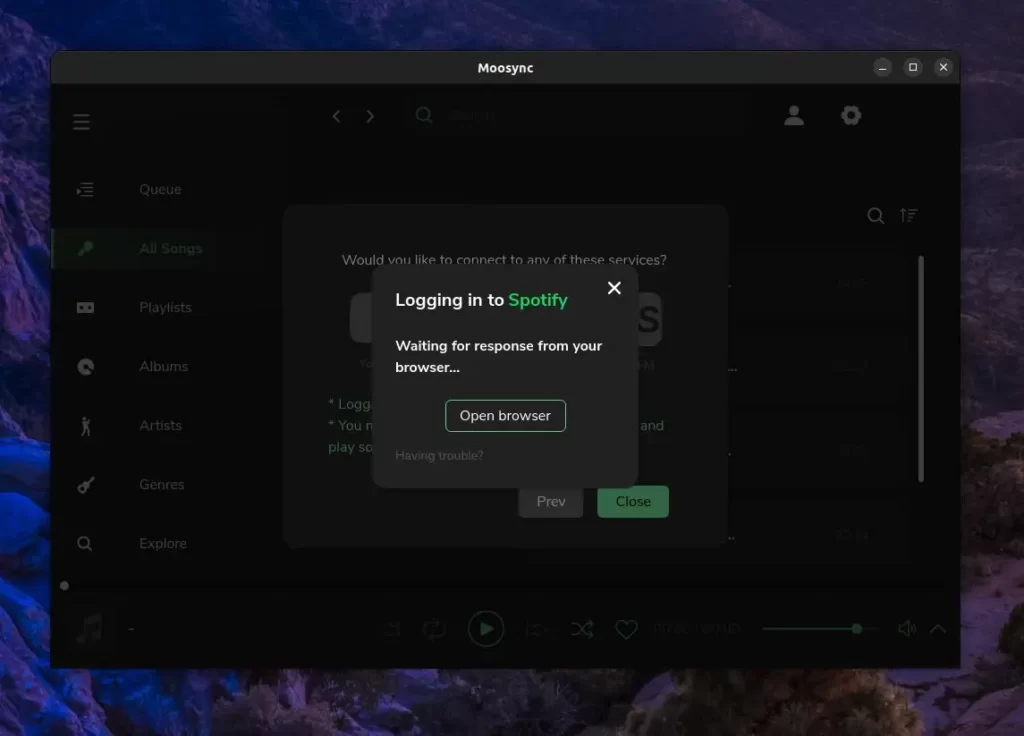
In this window, it will ask you to connect to any supported service, such as YouTube, Spotify, or LastFM. Since YouTube doesn’t require a login, I will show you the steps on how to log in with your Spotify account in Moosync. So, begin by clicking on the Spotify logo.
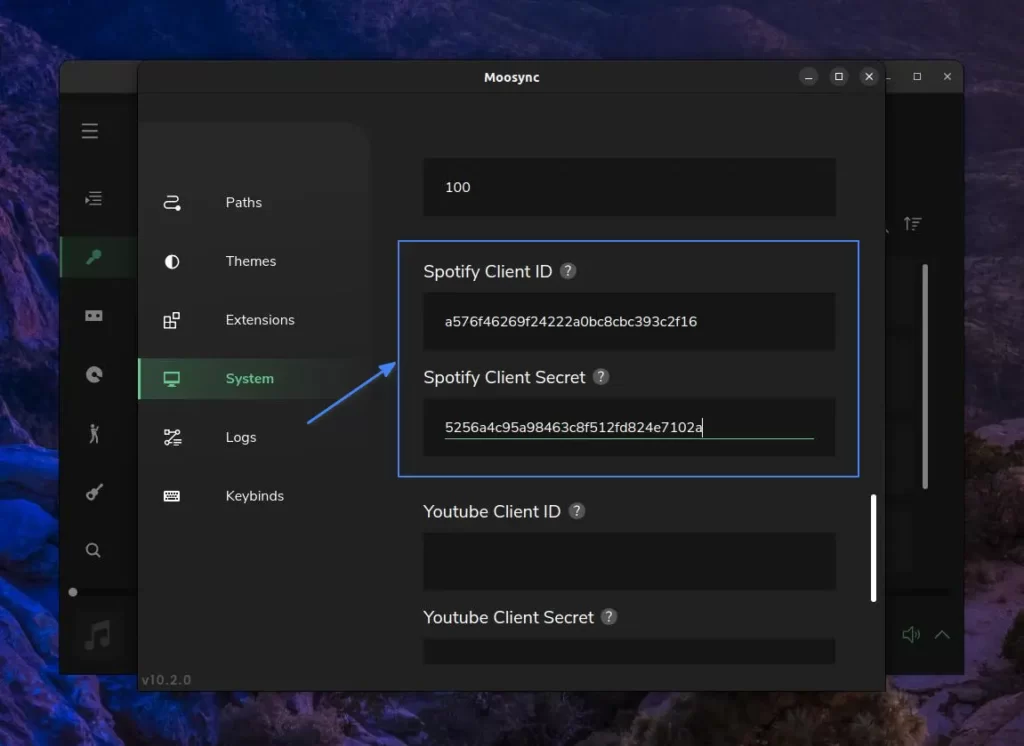
Next, it will launch a “System Setting” window; simply scroll down to the bottom where you’ll find the input box for Spotify Client ID and Spotify Client Secret, as shown.
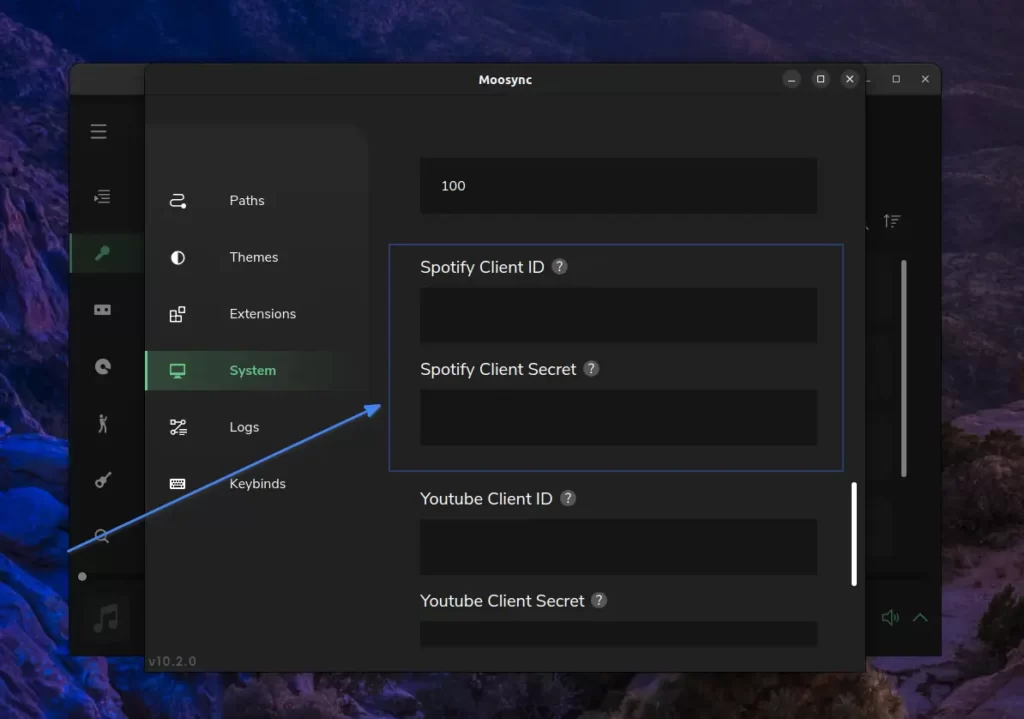
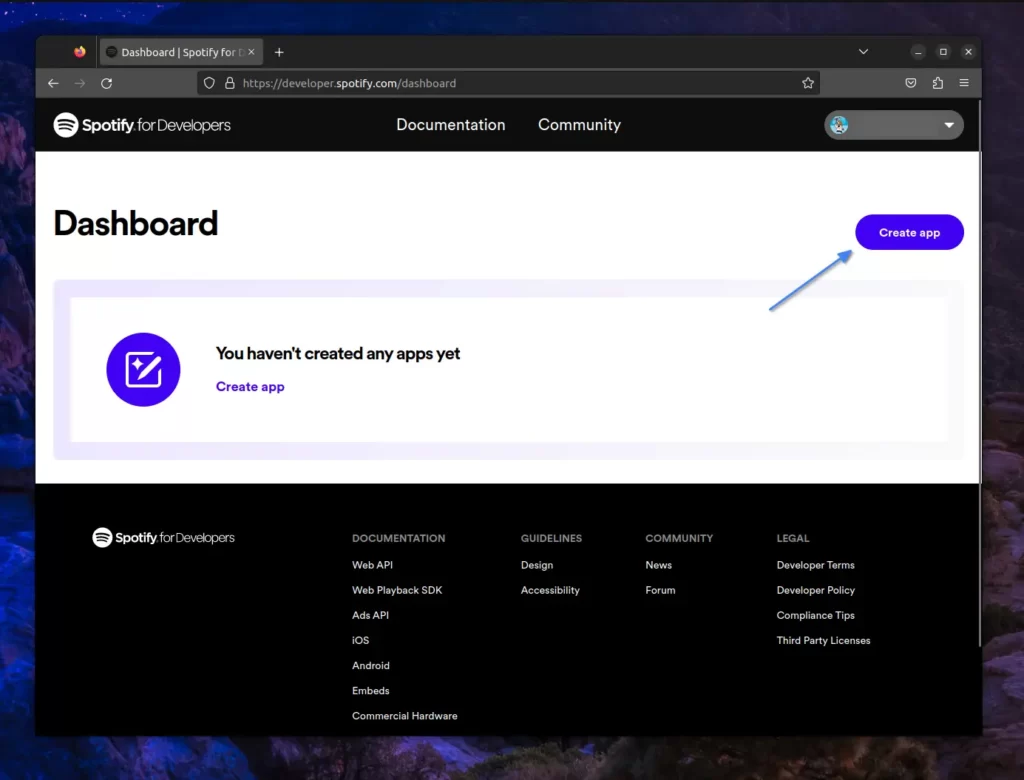
Now, to obtain the necessary keys, you need to launch your browser, navigate to the Spotify developer dashboard, and create a new application by clicking on the “Create app” button.
Here, you need to provide the app name, app description, and redirect URL (http://localhost:8080, http://localhost, https://moosync.app/spotify), then agree to the agreement and click on the “Create” button.

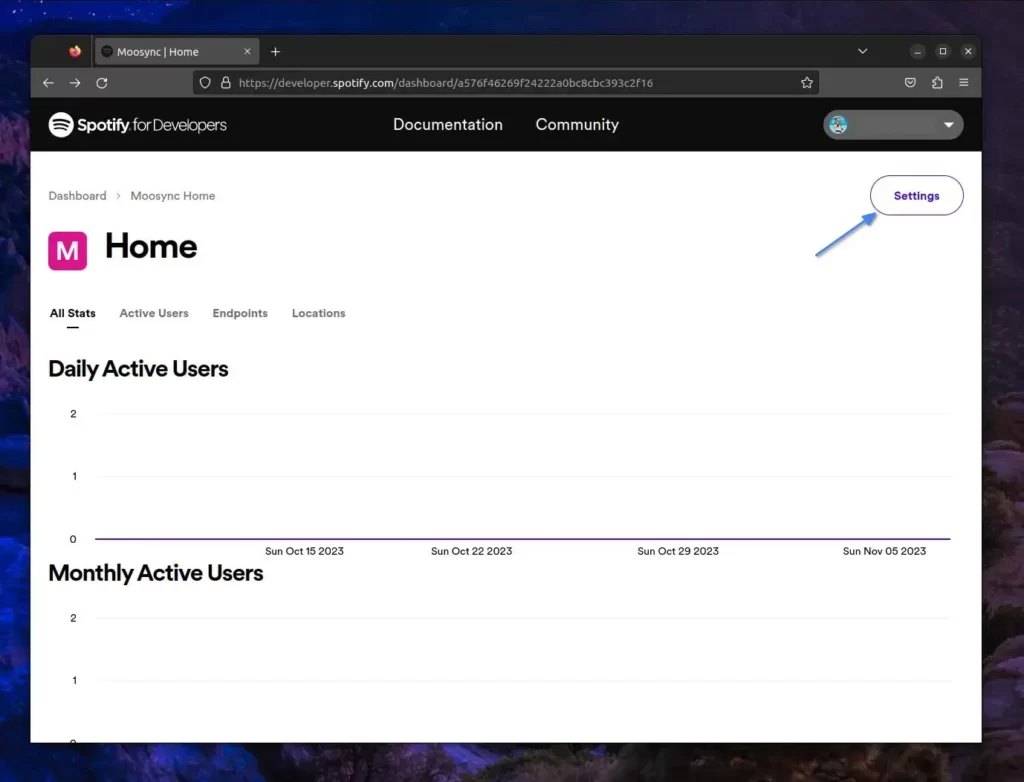
Here, click on the “Settings” button in the top right corner of the app home window.
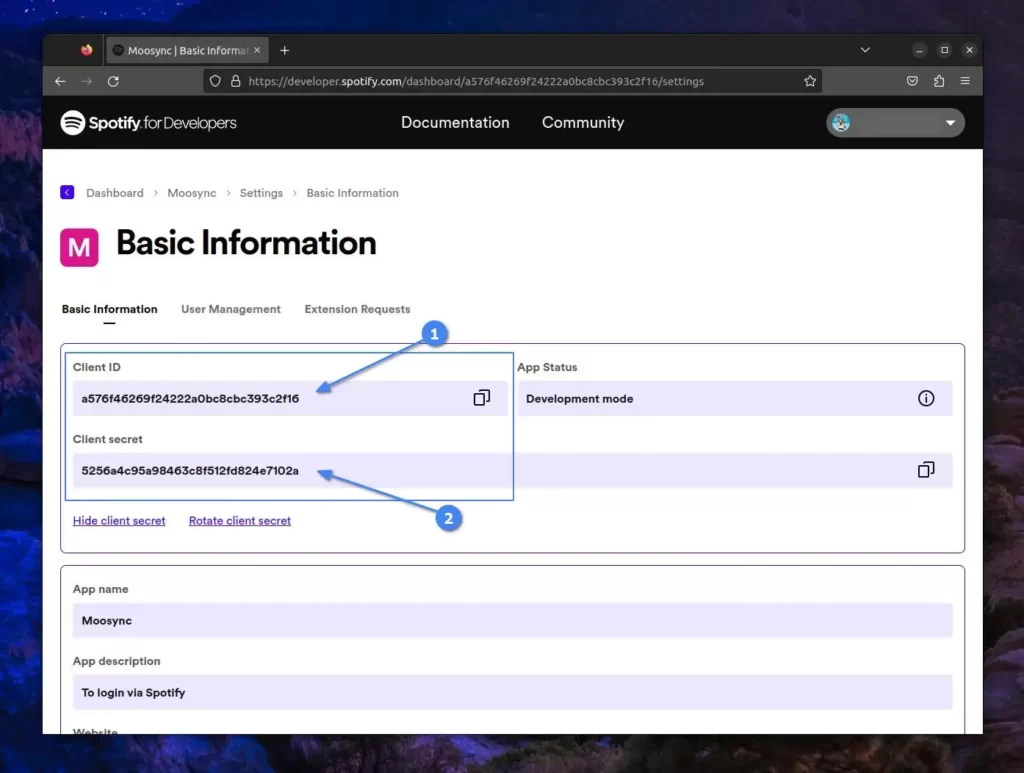
Copy the client ID and client secret key from here, as shown.
Move on to the Moosync window, paste the copied key into the respective input box, and close the window when you are done.
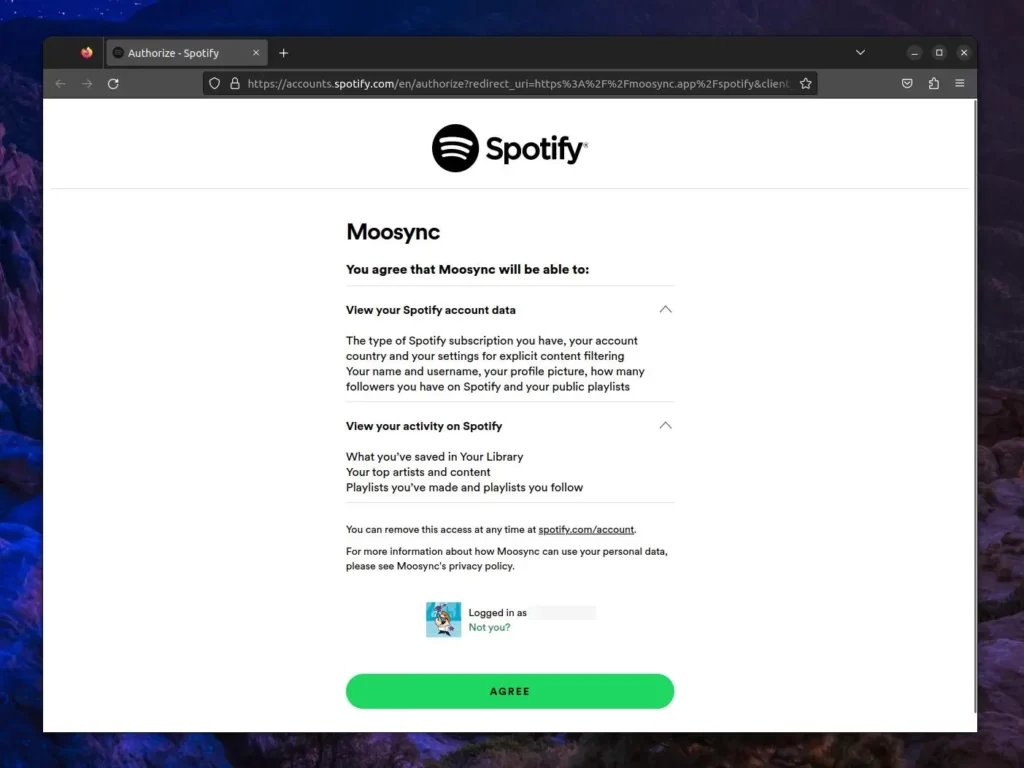
Once more, you’ll find yourself in the services window. Click on the Spotify logo again, and it will launch the Spotify web login link in your default browser.
Just click the “Agree” button to login.
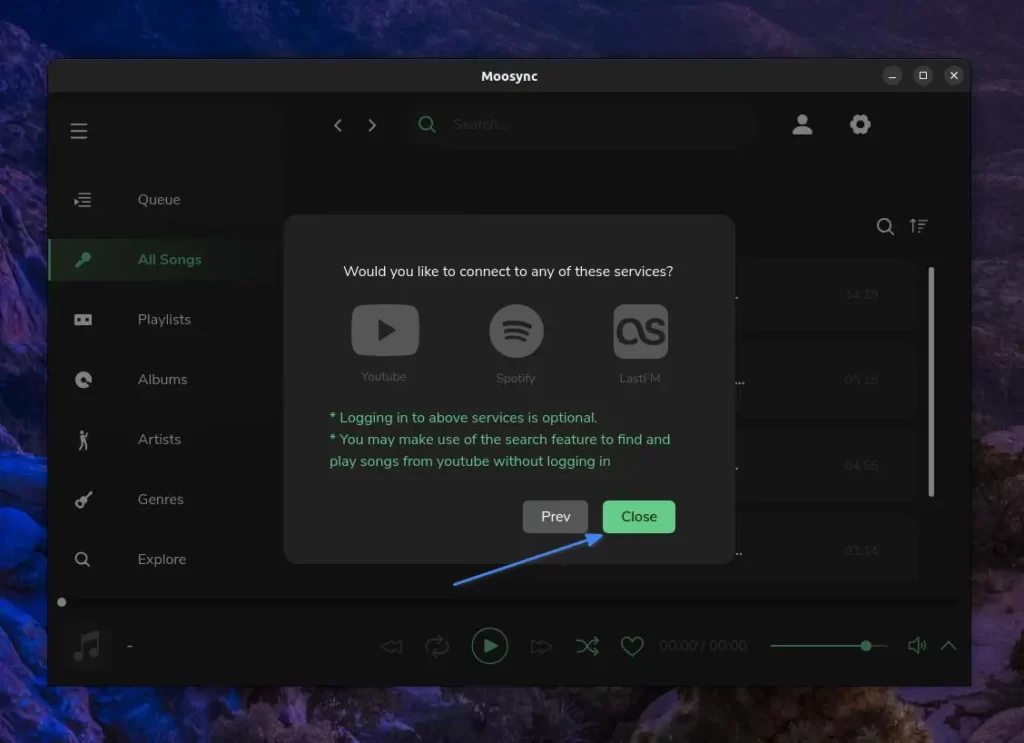
Once you are done, you will be redirected to the Moosync service window. Simply close this window at that time.
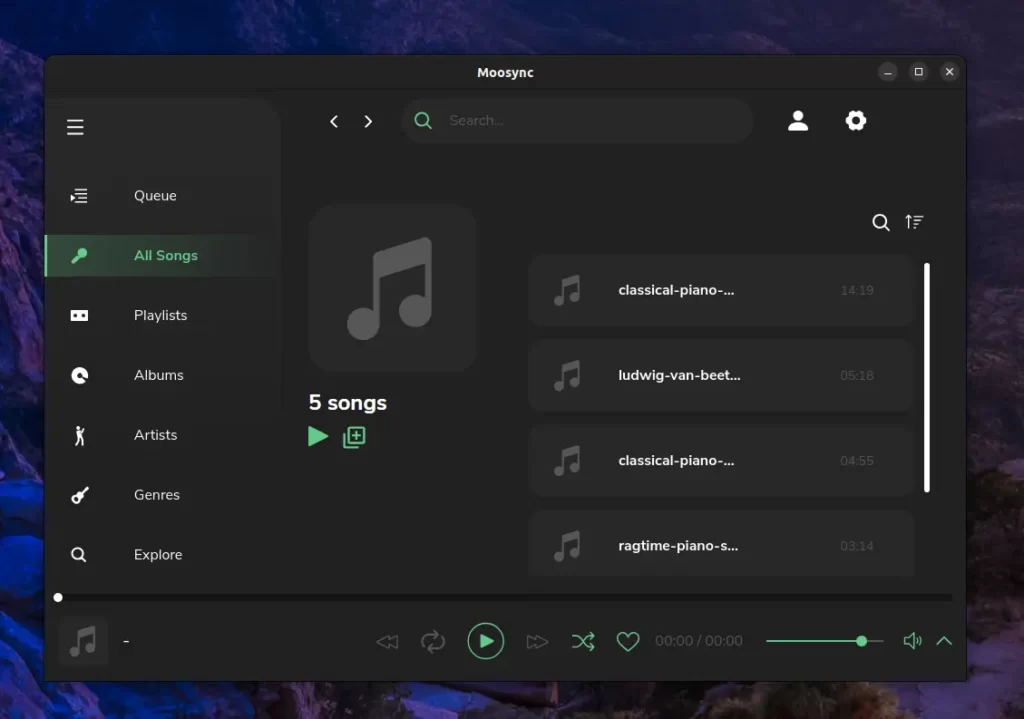
Here, you will be presented with “All Songs“, where the list of all local songs in the directory added to the music library will be displayed.
To search for a song on Spotify, click on the top search input box, type the artist or song name, select the Spotify tab, and you will see a list of all songs related to the provided text.
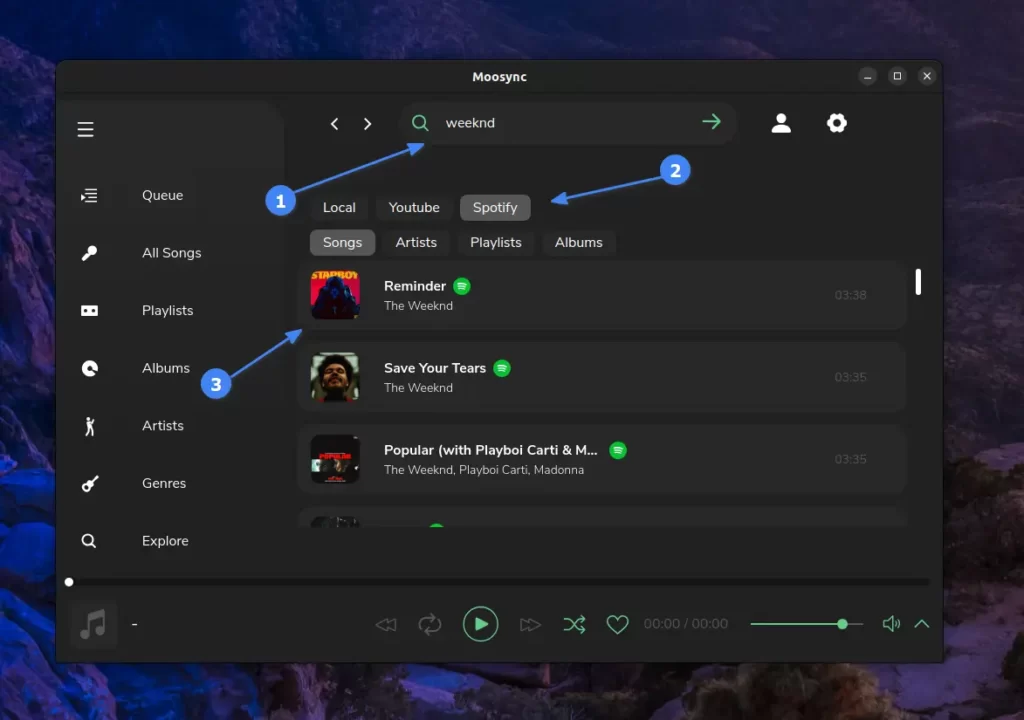
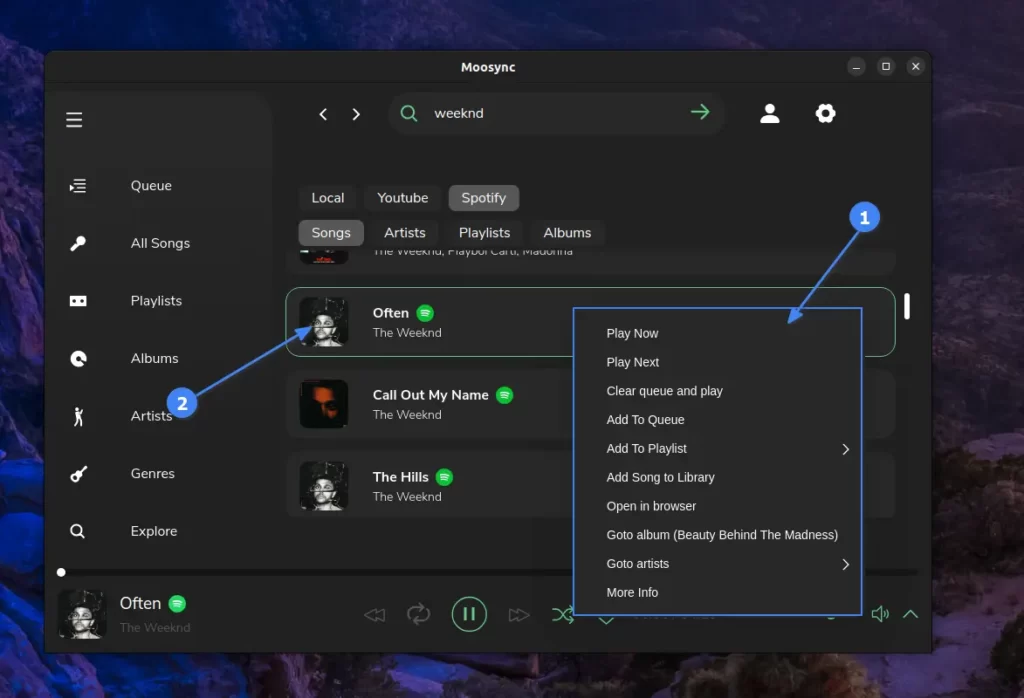
Now, you can right-click on the listed song to perform various actions, as shown below, or simply click on the song cover to play it.
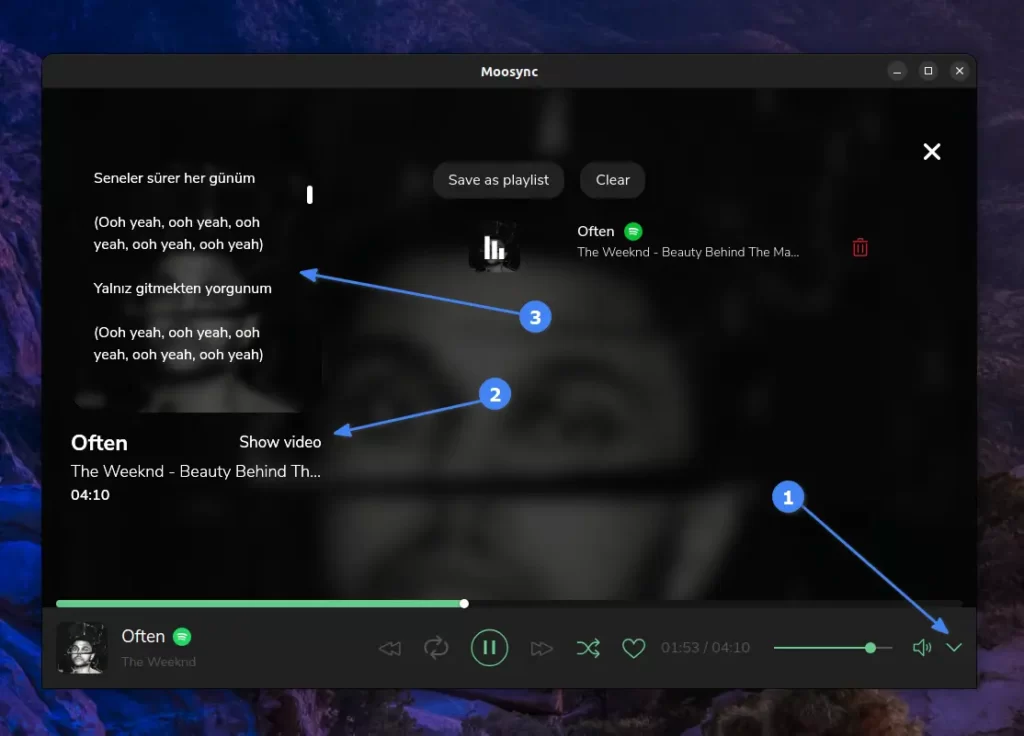
To read the lyrics, simply click on the icon in the right corner and then select the “Show lyrics” option to read the lyrics of the playing song (unfortunately, the lyrics will be unsynchronized with the song).
Now, the rest of the things are quite self-explanatory for you to explore on your own. Let’s delve into my experience while using Moosync.
Final Thought
It’s a remarkable music player, but its sluggish performance is a major issue. I don’t understand why the developer chose Electron (probably for the ease of writing code once and running it on multiple platforms), and there’s also a lack of Spotify integration; often, the playlists don’t appear in the “Playlists” section when you log in.
Also, there was an issue when updating the local music directory with new songs, as the app failed to refresh the list immediately and, in some instances, didn’t even list any of my local songs.
However, I’m interested in your thoughts and experiences, so I’m eagerly waiting for your response in the comment section.
Till then, peace!


