
MySQL is an open-source relational database management system (RDBMS) that is widely used for managing and organizing structured (or tabular) data, and to manage this data, you need to have basic knowledge of SQL queries.
It can be used in a wide range of applications and scenarios, such as web applications, analytics and reporting, mobile applications, online gaming, and many more, due to its flexibility, performance, and ease of use.
Top tier companies like Facebook, Google, Twitter, Airbnb, and many more still use MySQL at their core. So, the people who claim that MySQL is going to be replaced by NoSQL are total hoaxes, as both are made for different purposes.
In this article, I will guide you on how to install MySQL on your preferred Linux system and how to configure and manage it, with practical examples.
Tutorial Details
| Description | Installing, Configuring, and Managing MySQL on Linux |
| Difficulty Level | High |
| Root or Sudo Privileges | Yes |
| OS Compatibility | Ubuntu, Manjaro, Fedora, etc. |
| Prerequisites | – |
| Internet Required | Yes |
Key Features
I’ve talked a lot about MySQL in the introduction. However, I suggest looking at the following key features of MySQL that make it different from other RDBMSs:
- Open Source
- Cross-platform
- High performance
- Scalability
- Tight Security
- ACID Compliance (ensuring that database transactions are reliable and maintain data integrity)
- Support Multiple Data Types (like numeric, string, date and time, and more)
- Triggers and Stored Procedures, and many more.
So, leaving the list here, let’s see how you can install MySQL on your preferred Linux system.
How to Install MySQL on Linux
The exact command to install MySQL may vary slightly depending on your Linux distribution, but the process remains the same.
1. Update your system repository with the latest package information:
$ sudo apt update                                                                                        #Debian, Ubuntu, or Pop!_OS
$ dnf check-update                                                                                     #Red Hat, CentOS, or Fedora
$ sudo pacman -Sy                                                                                      #Arch, Manjaro, or EndeavourOS
$ sudo zypper ref                                                                                         #OpenSUSE
2. Now, choose the appropriate command from the following list based on your Linux distribution to install the latest version of MySQL:
$ sudo apt install mysql-server -y                                                                 #Debian, Ubuntu, or Pop!_OS
$ sudo dnf install mysql-server -y                                                                 #Red Hat, CentOS, or Fedora
$ sudo pacman -Sy mysql                                                                              #Arch, Manjaro, or EndeavourOS
$ sudo zypper install mariadb -y                                                                   #OpenSUSE
Once the installation is complete, you can follow the next step.
Starting the MySQL Service
Once the installation is successfully completed, check that the MySQL service is active and that it is set to automatically start on system boot by using the following command:
mysql” for Debian-based systems and “mysqld” or “mariadb” for CentOS/RHEL-based systems.$ sudo systemctl status mysqlOutput:
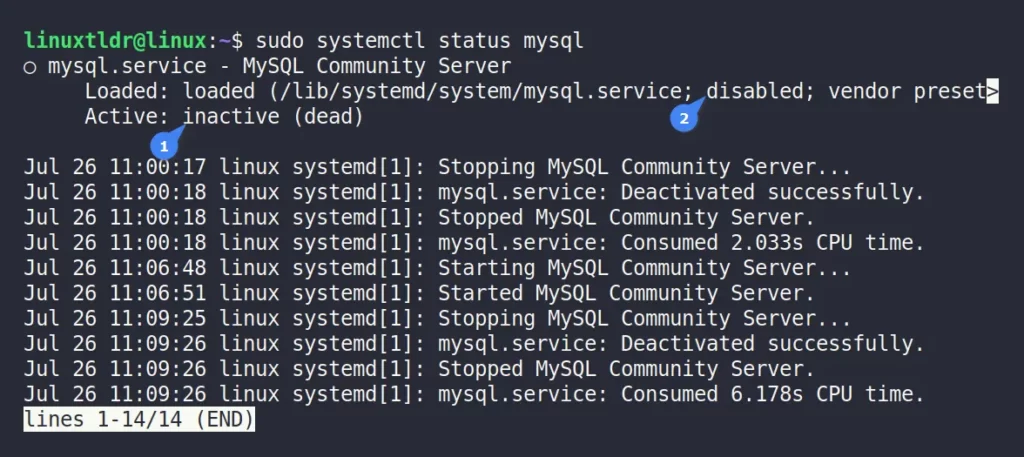
Ensure the service is active and set to automatically start on system boot by referring to the provided image. In my case, the service is “inactive” and “disabled“, respectively.
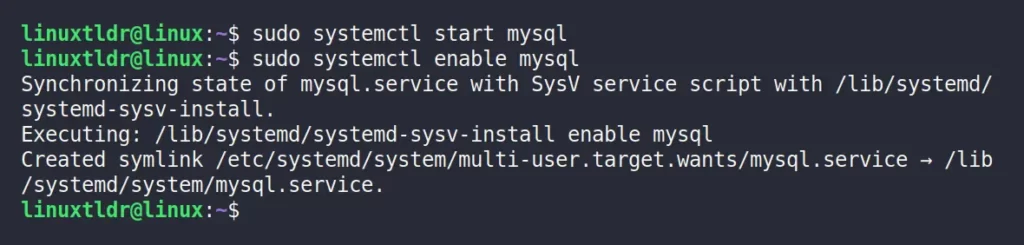
If the service is neither active nor set to start on system boot (as it is for me), execute the following command to rectify the settings:
$ sudo systemctl start mysql
$ sudo systemctl enable mysql
Output:
Note that while performing the aforementioned steps, if you get the following error in Arch or an Arch-based distribution like Manjaro.

Then execute the following command to initialize the database directory. Afterward, follow the previously mentioned steps to retry starting and enabling the MySQL services.
$ sudo mysql_install_db --user=mysql --basedir=/usr --datadir=/var/lib/mysqlOutput:

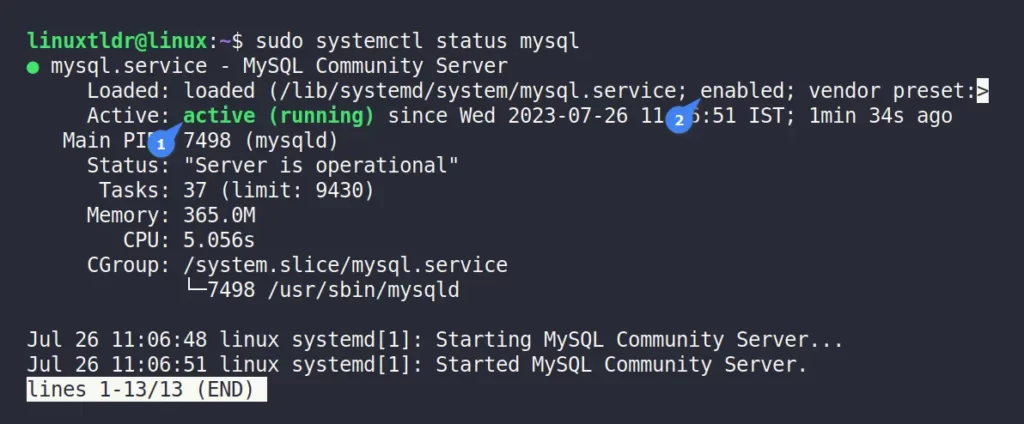
Once you start the service and set it to automatically start on system boot, you can re-verify the service status by using the following command:
$ sudo systemctl status mysqlOutput:
Configuring and Securing the MySQL Installation
It’s recommended to run a security script to enhance the security of your MySQL installation.
$ sudo mysql_secure_installationThe script will prompt you to configure some security settings for MySQL, starting with setting the validation for the MySQL password.
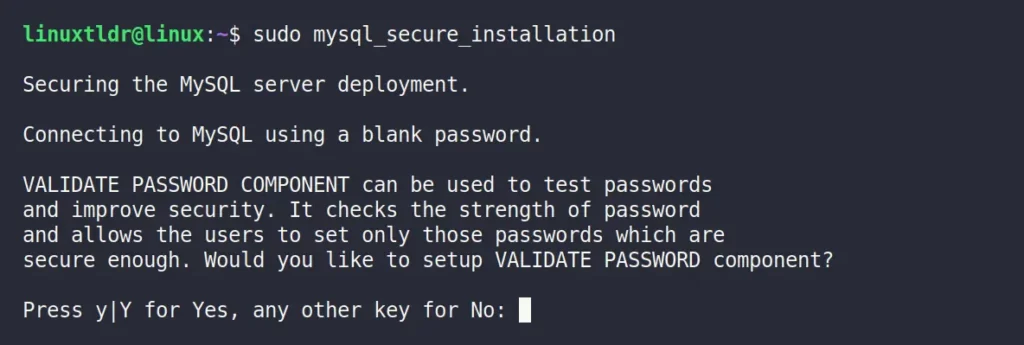
If you set the “VALIDATE PASSWORD COMPONENT” setting to “Yes“, then MySQL will enforce a certain password strength requirement for MySQL user accounts.
If you want to set it up, go ahead, although skip it for now and press enter to go with the default “No” option.
Now, it will prompt you to set the password for the MySQL root user, as “VALIDATE PASSWORD COMPONENT” is set to “No“. So, you can also set a weak password like “12345678“, but I don’t recommend it, especially in a production environment (got an error while setting the password?).

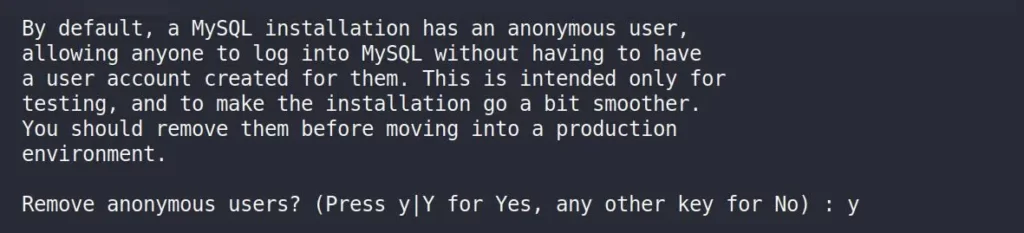
The script will now ask to remove the anonymous users (users with empty usernames), which could potentially be a security risk. So, type “Y” and press “enter“.
It will now ask if you want to disallow root logins from a remote machine. It’s generally safer to only allow root login from a local machine (via “localhost“). So, type “Y” and press “enter“.

MySQL often comes with a “test” database, which is not needed in the production environment. So, type “Y” and press “enter” to remove it.

Lastly, it will ask you to reload the privilege tables. This ensures that the changes you make take effect immediately. So, type “Y” and press “enter” to reload it.

And here you are done with the “mysql_secure_installation” script.
Connecting or Disconnecting from the MySQL Server
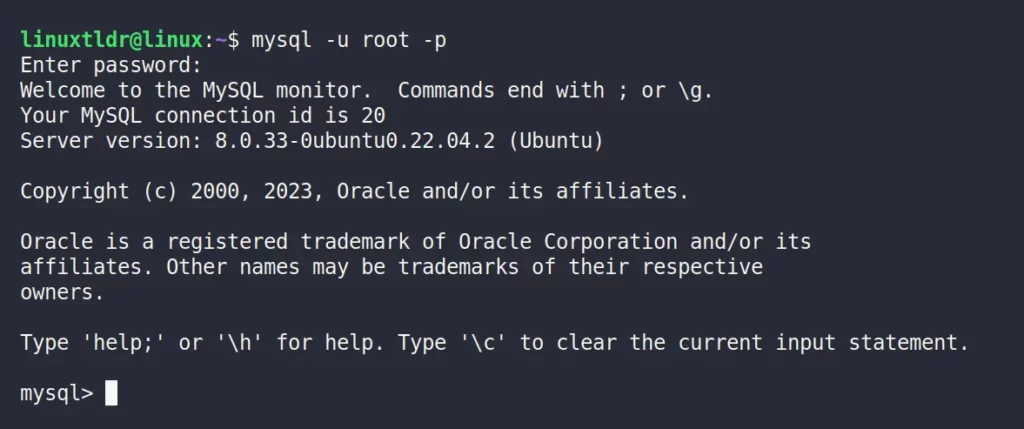
To be able to run the MySQL queries, first you need to connect to the MySQL server by providing user information like a username and password to the mysql command.
The following command will connect to the MySQL server using the root user with its respective password:
-h” flag to specify the hostname. When it’s not specified, MySQL considers connecting to “localhost“.$ mysql -u root -pOnce the provided root user information is validated, the command will prompt you with the MySQL console.
To disconnect from the server and leave the MySQL console, type:
mysql> quit

#OR

mysql> \q
Output:

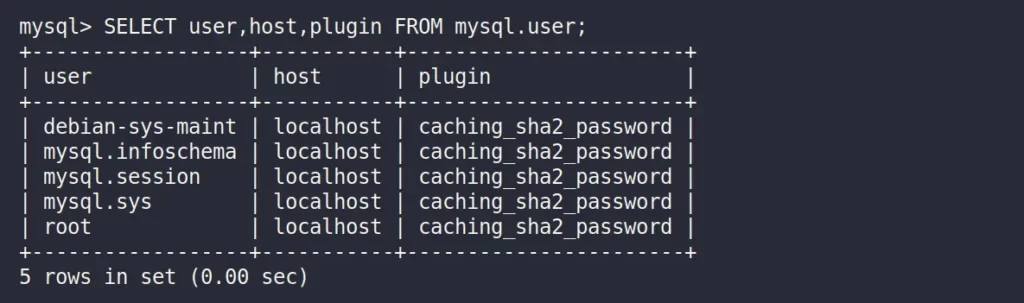
Listing All the MySQL Users
To list all the existing MySQL users along with their hostnames, type the following command in your MySQL console:
mysql> SELECT user,host,plugin FROM mysql.user;Output:
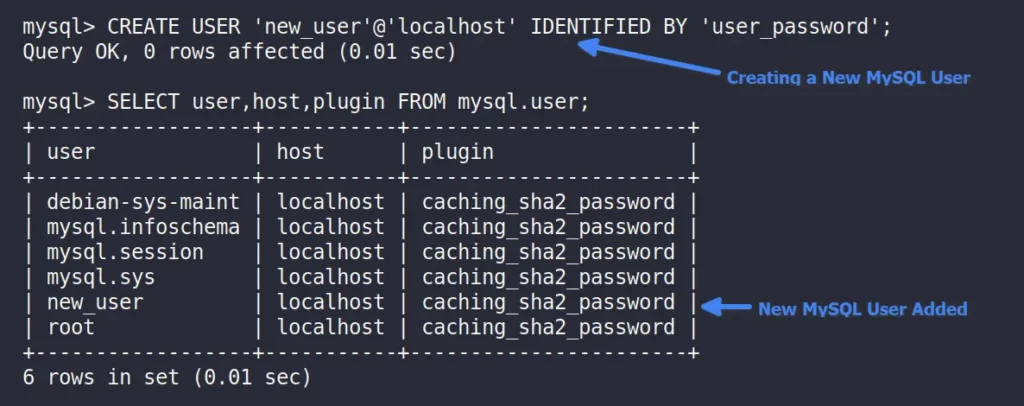
Creating a New MySQL User
Once you are connected to the MySQL server, you can use the “CREATE USER” statement to create a new user by specifying its username, hostname, and password.
new_user” with the desired username and “user_password” with the password you want to set for the new user.mysql> CREATE USER 'new_user'@'localhost' IDENTIFIED BY 'user_password';Output:
After creating the user, you might want to grant appropriate privileges to the user. For example, you can grant all privileges to all the databases to the new user using the “GRANT” statement.
ON *.*” with “ON your_database.*” if you want to grant all privileges on a specific database.mysql> GRANT ALL PRIVILEGES ON *.* TO 'new_user'@'localhost'; After creating the user and granting privileges, remember to reload the privilege tables for the changes to take effect.
mysql> FLUSH PRIVILEGES;Output:

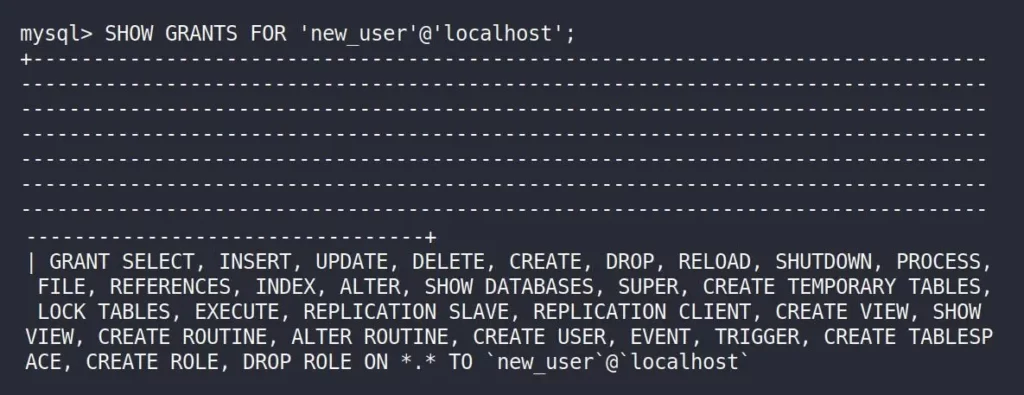
Checking the MySQL User Existing Privileges
To check the privileges for a specific user, you can specify the username and hostname in the “SHOW GRANTS” statement in the MySQL console.
mysql> SHOW GRANTS FOR 'new_user'@'localhost';Output:
Updating the MySQL User Password
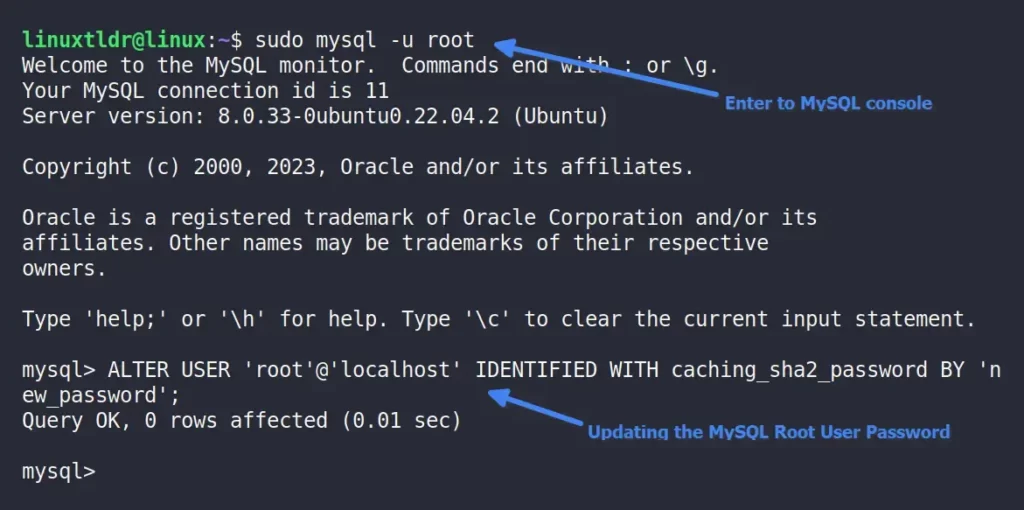
Note that while setting the password for the MySQL root user using the “mysql secure installation” script, it might give you the following error:

In that case, you have to separately set the password for the root user. For that, open a new terminal and enter the MySQL console using the following command:
$ sudo mysql -u rootAfter that, you can specify the username (“root” in this case), hostname, and password in the “ALTER USER” statement:
mysql> ALTER USER 'root'@'localhost' IDENTIFIED WITH caching_sha2_password BY 'new_password';

#OR

mysql> ALTER USER 'root'@'localhost' IDENTIFIED BY 'new_password';
Output:
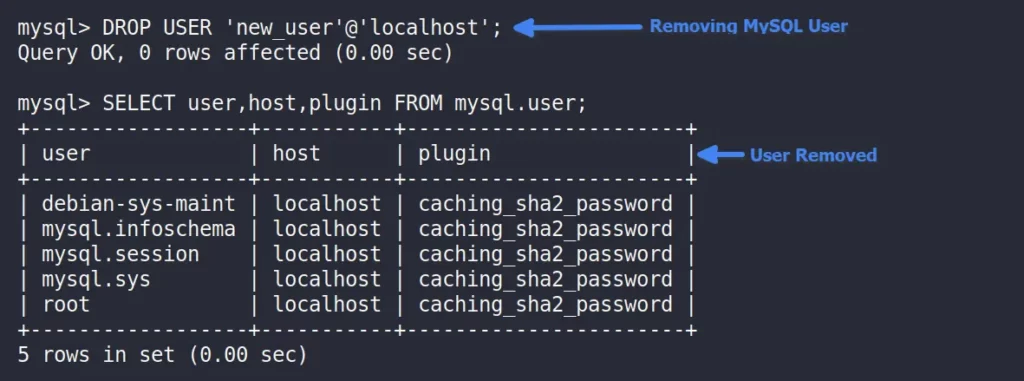
Deleting the MySQL User
To remove the user from the MySQL server, use the “DROP USER” statement while precisely specifying the target user username and hostname in the format 'username'@'localhost':
mysql> DROP USER 'new_user'@'localhost';Output:
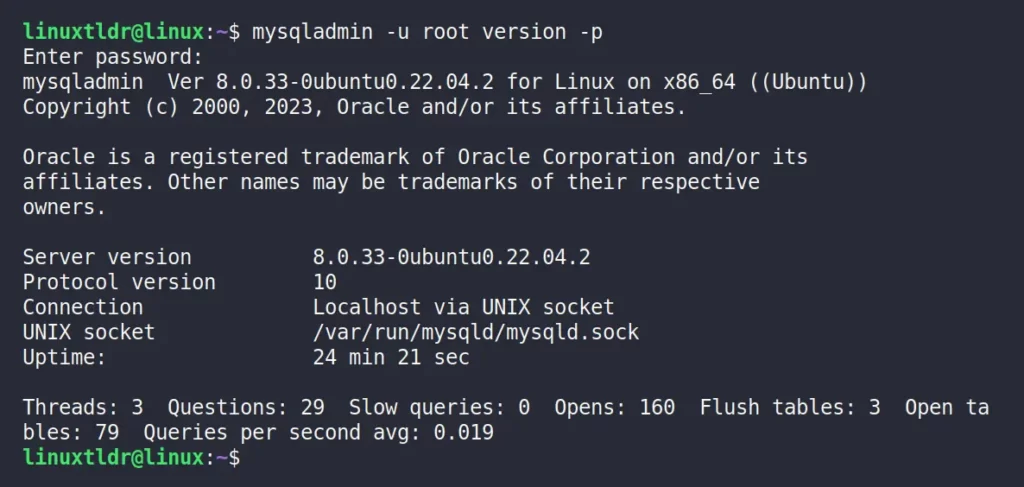
Check the MySQL Server Version
You can output information about the MySQL server version without entering the MySQL console by using the following command:
$ mysqladmin -u root version -pOutput:
Removing the MySQL Server from Linux
If you want to remove the MySQL Server from your Linux system, then execute the following command, depending on your Linux distribution:
$ sudo apt remove mysql-server -y                                                               #Debian, Ubuntu, or Pop!_OS
$ sudo dnf remove mysql-server -y                                                               #Red Hat, CentOS, or Fedora
$ sudo pacman -Rs mysql                                                                                #Arch, Manjaro, or EndeavourOS
$ sudo zypper remove mariadb  -y                                                                 #OpenSUSE
Final Word
I hope you find this article useful. If so, then do share it with your friends and follow us on our various social platforms.
Although I tried to cover every important thing a beginner should know while using MySQL, if something is missed unintentionally, then inform me in the comment section.
Till then, peace!


