
If you’re encountering the following error due to a forgotten password for your MySQL database, rest assured, you’ve come to the perfect destination for assistance.

Follow along with the article to learn how to reset a forgotten MySQL password on Linux.
Tutorial Details
| Description | Resetting MySQL Forgotten Password |
| Difficulty Level | Moderate |
| Root or Sudo Privileges | Yes |
| OS Compatibility | Ubuntu, Manjaro, Fedora, etc. |
| Prerequisites | – |
| Internet Required | No |
A Note for Readers
All types of MySQL versions, including the mariadb (an open-source alternative to MySQL) that some distributions ship, have slightly different procedures for changing the MySQL password.
This article will guide you through the process of resetting forgotten passwords for the latest MySQL 8.x versions.
How to Reset a Forgotten MySQL Password on Linux
Kindly be aware that the upcoming steps involve system modifications that require root access or sudo privileges. With this in mind, let’s proceed.
1. Open your terminal and verify your current MySQL version, ensuring it’s 8.x.
$ mysql --versionOutput:

2. Upon verifying your MySQL version, proceed to stop the MySQL service by executing one of the following commands:
$ sudo systemctl stop mysql

#OR

$ sudo /etc/init.d/mysql stop
Output:

3. Create a new “mysqld” directory within the “/var/run” location and grant ownership to the MySQL user via the chown command.
$ sudo mkdir /var/run/mysqld && sudo chown mysql /var/run/mysqldOutput:

To be on the safe side, ensure that the ownership of the “mysqld” directory is changed to the MySQL user by using the ls command. (optional)
$ ls -ld /var/run/mysqld/Output:

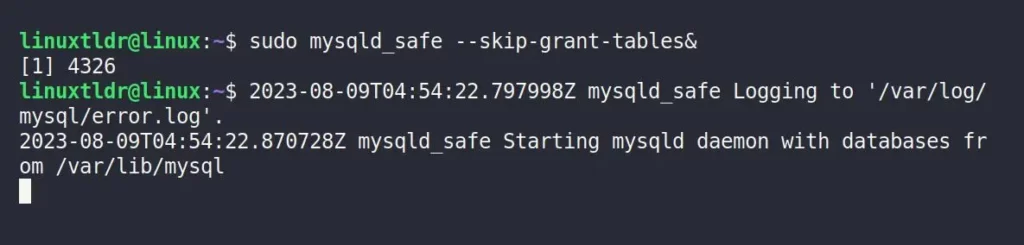
4. Start MySQL in safe mode using the “--skip-grant-tables” parameter. This will deactivate the validation of user privileges and authentication, granting unrestricted connections without the requirement for a valid password.
$ sudo mysqld_safe --skip-grant-tables&Output:
If, for any reason, you come across the following error while proceeding with the aforementioned method:
ERROR 2002 (HY000): Can't connect to local MySQL server through socket '/var/run/mysqld/mysqld.sock' (2)Ensure to terminate all the active MySQL services by executing the following command:
$ sudo killall -u mysql5. After starting MySQL in safe mode, open a new terminal session or tab and execute the following command to launch the MySQL console without requiring a password:
$ sudo mysql -u root mysqlOutput:
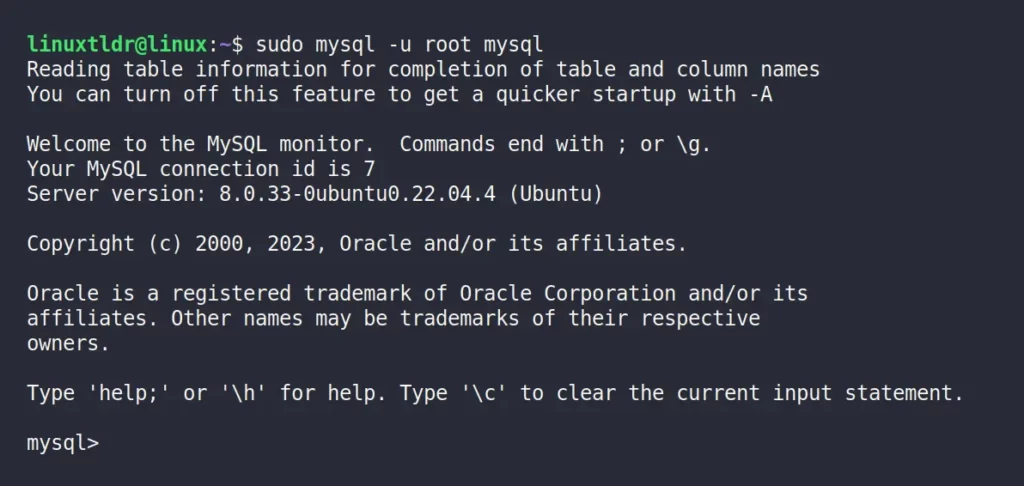
Congratulations! You’ve gained access to the MySQL console without requiring a password. Your next step is to proceed with resetting your forgotten password.
6. Once you gain access to the MySQL console, execute the following command to reset the password for the MySQL user “root” by setting its authentication string to “null“.
mysql> UPDATE mysql.user SET authentication_string=null WHERE User='root';
mysql> FLUSH PRIVILEGES;
Output:

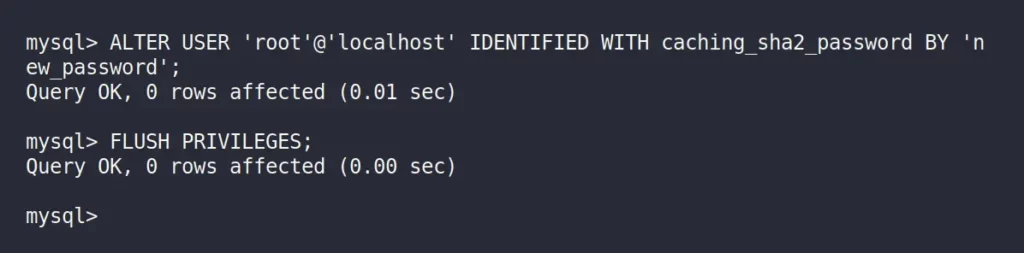
7. After successfully resetting the MySQL user “root” password to “null“, proceed by using the following command to set a new password for the root user.
new_password” field with your preferred password choice.mysql> ALTER USER 'root'@'localhost' IDENTIFIED WITH caching_sha2_password BY 'new_password';
mysql> FLUSH PRIVILEGES;Output:
8. Finally, exit the MySQL console by entering the following command:
mysql> exitOutput:

After successfully following the preceding steps, you can now move on to the next section, where you’ll be able to access your MySQL console using the newly set password.
Access MySQL with a New Password
The first step after resetting your MySQL password is to terminate all the active MySQL processes and restart the MySQL service by using the following commands:
$ sudo killall -u mysql
$ sudo systemctl start mysql
Output:

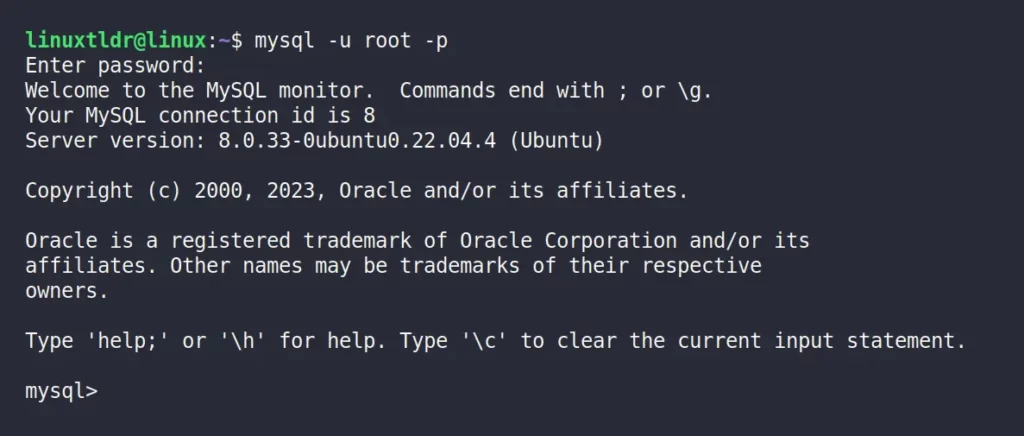
At long last, the highly anticipated moment arrives: you can now access your MySQL user root account by logging in using the recently updated password you’ve chosen.
$ mysql -u root -pOutput:
Final Word
I hope this guide helped you reset the MySQL user root password. However, if you have a question or encounter an error that is not mentioned in this article, feel free to tell us in the comment section.
Till then, peace!


