
The chown command is used to modify the user and group ownership of files and directories. It will be helpful to restrict the access permissions for files and directories to selective users and members of group.
Tutorial Details
| Description | Chown (Change Ownership) |
| Difficulty Level | Moderate |
| Root or Sudo Privileges | Yes |
| OS Compatibility | Ubuntu, Manjaro, Fedora, etc. |
| Prerequisites | chown, gpasswd, echo, usermod, ls, groups |
| Internet Required | No |
The chown usage requires knowledge of users’ access permissions and members of the group. If you know them well, you can move forward.
Whenever you create a new file or directory in your system, for the time being, the active user (who created the file) is assigned as the file owner and its group.
$ touch file.txt
$ ls -l file.txt
Output:

As you can see above, the newly created “file.txt” is owned by the current user and group.
The owner (ex: “linuxtldr“) and members of the group (ex: “linuxtldr“) have read and write permissions, but the other users have only the read permission.
However, you can add the other users in the members of group (ex: “linuxtldr“) to give them read and write access permission to your file.
If you know all the users in your Linux system and want to transfer file ownership to another user, you can do that as well.
But before that, let’s see the syntax and options of the chown command.
Syntax of the Chown Command
The chown command asks for an option (optional), username, or group name depending on what you want to change and the target file or directory.
$ chown [OPTION] [USER]:[GROUP] [FILE/DIRECTORY]The following is the list of valid options for the chown command.
| Options | Description |
|---|---|
-c, --change | It will only report when a change is made that is identical to verbose mode. |
-f, --silent, --quiet | Suppress the most error messages |
-v, --verbose | It will display the diagnostic for every file processed |
--dereference | It will affect the referent of each symbolic link (default), rather than the symbolic link itself |
-h, --no-dereference | It will affect symbolic links instead of any referenced file (useful only on systems that can change the ownership of a symlink) |
--from=CURRENT_OWNER:CURRENT_GROUP | It is used to change the current owner and group if they match the file owner or group |
--no-preserve-root | It will not treat the backslash ‘/‘ specially (by default) |
--preserve-root | If the command fails to operate recursively on the backslash ‘/’ |
--reference=RFILE | It will use the RFILE’s owner and group rather than specifying OWNER:GROUP values |
-R, --recursive | It is used to perform operations on files and directories recursively |
Transferring the File Ownership
In my Linux system, I’ve created a test user with the name “pt1“, and want to transfer the ownership of the file “file.txt” to that user.
For that, I will specify the username with the chown command, as shown.
#Checking the current owner of the file
$ ls -l file.txt

#Tranfering ownership to a different user
$ sudo chown pt1 file.txt

#Re-checking the current owner of the file
$ ls -l file.txt
Output:
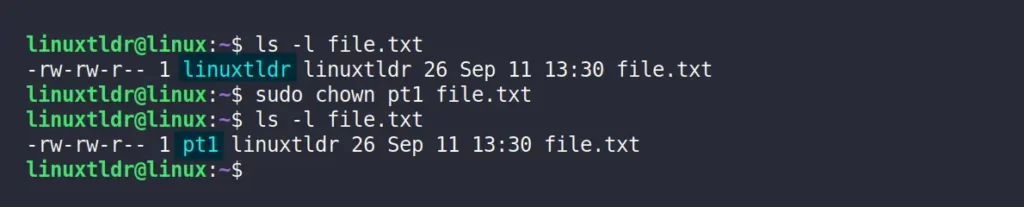
After ownership is transferred to the “pt1” user, they have read and write permissions on the file.
However, the previous user “linuxtldr” is a different user but still holds read and write permission because he is one of the file members of the group.
If you want to change the ownership back to the original user (ex: “linuxtldr“), then specify their username as shown.
$ ls -l file.txt
$ sudo chown linuxtldr file.txt
$ ls -l file.txt
Output:

Transferring the Group Ownership
Transferring the group’s ownership is important and critical; before we proceed, you must know that all users who are members of the group will have read and write permission.
So, currently, “file.txt” is added to the “linuxtldr” group; however, whenever you create a new user in Linux, it also creates a group with them.
It means the “pt1” user has a group name with the same username as “pt1” that we will use to transfer the group ownership from “linuxtldr” to “pt1” as shown.
#Checking the current group assigned to the file
$ ls -l file.txt

#Transferring ownership to different group
$ sudo chown :pt1 file.txt

#Re-checking the group assigned to the file
$ ls -l file.txt
Output:

For now, the owner of this file is “linuxtldr” and group is “pt1” so only the owner and members of group have read and write permission to this file.
Let us now change back to the previous group.
$ ls -l file.txt
$ chown :linuxtldr file.txt
$ ls -l file.txt
Output:

Transferring the File and Group Ownership
Until now you understand how to transfer file and group ownership separately let’s do the same thing together.
For that, I will transfer the file and group ownership from “linuxtldr” to “pt1” as shown.
#Checking the current file owner and group
$ ls -l file.txt

#Transferring the owernship to different user and group
$ sudo chown pt1:pt1 file.txt

#Re-checking the current file owner and group
$ ls -l file.txt
Output:

As both the owner and group are “pt1“, only the “pt1” user and members of group “pt1” have permission to read and write the file.
If the previous owner, “linuxtldr“, who is neither the owner nor a member of the group, tries to modify the file, will get the following error.
$ echo "modifying the file" > file.txt Output:

The only way to allow this user to have read and write permission is by change the permissions for other users (not recommended) or adding the user in the members of group using the usermod command.
$ sudo usermod -aG pt1 linuxtldrOutput:

In the above command, the user “linuxtldr” is added to the “pt1” group. To reflect the changes immediately, use the newgrp command or log out and relogin to your session.
To verify the user is added or not, execute the following groups command.
$ groupsOutput:

Now that you have been added to the “pt1” group, you are able to modify the file without any problems.
$ echo "modifying the file" > file.txt
$ cat file.txt
Output:

To remove the user’s permission from the file, just remove him from the list of members of groups using the gpasswd command.
$ sudo gpasswd --delete pt1 linuxtldrOutput:

Restart your session or system and verify the user is removed using the following command.
$ groupsOutput:

If you look at the commands, you will find that each time file or group ownership is transferred, the user is required to have sudo permission (if they are not a root user).
Even adding the user to the group requires sudo permission, so if you remove the user from the group and they have sudo permission, they are able to add themselves back to the group to have access to your files.
Due to this, you must know to whom to give and to whom not to give sudo permission.
That’s the end of this article. Bye bye.


