Jupyter Notebook is the most popular server-client application that allows you to write, run, test, and debug Python-interpreted programs on notebook documents via a web browser.
Unfortunately, other interpreted programming languages, such as Javascript, lack such fully-fledged applications that offer tight integration and enable users to write programs in notebook documents via a web browser.
Nevertheless, you can leverage the same Jupyter Notebook to execute your JavaScript code by installing a JavaScript runtime environment (such as Node.js) on your system and a Python library (or a kernel) that enables Jupyter to connect to that runtime.
So stick with this article till the end to discover how to execute your JavaScript code in your favorite Jupyter Notebook on Linux.
Setup Jupyter Notebook Environment to Execute Javascript
To achieve JavaScript functionality in Jupyter Notebook, you need to set up an environment that requires multiple steps. However, I’ve provided you with a step-by-step guide, followed by
1. Open your terminal and execute the following command to install Node.js (including NPM) and Python (including Pip) on your Linux system.
$ sudo apt install nodejs npm python3 python3-pip                               #For Debian, Ubuntu, Linux Mint, etc.
$ sudo dnf install nodejs python3 python3-pip                                        #For RHEL, Fedora, Alma Linux, etc.
$ sudo pacman -S nodejs npm python python-pip                                 #For Arch, Manjaro, EndeavourOS, etc.
Output:

2. Once the installation is finished, verify that each of these has been successfully installed and is accessible from the command-line.
$ nodejs -v
$ npm -v
$ python3 --version
$ pip --version
Output:

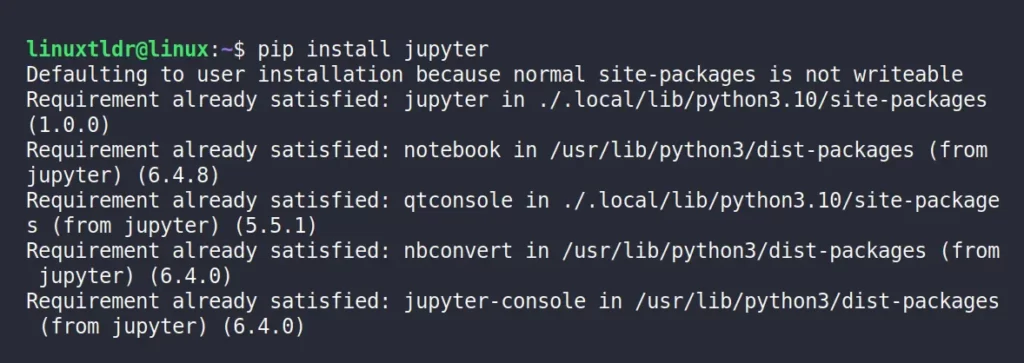
3. Next, you need to install the Jupyter Notebook by executing the following command:
$ pip install jupyterOutput:
4. Now, execute the following command to install IJavascript (a JavaScript kernel for the Jupyter notebook) via NPM.
$ sudo npm install -g ijavascriptOutput:

5. Finally, execute the “ijsinstall” command to register the IJavascript kernel with Jupyter, enabling other tools (e.g., the Jupyter notebook) to invoke it.
$ ijsinstallOutput:

That’s it! Now you can proceed to the next section to learn how to write, run, test, and debug your JavaScript code in Jupyter Notebook (or Jupyter Lab).
How to Execute Javascript on a Jupyter Notebook
After successfully completing all the previously mentioned steps, you can execute the following command to launch Jupyter Lab (or Jupyter Notebook, whichever you prefer).
$ jupyter-lab

#OR

$ jupyter notebook
Output of the “Jupyter Lab“:
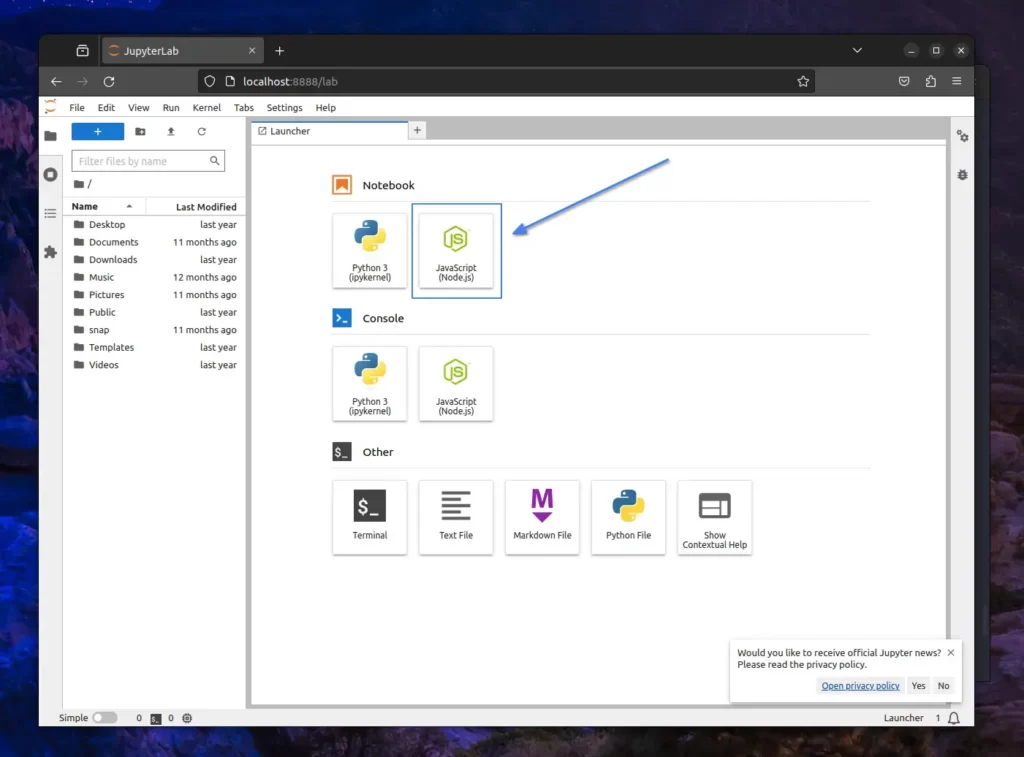
In the “Notebook” section, you’ll find the “JavaScript (Node.js)” option. Clicking it will promptly launch a new document with the JavaScript kernel, so feel free to proceed.
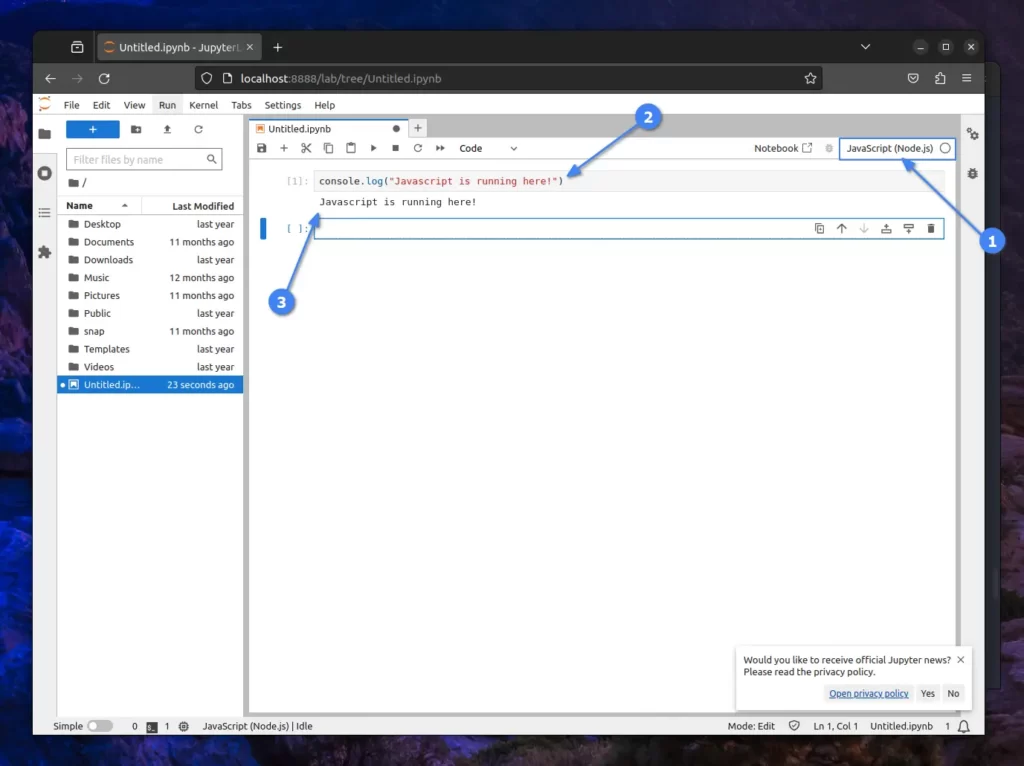
Here, you can see the highlighted point “1“, indicating the use of the JavaScript kernel in Jupyter Notebook, with “2” representing our basic JavaScript console code and “3” showing the output of our JavaScript program.
Now, if you wish to work with specific JavaScript libraries, you can do so. For instance, I’ve installed the “Get superhero names” library using NPM and randomly generated a hero name.
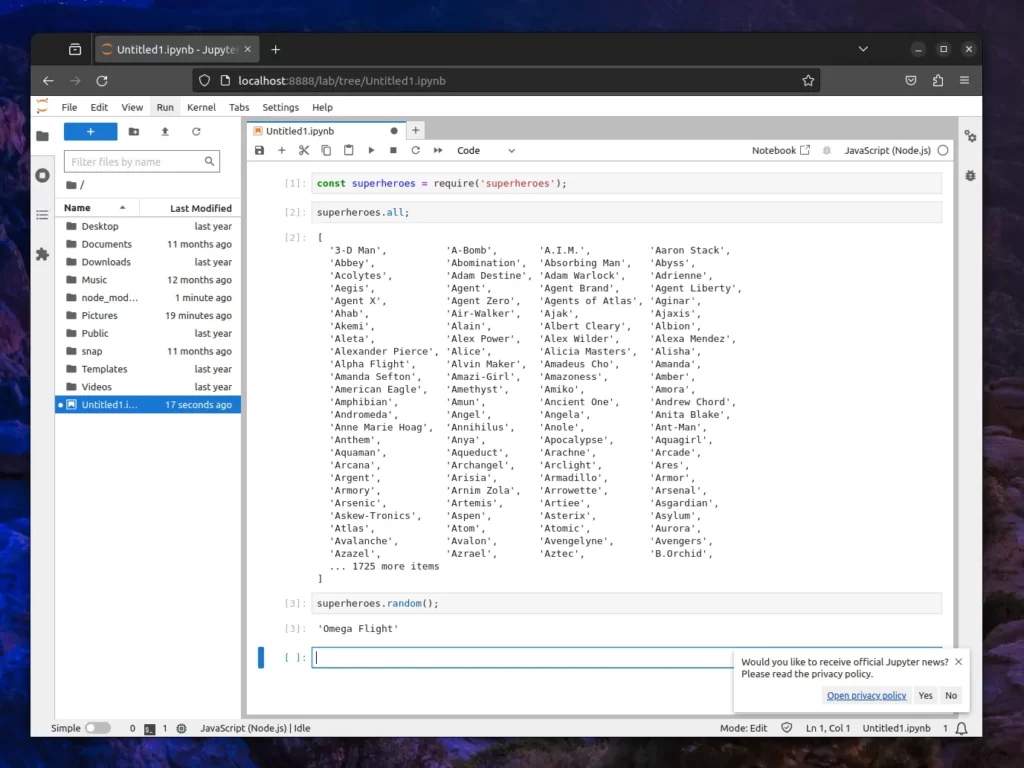
Now, I’ll take a pause here, but you can go further and explore more with a complex JavaScript program.
Bonus Tip: Executing JavaScript in Jupyter Notebook using Magic Command
The aforementioned methods require multiple steps, including the installation of a JavaScript runtime and the registration of a JavaScript kernel in your Jupyter notebook.
Nevertheless, all of this can be skipped, allowing you to run basic JavaScript code directly in your Jupyter notebook using a Magic command.
In Jupyter Notebooks, “magic commands” are special commands that are not a part of the Python language itself but provide additional functionality and control within the Jupyter environment.
In Jupyter, it starts with either a single “%” character for line magic (applied to a single line) or “%%” for cell magic (applied to the entire cell).
So, to execute the JavaScript in your Jupyter Notebook, you can use either “%%js” or “%%javascript” to instruct the notebook that the specified cell must be treated with the JavaScript kernel.
For example, you can inspect the below screenshot of executing JavaScript in Jupyter Lab (configured with a Python kernel) using the magic command.
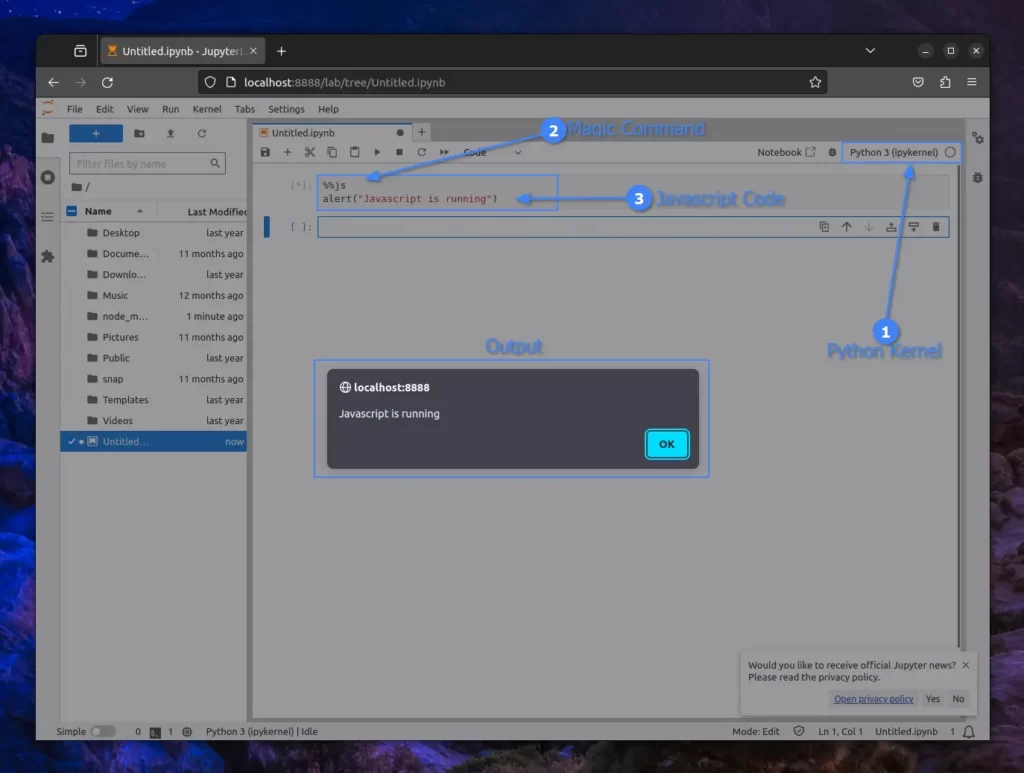
Keep in mind that this method does not link to any JavaScript runtime, such as Node.js, so you cannot use your NPM-installed packages. It will only run JavaScript code that is compatible with your default browser.
Additionally, this method will treat your current document as an HTML page. Therefore, JavaScript code, such as “console.log()“, will be displayed in the browser’s console instead of below the cell.
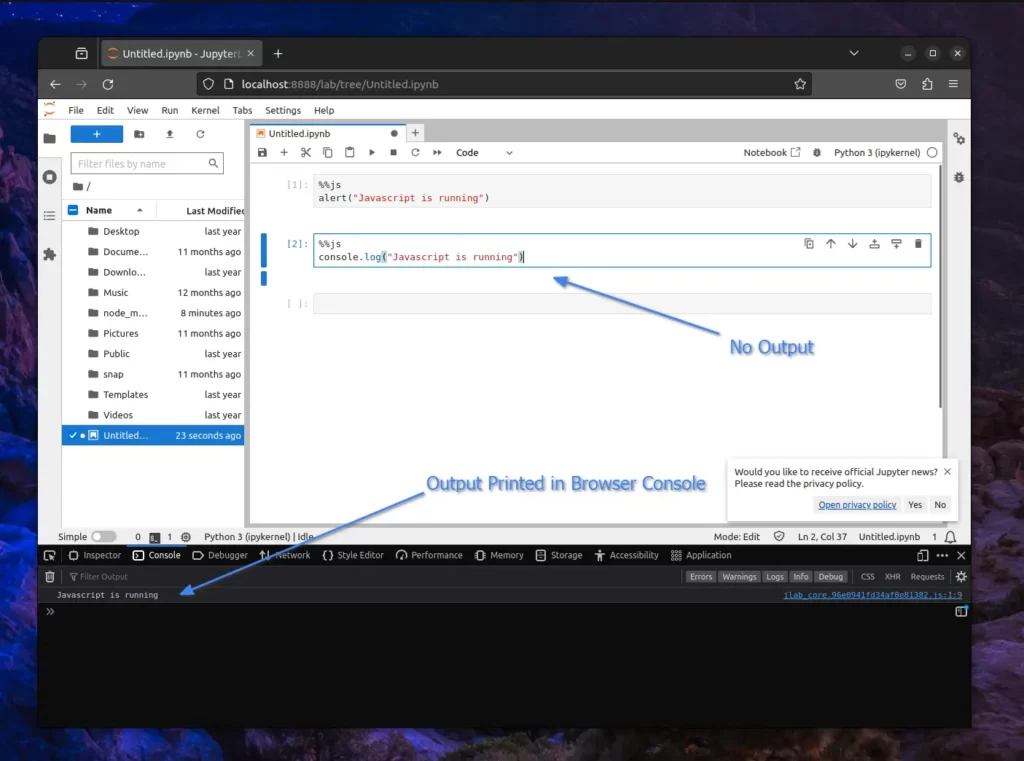
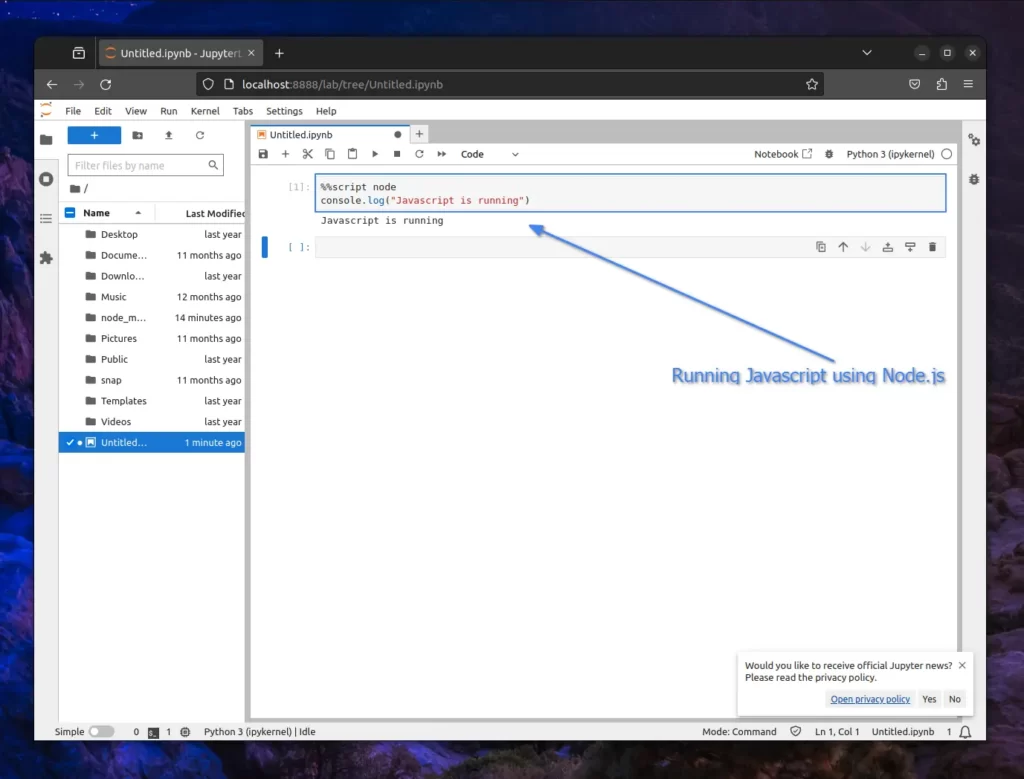
Now, don’t be disheartened, as magic commands also act as the shebang “#!” line of a bash script. So, if you have installed a JavaScript runtime (like Node.js), you can specify “%%script node” to use it and run any JavaScript code in Jupyter notebook that will be processed in Node.js.
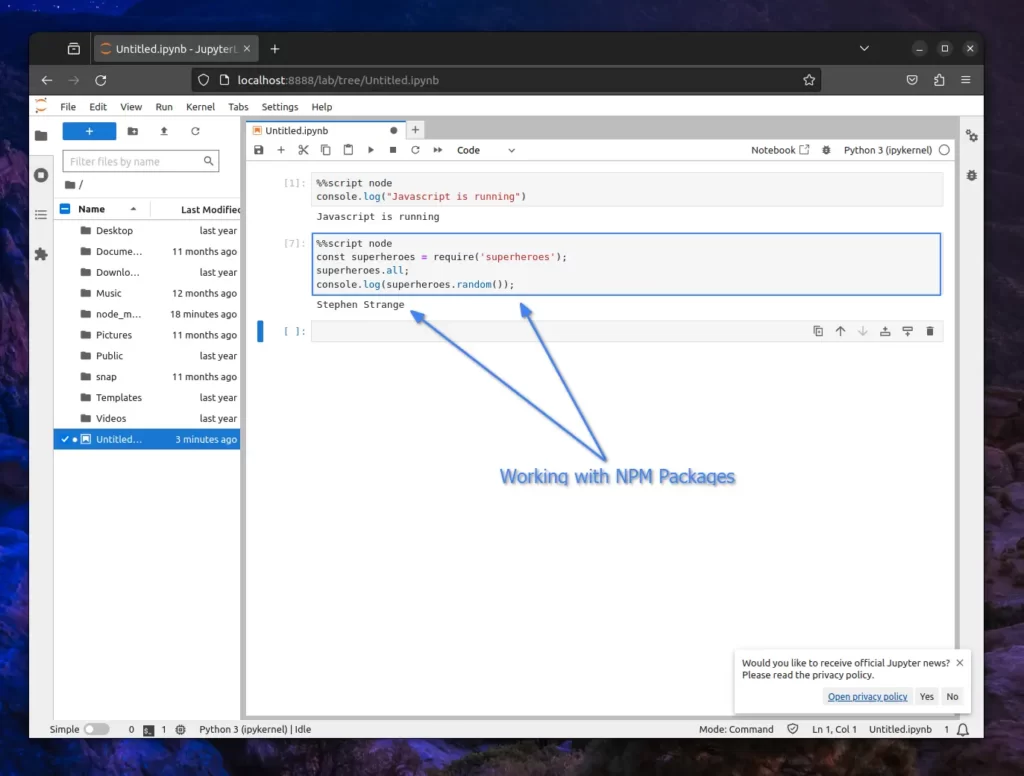
With this method, you can also use your favorite NPM-installed packages in your Jupyter notebook (however, it is quite irritating).
Now, let’s end this article here.
Final Word
In this article, you explored multiple methods for executing your JavaScript code in Jupyter Notebook, with or without external tools.
If you ask for my suggestion, my preference is that if it’s another person’s system, then I use the magic command. Otherwise, I consistently opt for the initial approach of setting up the JavaScript runtime environment and registering the kernel in Jupyter Notebook.
So, I hope you find this article useful. If you have any questions or queries related to the topic, feel free to tell us via the comment section.
Till then, peace!


Join The Conversation
Users are always welcome to leave comments about the articles, whether they are questions, comments, constructive criticism, old information, or notices of typos. Please keep in mind that all comments are moderated according to our comment policy.