
Visual Studio Code (a.k.a. VSCode) is a free and open-source code editor developed by the software giant Microsoft. It is one of the most popular code editors in the developer community due to its lightweight, speedy, and feature-rich nature.
VSCode offers a highly customizable and extensible coding environment, empowering developers to finely tailor it to suit their unique needs and preferences.
Absolutely mesmerizing, isn’t it? So, stick with this article, and you will learn its features, what it can and can’t do, how to install VSCode in your preferred Linux distribution, its alternatives, and the top extension recommended by me.
Tutorial Details
| Description | VSCode Installation and Top Extensions |
| Difficulty Level | Low |
| Root or Sudo Privileges | Yes |
| OS Compatibility | Ubuntu, Manjaro, Fedora, etc. |
| Prerequisites | – |
| Internet Required | Yes |
Key Features
VSCode is one of the rare code editors that offers a wide range of features that can be covered in the following list, although I tried to list the most popular ones:
- Cross-platform support
- Intellisense and autocompletion
- Built-in Git Integration
- Built-in Code Debugger
- Integrated Terminal
- Split editing (horizontal or vertical)
- Themes and Customization
- Command Palette
- Multiple language support, and many more.
Overall, it strikes a perfect balance between being lightweight and feature-rich, making it the ultimate first choice for developers.
Unfortunately, there are a few things that VSCode either lacks or doesn’t execute as effectively as desired.
What VSCode Can Do and What It Can’t
I know it’s difficult to digest, but I’ve been using it for approximately 5 years now, and the following is my unbiased overview of what I experienced while using VSCode.
| What VSCode Can Do | What VSCode Can’t Do |
|---|---|
| Rich code editing experience with many features. | It doesn’t provide the same level of integrated tooling as a full-fledged IDE. |
| Support large scale code writing. | It might not be the most performant option for extremely large and resource-intensive projects |
| Version Control Integration using Git | It has some UI-related extensions, it lacks a dedicated visual designer for creating complex graphical user interfaces. |
| Integrated debugger to allow developers to debug their code easily. | While it supports debugging, it doesn’t have comprehensive profiling and code analysis capabilities as some specialized IDEs provide. |
| Any extension based on your requirement can be found on the extension marketplace. | While it supports ton’s of programming language through extensions, yet less popular or niche language might be left. |
| Support split editing and workspace to allow developers to manage and group related projects. | Although suitable for mobile development, it falls short of the native support offered by specialized IDEs like Android Studio or Xcode. |
I have tried to present the information in the table above with the utmost neutrality and clarity, ensuring that you grasp a comprehensive understanding of VSCode. Now, let’s roll into the installation part.
How to Install VSCode on Linux
Note that there are two ways to install VSCode on your preferred Linux system: using the system default package manager or manually installing it from the source package.
However, I’ll show you the steps for both ways. So, you can choose the most suitable one, starting with:
Installing VSCode using Package Managers
The process of installing VSCode using the system’s default package manager may slightly vary depending on your Linux distribution. So, choose one of the following methods based on your Linux system:
Installing VSCode on a Debian or Ubuntu System
1. Install the required dependencies:
$ sudo apt install software-properties-common apt-transport-https -y2. Import a Microsoft GPG Key:
$ curl -fsSL https://packages.microsoft.com/keys/microsoft.asc | gpg --dearmor > microsoft.gpg
$ sudo mv microsoft.gpg /etc/apt/trusted.gpg.d/microsoft.gpg
3. Add the VSCode repository:
$ sudo sh -c 'echo "deb [arch=amd64] https://packages.microsoft.com/repos/vscode stable main" > /etc/apt/sources.list.d/vscode.list'4. Update the system repository and install VSCode:
$ sudo apt update
$ sudo apt install code -y
Installing VSCode on a Red Hat or Fedora System
1. Import a Microsoft GPG Key:
$ sudo rpm --import https://packages.microsoft.com/keys/microsoft.asc2. Add the VSCode repository:
$ sudo sh -c 'echo -e "[code]\nname=Visual Studio Code\nbaseurl=https://packages.microsoft.com/yumrepos/vscode\nenabled=1\ngpgcheck=1\ngpgkey=https://packages.microsoft.com/keys/microsoft.asc" > /etc/yum.repos.d/vscode.repo'3. Install VSCode:
$ sudo dnf install code -yInstalling VSCode on an Arch or Manjaro System
VSCode is available in the Arch User Repository (AUR). You can use AUR helpers like Yay to install it on your Linux system.
$ yay -S visual-studio-code-binOr you can build it manually using “makepkg“:
$ git clone https://aur.archlinux.org/visual-studio-code-bin.git
$ cd visual-studio-code-bin
$ makepkg -si
Installing VSCode on an openSUSE-based System
1. Import a Microsoft GPG key:
$ sudo rpm --import https://packages.microsoft.com/keys/microsoft.asc2. Add the VSCode repository:
$ sudo sh -c 'echo -e "[code]\nname=Visual Studio Code\nbaseurl=https://packages.microsoft.com/yumrepos/vscode\nenabled=1\ntype=rpm-md\ngpgcheck=1\ngpgkey=https://packages.microsoft.com/keys/microsoft.asc" > /etc/zypp/repos.d/vscode.repo'3. Then refresh the package cache and install VSCode using Zypper command.
$ sudo zypper refresh
$ sudo zypper install code -y
Installing VSCode from the Source Package
Installing VSCode from the default package manager requires manually adding the Microsoft keys and repository in most Linux distributions.
If you do not want to populate your system with tons of repositories, then you can download and install VSCode from the source package.
.deb” package, you’ll automatically set up the apt repository and signing key, enabling automatic updates via the standard system update mechanism (apt update).1. Go to the VSCode download page and download the appropriate package for your Linux distribution (usually a “.deb” package for Ubuntu/Debian and a “.rpm” package for Red Hat/Fedora) and architecture (generally it will be “x64“).
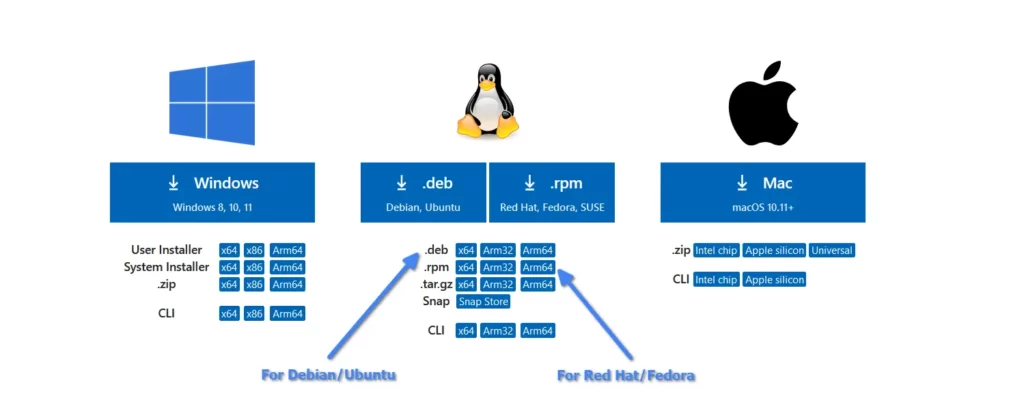
2. Once the file is downloaded, open your terminal, navigate to the directory where the downloaded package is located, and install it using the APT (for “.deb“) or DNF (for “.rpm“).
#Debian or Ubuntu System
$ sudo dpkg -i code*.deb

#Red Hat or Fedora System
$ sudo rpm -i code*.rpm
Verify the Installation
Once the installation is successfully completed, you can launch the editor by searching for it in the “Application Menu” or by typing the following command in your terminal:
$ codeOutput:
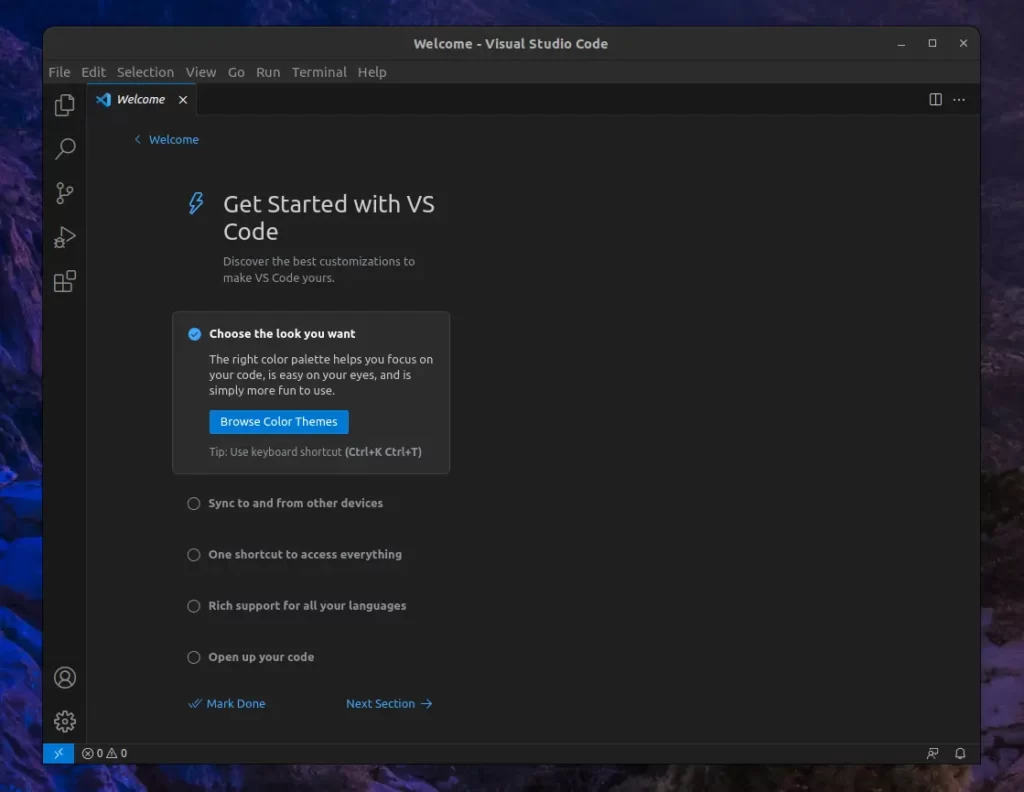
Note that after launching it for the first time, it will take you through a few steps to customize VSCode according to your needs:
Most of them are self explanatory and not mandatory. So, you can click on the “Mark Done” button on the bottom to skip through this.
Top VSCode Extensions Recommended by Me
Once VSCode is installed, you can use it like any other text editor designed for developers, packed with rich features.
But it doesn’t stop there; you can unleash the full potential of VSCode by installing extensions, amplifying its capabilities to a whole new level.
1. First, I will show you how an extension is installed in VSCode. So, first launch the VSCode GUI editor and navigate to the highlighted section:
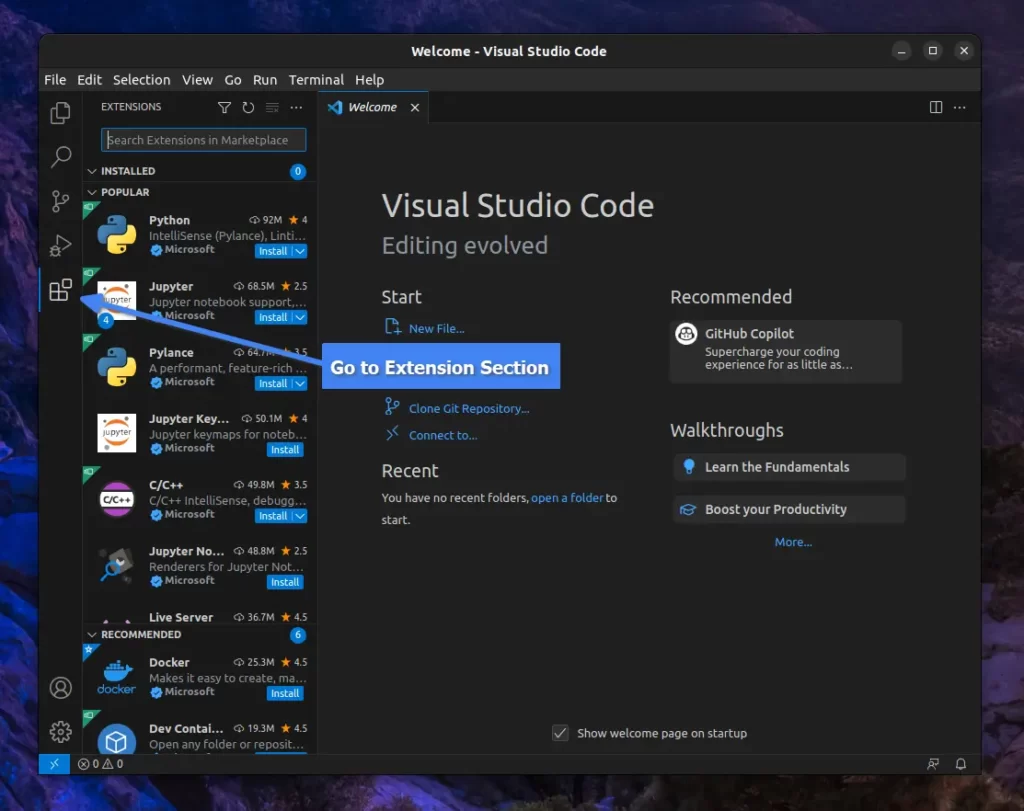
2. From the extension section, you can notice three things: first, it will show you the installed extensions (“0” in this case); second, it will present you with the popular (generally most installed) extensions; and last, it will show you the recommended extensions.
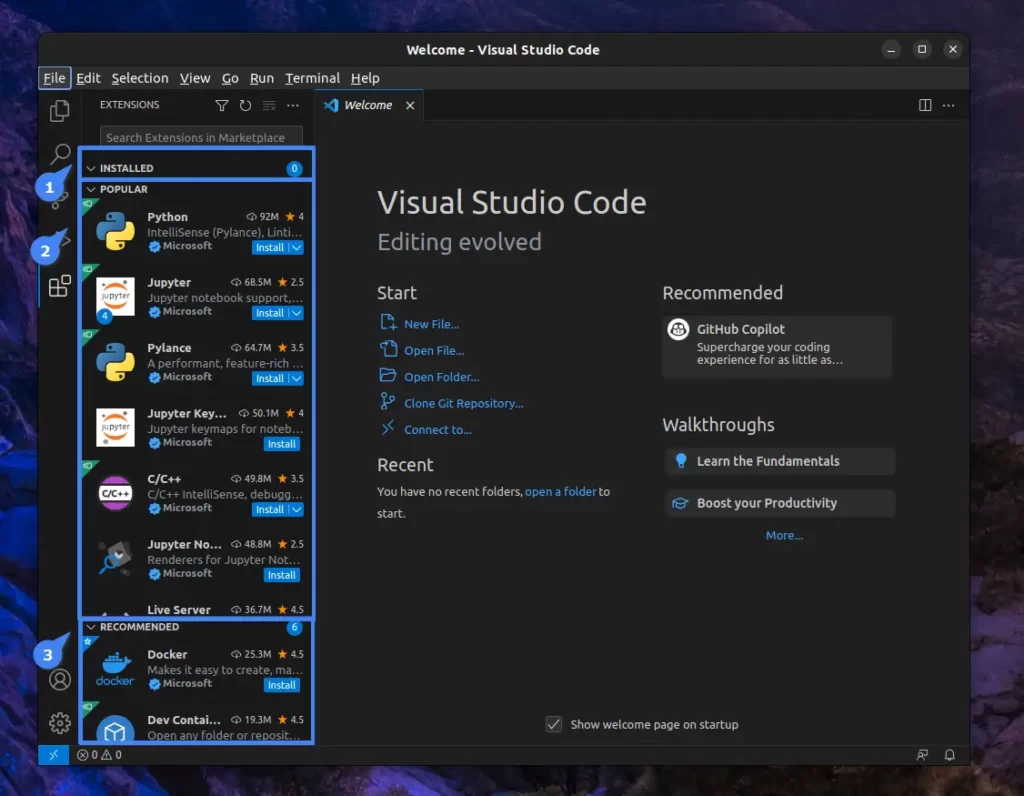
If you find any useful extensions that fulfill your requirements, click the “Install” button next to the extension publisher name.
3. To search for extensions, simply click on the top “Search Extensions in Marketplace” input field and write the extension name you want to search for (e.g., “color picker“).
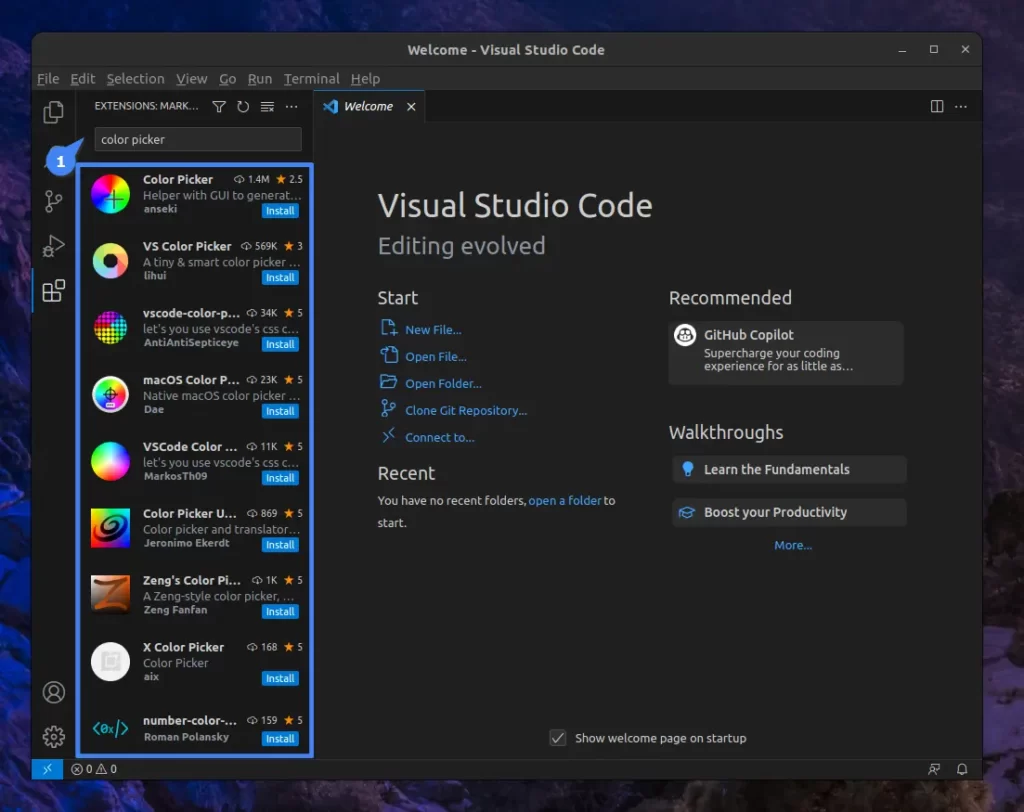
As you can see, it provided you with a list of all the extensions matching the provided name.
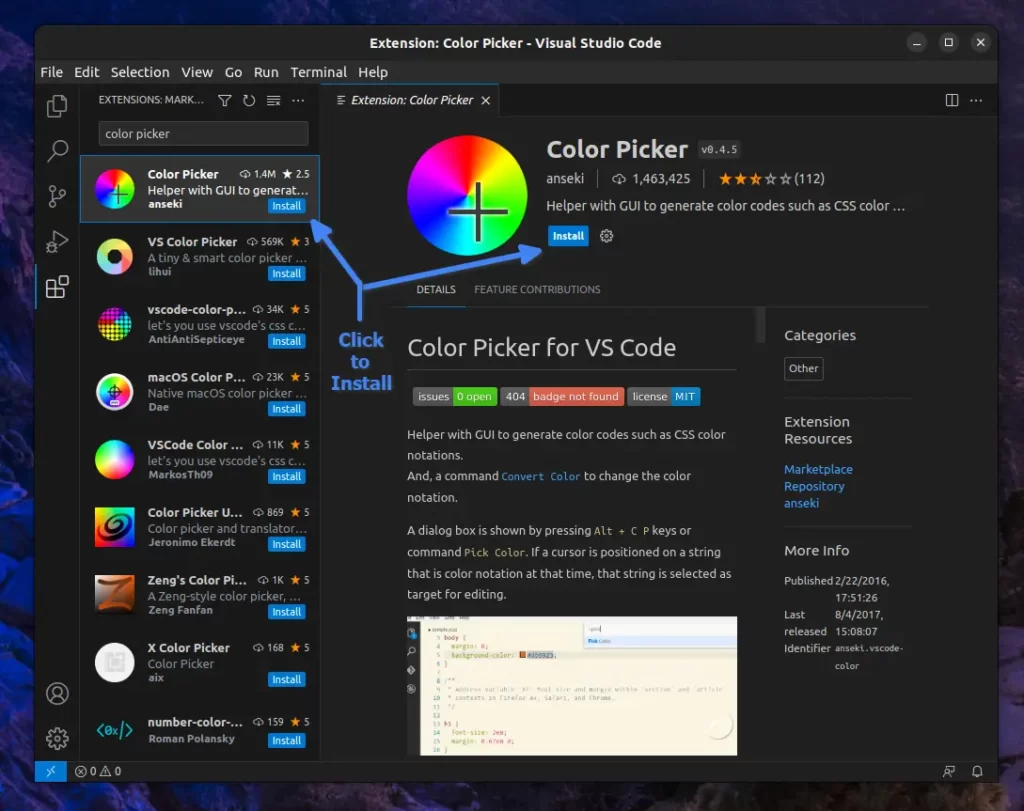
4. Once you find the desired extension, simply click the “Install” button next to the publisher name or click on the extension to get more information about it.
Note that after the extension installation is complete, some extensions might ask you to reload VSCode to reflect the changes properly.
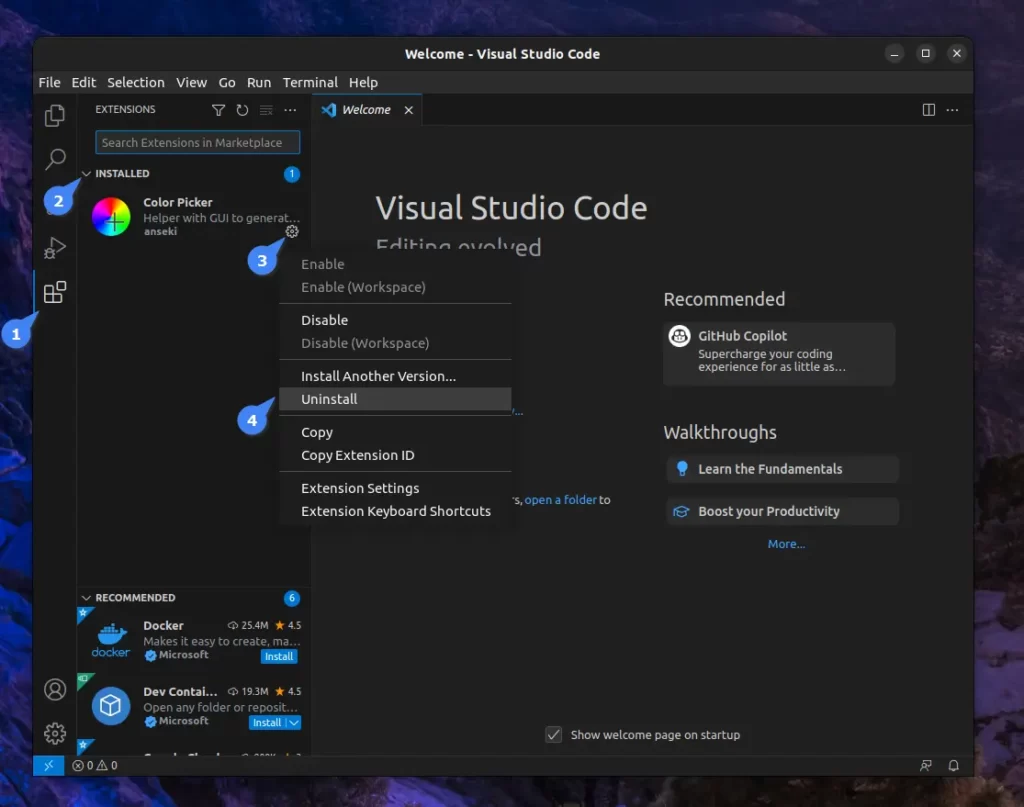
5. If the desired extension is not working as expected, then you can uninstall it by navigating to the “Installed” section, Clicking on the “gear icon” next to the desired extension, and then clicking on the “uninstall” button.
I hope you now understand all the important steps required to manage an extension in VSCode. Concluding that, let’s check out the top recommended extension for you.
- Calc (Calculate extension): Provide integrated calculation for an expression, support underscores, big numbers, and mathematics functions.
- Code Runner: Run the code file of the current active tab or through the context menu of File Explorer. It supports all popular languages, such as C/C++, Python, PHP, Perl, Ruby, Go, Swift, Kotlin, Dart, Visual Basic .NET, Java, and many more.
- Cursor Tools: It helps you create multiple cursors out of all the anchors in your current editor, allowing you to modify multiple things at once.
- Open in Browser: This will open the current HTML file in your default browser. For those who don’t prefer an integrated HTML viewer.
- REST Client: Allows you to send HTTP requests and view the response in your VSCode (alternatively, you can use the Thunder client, a lightweight version).
- GitHub Copilot: Provide your code suggestion using artificial intelligence (it might also suggest proprietary code).
- Remote – SSH: Allows you to open folders or edit files on a remote machine via SSH.
- Jupyter: Provide notebook support like Jupyter integrated with VSCode.
- WSL: Allows you to open folders or edit files in the Windows Subsystem for Linux (WSL).
- Live Server: Launch a local development server with a live reload feature for static and dynamic pages.
I’ve got to end this list here, although there are tons of other extensions that can enhance your work while working with VSCode.
You can simply hunt them down in the marketplace, or if you are having difficulty, we are always available for you. Just tell us your queries in the comment section.
How to Remove VSCode from Linux
To uninstall VSCode, installed either through the default package manager after adding the external repository or using the “.deb” or “.rpm” package, simply execute one of the appropriate commands depending on your Linux distribution.
$ sudo apt remove code                                                                       #For Debian, Ubuntu, Linux Mint
$ sudo dnf remove code                                                                       #For RHEL, Fedora, AlmaLinux
$ yay -R visual-studio-code-bin                                                          #For Arch, Manjaro, EndeavourOS
$ sudo zypper remove code                                                                 #For OpenSUSE
The above command will successfully uninstall VSCode from your system while leaving the manually added repository unchanged, which I recommend keeping as it doesn’t cause any harm and simplifies future VSCode installations if desired.
Final Word
I hope you find this article useful, and if you are afraid of using VSCode as Microsoft is backing it (it is well-known for catching users telemetry data), then you can use its alternatives like VSCode Codium, Sublime, Geany, etc.
If you have any questions or queries related to this article, then feel free to tell us in the comment section.
Till then, peace!


