
Python is undoubtedly a popular programming language, but due to its design, it lags behind in certain aspects, which leads many programmers to choose a different programming language.
One aspect that Python has traditionally faced limitations in executing tasks concurrently and efficiently due to the Global Interpreter Lock (GIL), which ensures that only one thread can execute Python bytecode at a time, thereby hindering the full potential of multi-core processors.
Another aspect is the multiple layers involved during program execution; thus, no matter how well optimized a programmer keeps their code, it will always be executed slower compared to other programming languages like C/C++ or Rust.
So, to overcome these types of issues, there has always been some search for solutions, one of which recently caught my eye, named Codon.
What is Codon?
Codon isn’t a replacement, plugin, or any new programming language; it’s simply a Python compiler that converts Python code into native machine code without any runtime overhead.
There’s practically no learning curve; you can jump right in and run your existing Python program with multithreading in Codon with little to no changes, experiencing a performance boost of 10-100x or more compared to vanilla Python.
So, stick with this article till the end to learn more about its features, how to install Codon on Ubuntu (and other Linux distros), and how to run your existing Python program with Codon.
Tutorial Details
| Description | Python Codon |
| Difficulty Level | Low |
| Root or Sudo Privileges | No |
| OS Compatibility | Ubuntu, Manjaro, Fedora, etc. |
| Prerequisites | – |
| Internet Required | Yes (for installation) |
Features of Codon
The following is a list of standout Codon features.
- It closely aligns with CPython (but is not a replacement) in syntax, semantics, and libraries.
- The goal is to enhance performance to match that of low-level languages such as C/C++, or Rust.
- Full, seamless support for multicore programming, multithreading (no GIL!), GPUs, and more.
- A comprehensive optimization framework capable of targeting high-level Python constructs and libraries.
- Complete compatibility with Python’s array of packages and libraries.
How to Install Codon on Ubuntu (and Other Linux Distros)
Installing Codon on Linux and macOS is straightforward with just one command. However, for Windows, you’ll need to use WSL to execute the same command.
So, if you’re running Ubuntu or any other Linux distro (including macOS), then open your terminal and execute the following command:
$ /bin/bash -c "$(curl -fsSL https://exaloop.io/install.sh)"The above command will begin the Codon installation process, and while installing, it might prompt you to press “Enter” to allow the addition of the Codon “/bin” path to the “~/.bash_profile“.

This will finish the installation, but note that the “~/.bash_profile” must be present in the “~/.bashrc“; if not, then the “codon” command will not be accessible, and you might get a “codon: command not found” error.
So, if you are a beginner and don’t want to go any further in the rabbit hole, just add the following line at the end of the “~/.bashrc“.
# Codon compiler path (added by install script)
export PATH=$HOME/.codon/bin:$PATH
Once done, refresh your terminal session and execute the following command to confirm the accessibility of the “codon” command:
$ codon --versionOutput:

How to Use Codon to Run a Python Program
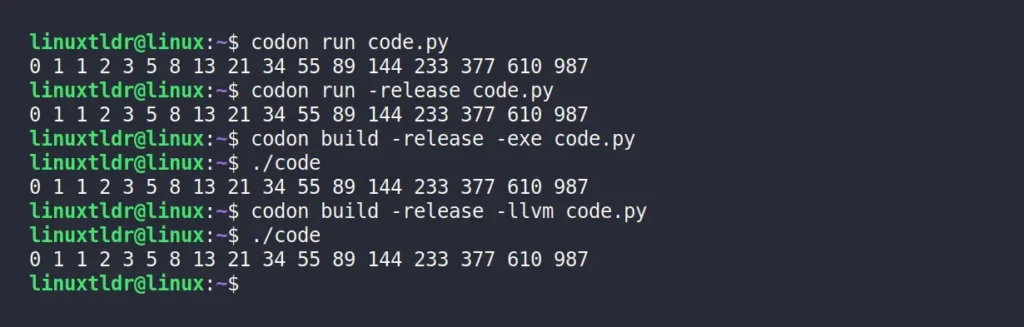
Now that we have Codon installed, we can begin using it to compile our Python program. I’ll use the following Python program for demonstration, which is also featured on their page. To follow along, you can create a new “code.py” file and copy-paste it.
def fib(n):
    a, b = 0, 1
    while a < n:
        print(a, end=' ')
        a, b = b, a+b
    print()
fib(1000)
Once done, save the file, and then, for compiling and running, execute one of the following commands according to your needs:
# Compile and run the program.
$ codon run code.py

# Compile and run the program with optimizations enabled.
$ codon run -release code.py

# Compile to executable with optimizations enabled.
$ codon build -release -exe code.py
$ ./code

# Compile to LLVM IR file with optimizations enabled.
$ codon build -release -llvm code.py
$ ./code

# Get the complete list of all "run" and "build" option.
$ codon run --help
$ codon build --help
Output:
You’ve now learned how to execute a basic Python program and compile or generate its executable using Codon. Now, let’s see how to use multiple threads with Codon. To begin, I’ll first create a simple Python program using a for loop and threading, as shown.
for i in range(10):
    import threading as thr
    print('This is a Thread', thr.get_ident())
Once done, I’ll run this Python program using the “python” command.
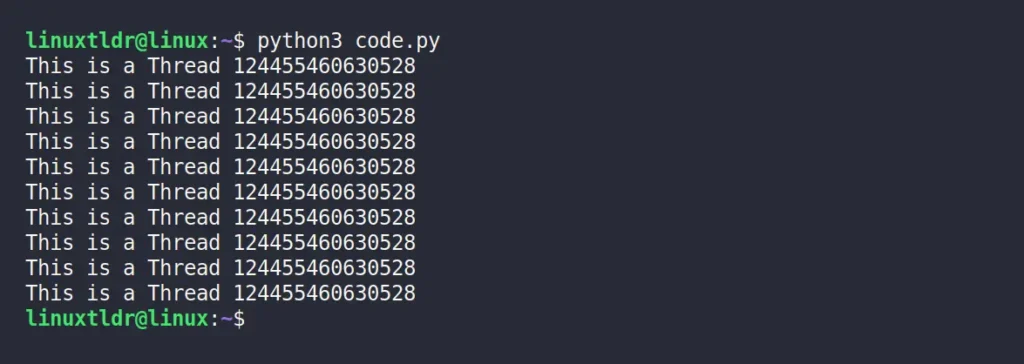
If you look at the above image carefully, you’ll notice that each loop iteration has been executed by a single “124455460630528” thread only.
This is the default behavior of Python, since it can’t handle programs with multiple threads. Thus, to achieve multithreading within the same program, you can simply add “@par” at the top.
@par
for i in range(10):
    import threading as thr
    print('This is a Thread', thr.get_ident())
Once done, run the same program, but this time with the “codon” command.
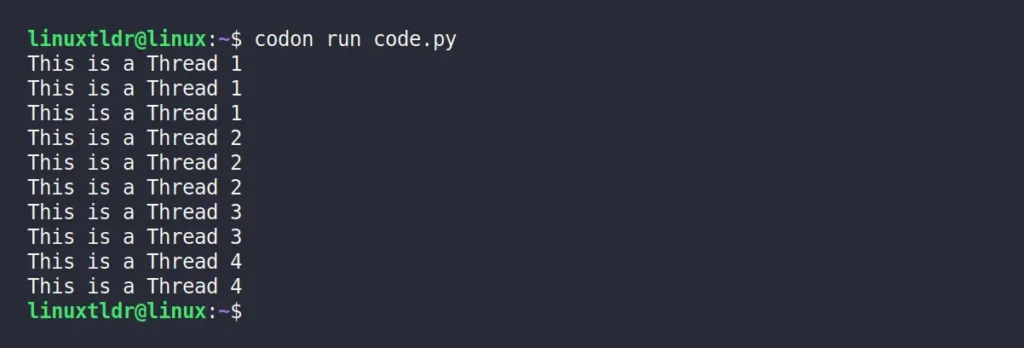
At this time, one thread handles the first three iterations, another thread handles the next iterations, and so on. So, here all the numeric values you see are “thread identifiers“, so for every loop execution, you are mostly using different threads.
The additional “@par” decorator used at the beginning of our program tells Codon to use OpenMP (an API supporting shared-memory parallel programming), instructing each for-loop to be handled by multiple threads during compilation.
You can also limit the number of threads to four by specifying “@par(num_threads=4)” and enable GPU programming (only for Nvidia devices) using the “@par(gpu=True)” syntax.
Here, I’ll end this article, but if you find it interesting and wish to dig deeper, I highly recommend reading the Codon documentation, which is remarkably easy to comprehend and among the most user-friendly resources I’ve encountered.
Lastly, if you have any questions or queries related to the topic, then do let me know in the comment section.
Till then, peace!


Join The Conversation
Users are always welcome to leave comments about the articles, whether they are questions, comments, constructive criticism, old information, or notices of typos. Please keep in mind that all comments are moderated according to our comment policy.