
LunarVim is a fantastic NeoVim-based IDE, a community-driven project available for free to try, providing support for most popular programming languages such as C/C++, Python, Java, Node.js, Angular, Go, Scala, and 13+ more.
It comes with a default configuration to offer features such as autocompletion, an integrated terminal, a file explorer, a fuzzy finder, LSP linting, formatting, and debugging.
You can take it a step further by customizing the “config.lua” file to add your own plugins, keymaps, autocommands, leader binding, and various other custom settings.
So, stick with this article to learn a bit of criticism about it, its list of features, how to install LunarVim on your preferred Linux system, along with additional tips and tricks on usage.
Tutorial Details
| Description | LunarVIM (a NeoVim IDE) |
| Difficulty Level | Moderate |
| Root or Sudo Privileges | No |
| OS Compatibility | Ubuntu, Manjaro, Fedora, etc. |
| Prerequisites | NeoVIM |
| Internet Required | Yes (for installation) |
Criticism Around LunarVim
LunarVim is often criticized as a sophisticated IDE built from NeoVim, which irks Linux enthusiasts for offering custom plugins, key bindings, and other features that can be manually configured in NeoVim.
Another issue is its heavy dependence on the latest version of NeoVIM, which is a little trickier to get as traditional package managers often contain older versions, and installing the latest version requires additional steps.
If you’re a beginner, recently hop on the NeoVim boat. I recommend gaining some knowledge about it, getting comfortable, and then using LunarVim, as its customization requires a good understanding of Lua.
And concerns about having the latest version of NeoVim can be readily addressed, as I will explain in this article how to acquire the latest versions of NeoVim and LunarVim for your Linux system.
Features of LunarVim
The following is a list of the renowned features offered by LunarVim.
- Supports Angular, C/C++, Go, Java, Python, and 11+ more languages.
- Offers autocompletion, an integrated terminal, a file explorer, and more.
- External plugins can be added via a configuration file.
- Optimizing speed through lazyloading plugins.
- Eliminate disabled plugins while compiling to achieve maximum speed.
- Git integration for buffers is included.
- Always highlight enclosing brackets if they exist.
- Multiple themes, including a dark theme, are available.
To get a comprehensive list of features, check out its core plugins list page.
How to Install LunarVim on Linux
The installation of LunarVim is a little trickier, as it involves the latest version of NeoVIM and some necessary dependencies to make it work flawlessly.
Although I’ll guide you through each step to make LunarVim work correctly, just follow along with the article and perform each step sequentially. So, let’s begin with…
1. Install the Latest Version of NeoVim
The current version of LunarVim (a.k.a. v0.9.0) requires the latest version of NeoVim (a.k.a. v0.9.0+) on your Linux system. Fortunately, we have already written a comprehensive guide on installing the latest version of NeoVim on Linux.
Yet, you can run the following commands to quickly install the latest version of NeoVim.
#For Debian, Ubuntu, Linux Mint, etc.
$ sudo add-apt-repository ppa:neovim-ppa/unstable -y && sudo apt update && sudo apt install neovim

#For RHEL, Fedora, Alma Linux, etc.
$ sudo dnf install neovim

#For Arch, Manjaro, EndeavourOS, etc.
$ sudo pacman -S neovim2. Install the Necessary Dependencies for LunarVim
For LunarVim to function properly, it requires the installation of some necessary dependencies to support it, such as Git, Make, Cargo, Python with Pip, and Node.js with NPM.
So, to install them, simply execute the following command based on your Linux system:
$ sudo apt install git make python3 nodejs npm cargo                     #For Debian, Ubuntu, Linux Mint, etc.
$ sudo dnf install git make python3 nodejs cargo                              #For RHEL, Fedora, Alma Linux, etc.
$ sudo pacman -S git make python nodejs npm cargo                     #For Arch, Manjaro, EndeavourOS, etc.
3. Install the Latest Version of LunarVim
Once you have completed the previous steps, you can continue by installing the latest version of LunarVim using the following ready-to-use command that will fetch the LunarVim installation script and initiate it.
$ LV_BRANCH='release-1.3/neovim-0.9' bash <(curl -s https://raw.githubusercontent.com/LunarVim/LunarVim/release-1.3/neovim-0.9/utils/installer/install.sh)It happened to me that the aforementioned command would get stuck and do nothing, resulting in a blank output. If you encounter the same issue, access the install.sh script from here, create and copy its content to the “install.sh” file on your system, and execute it.
$ bash install.shOutput
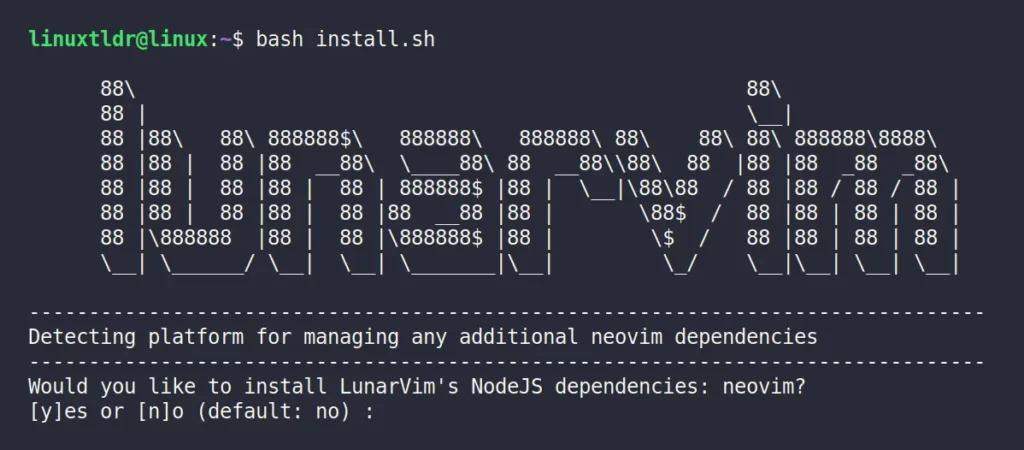
When the installation begins, it will prompt you to install dependencies and packages to add various features and provide support for various programming languages. Although it is optional, I recommend typing “y” for yes to install them.
4. Adding LunarVim Binary File Path to $PATH
Once the installation of LunarVim is complete, you will receive an output similar to the one below.
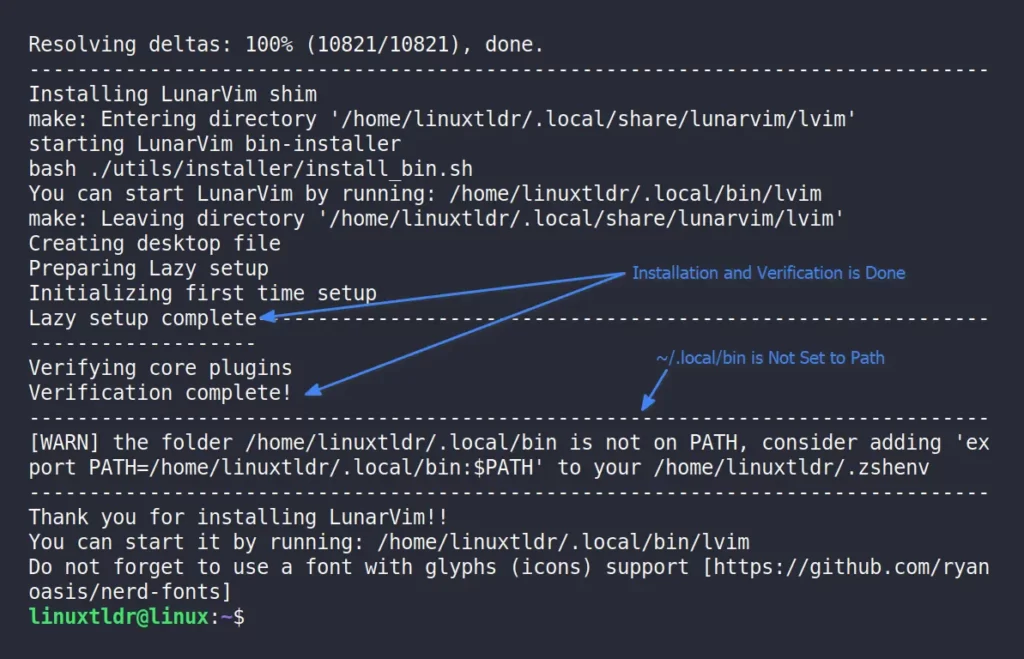
To make LunarVim accessible from anywhere, it is recommended to add the “$HOME/.local/bin” path to your $PATH environment variable by including the following line in your default login shell profile, like ~/.bashrc or ~/.bash_profile for Bash, to ensure the changes persist.
export PATH="$HOME/.local/bin:$PATH"When you’re done, do not forget to reload your shell configuration file or restart your terminal session to apply the changes.
5. Enable Beautiful Icons via Nerd Fonts (optional)
LunarVim utilizes the Nerd font to enhance the user’s experience by representing the directory, file, and various settings with glyphs (or icons). You can read more about them in our separate article on installing Nerd Fonts, and then go on and install your favorite one from here.
But for a moment, you can use the following commands to instantly install my favorite Nerd font on your Linux system.
$ wget https://github.com/ryanoasis/nerd-fonts/releases/download/v3.0.2/DejaVuSansMono.zip
$ mkdir -p ~/.local/share/fonts/
$ unzip DejaVuSansMono.zip -d ~/.local/share/fonts/DejaVuSansMono
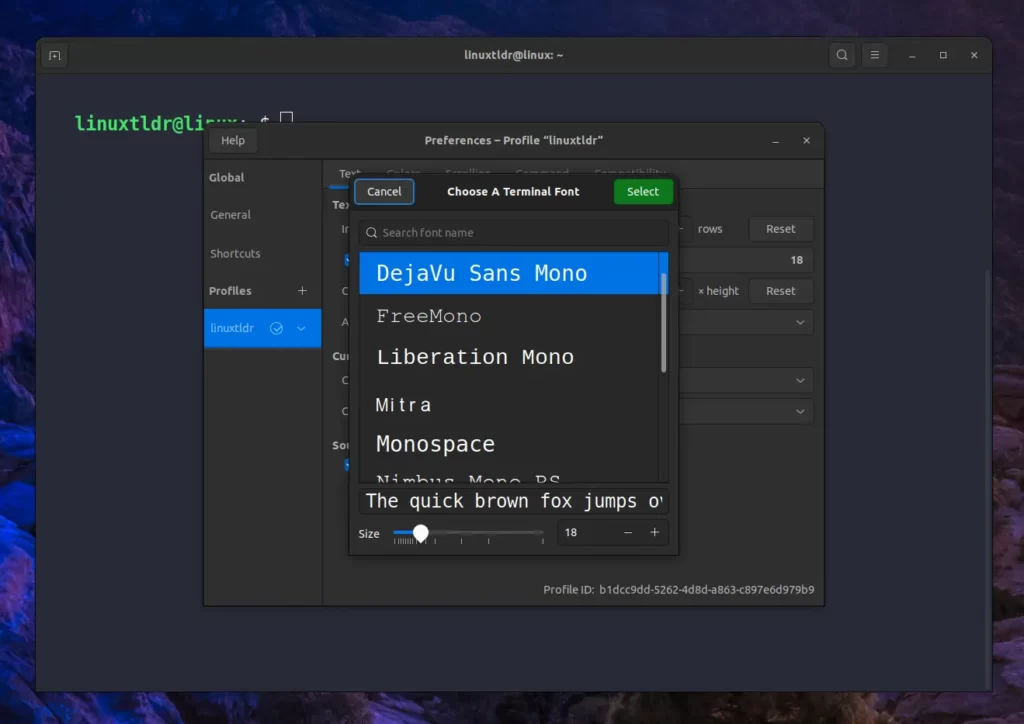
$ fc-cache -f -vAfter completing the task, navigate to the terminal settings and switch your terminal’s default font to “DejaVu Sans Mono“.
That’s it; all the necessary steps for installing LunarVim are complete. Now you can proceed to the next section to learn how to launch and use it.
How to Launch and Use LunarVim on Linux
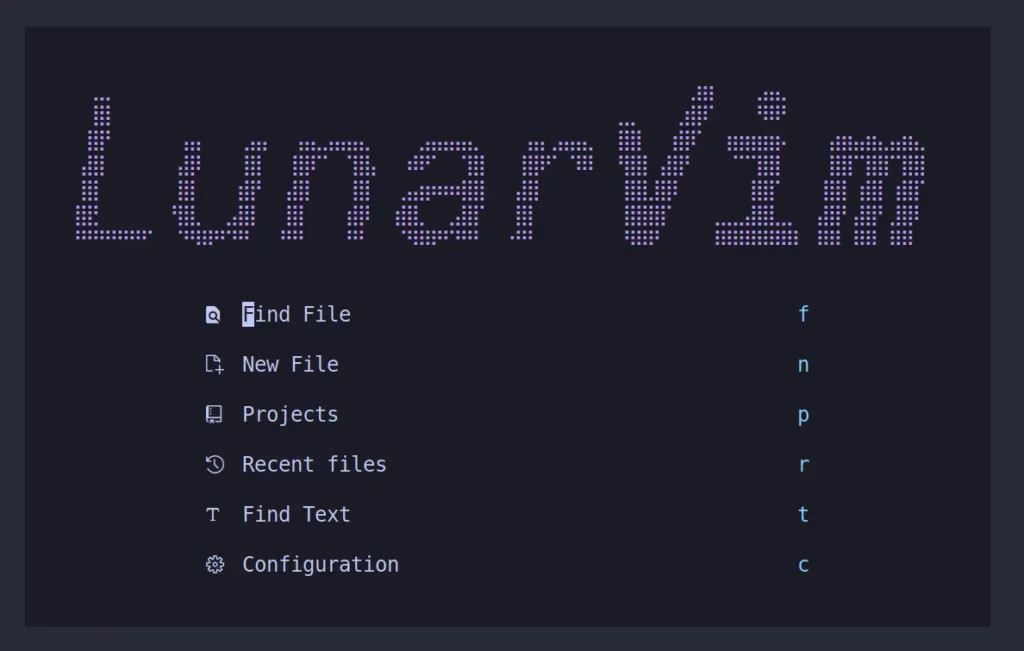
Once the installation of LunarVim is complete, you can execute the following command to launch it:
$ lvimOutput:
This article isn’t solely focused on usage, but I’ll provide you with some tips and tricks to get around with it and get comfortable. Once you’re ready, you can dig further and explore on your own.
So, while working with LunarVim, a strong understanding of NeoVim (basically, Vim) fundamentals and their functionality is beneficial to know; for example, familiarity with terms like Normal, Insert, and Visual mode is required.
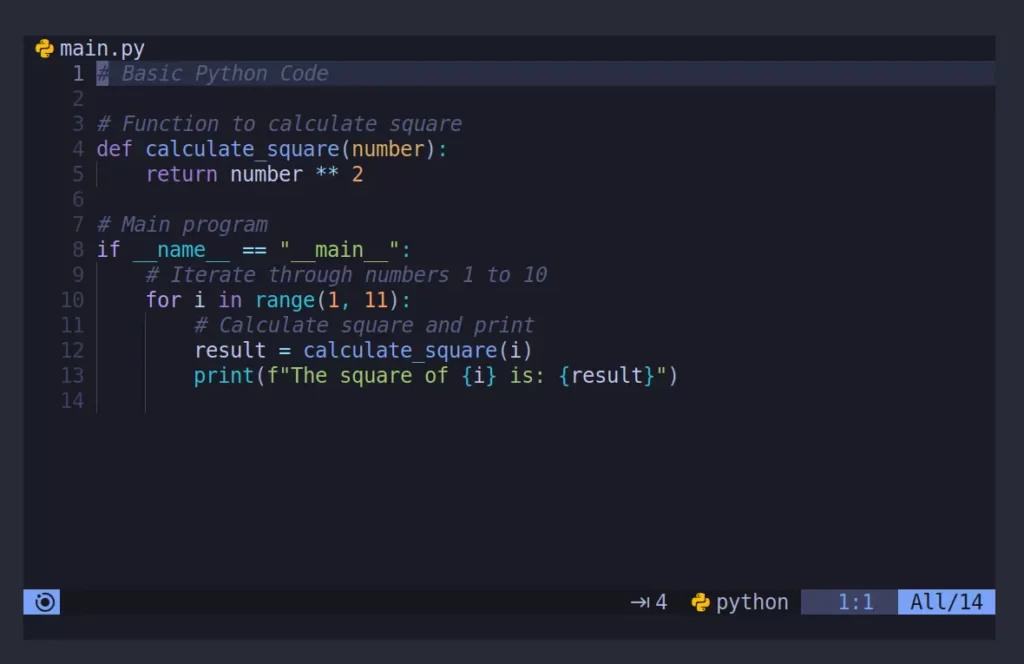
Now, I’ve already created a Python file with basic code, opened it with LunarVim using the “lvim main.py” command, and the output looks like the one below.
To quickly perform various actions, you can utilize LunarVim’s pre-defined keybindings, with the leader key being the “space” key and its paired counterpart.
Here is a list of keys I regularly use to enhance my productivity at work.
| Key Binding | Description |
|---|---|
| Space e | Open File Exporer in the sidebar. |
| Space ; | Navigate to the dashboard. |
| Space / | Add a comment to the selected area. |
| Space c | Close the current buffer (or file). |
| Space f | Open the file finder. |
| Space w | Save the current file. |
| Space q | Quit the LunarVim (on some instances, it also functions as a back command as well). |
To perform more advanced operations, I would suggest you press the “space” button and wait for a few seconds until the following window appears.
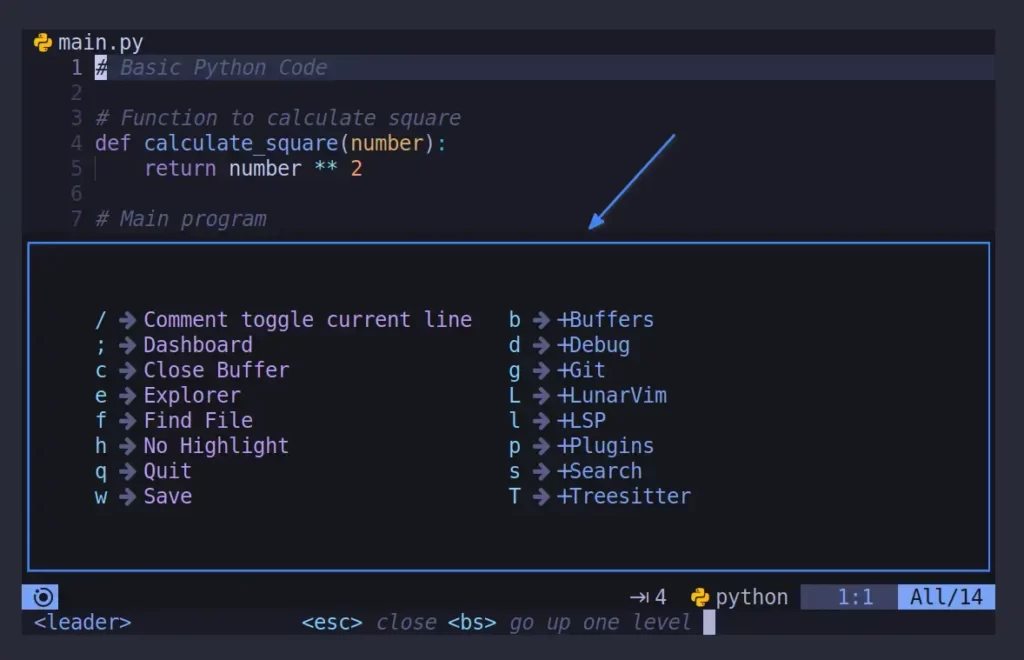
From the right side, you will find more subcategories of advanced options, such as buffers, debugging, Git, plugins, treesitter, and more, from which you can dig deeper to get more advanced in LunarVim.
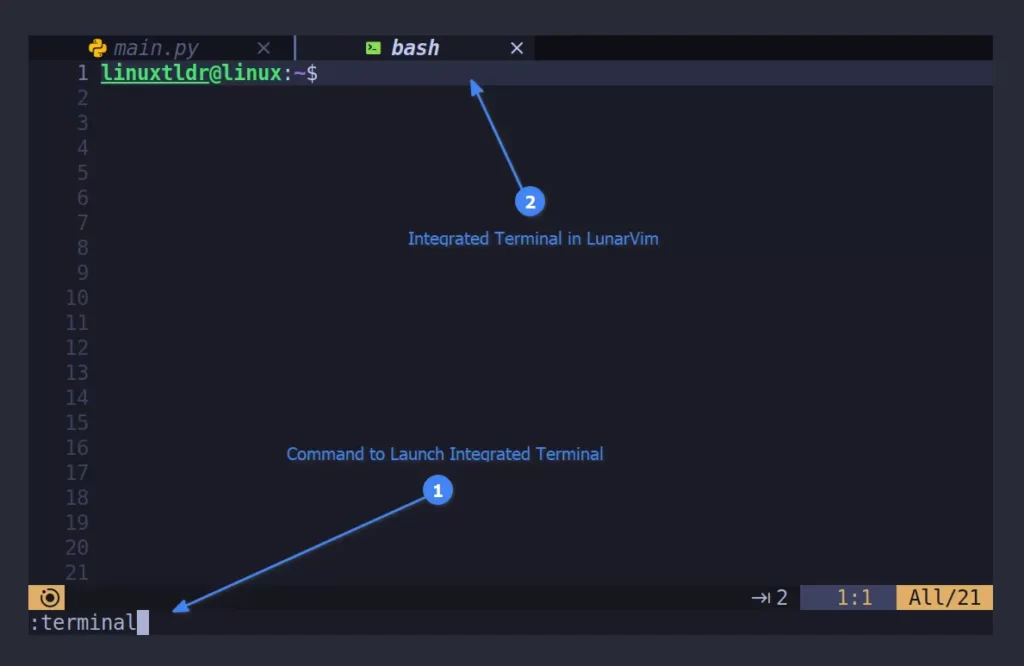
I strongly suggest you check out the “b -> +Buffers” option, as it will improve your productivity with the various shortcuts. For example, if you have opened the LunarVim integrated terminal window using the “:terminal” command.
Here, you can manage between multiple tabs using the designated buffer keys.
| Key Binding | Description |
|---|---|
| Space b n or Space b b | Move between the next or previous tabs. |
| Space b j | Add a string (in red) to all buffer (or file) tabs, through which you can move to them quickly. |
| Space b e | Pick the buffer (or file) to close, depending on the name (colored red) in the tab. |
| Space b f | Open the file finder. |
You can manually check the remaining keys using “Space b” and also check out the Debug, Plugins, and Search options.
Here, I’ll end this article because covering all the LunarVim functionality in a single article is a bit complex and might scare a beginner who just wants to give it a try.
However, you can dig more into it by visiting the official LunarVim beginner’s guide documentation, and you can also check out the following video to gain an idea of how to manage plugins in LunarVim.
How to Update LunarVim on Linux
When the latest version of LunarVim is available, you can swiftly update to that version using the “:LvimUpdate” LunarVim command or use the following terminal command:
$ lvim +LvimUpdate +qAnd to update your LunarVim plugins, you can simply use the “:LvimSyncCorePlugins” command in your LunarVim or use the following terminal command:
$ lvim +LvimSyncCorePlugins +qHow to Remove LunarVim on Linux
The uninstallation of LunarVim is quite easy; simply run the following one-line command.
$ bash ~/.local/share/lunarvim/lvim/utils/installer/uninstall.sh

#OR

$ bash <(curl -s https://raw.githubusercontent.com/lunarvim/lunarvim/master/utils/installer/uninstall.sh)
Final Word
If you’ve read the entire article, thank you, as it will improve my SEO (joke aside); you might have understood how complex (or confusing) it can get, especially for those unfamiliar with NeoVim (or Vim).
Here, everything, including settings, keybindings, and nearly all aspects, is customizable with a little knowledge of Lua. An advanced Linux user skilled in Vim might find this IDE annoying, as they can manually build their own IDE without depending on a premade version from someone else.
And, from my perspective, they are entirely correct. Being an advanced Vim user, relying on a pre-made IDE is a complete waste of time for your skills. However, for a beginner with decent Vim knowledge who wants to explore its potential, I suggest giving it a try.
Lastly, it all depends on you, so if you have any questions, queries, or need help, feel free to let me know in the comment section.
Till then, peace!


